Cloudflare DDoS Protection
Cloudflare provides a robust layer of DDoS protection for your server and applications.
When using Cloudflare’s Proxy, CDN, and security features, all incoming traffic to your Coolify-hosted apps is shielded from malicious attacks, like DDoS, and secured through Cloudflare’s global network.
Why Use Cloudflare for DDoS Protection with Coolify?
- Blocks malicious traffic before it reaches your server.
- No need to scale server resources during DDoS attacks — Cloudflare absorbs the impact.
- Hides your server’s real IP address by proxying your application through Cloudflare’s global network.
When Not to Use Cloudflare for DDoS Protection
- You prefer not to route all traffic through Cloudflare’s network.
- Privacy concerns, Cloudflare terminates TLS, which means they can inspect incoming requests.
- You need free wildcard support for deep subdomains (more than 1 level subdomains -- e.g.,
*.sub.domain.comwhich Cloudflare does not offer for free).
Example Data
The following data is used as an example in this guide. Please replace it with your actual data when following the steps:
- IPv4 Address of Origin Server:
203.0.113.1 - Domain Name:
shadowarcanist.com - Username:
shadowarcanist
How It Works?
A simple high-level overview diagram to give you a visual idea of how this works:
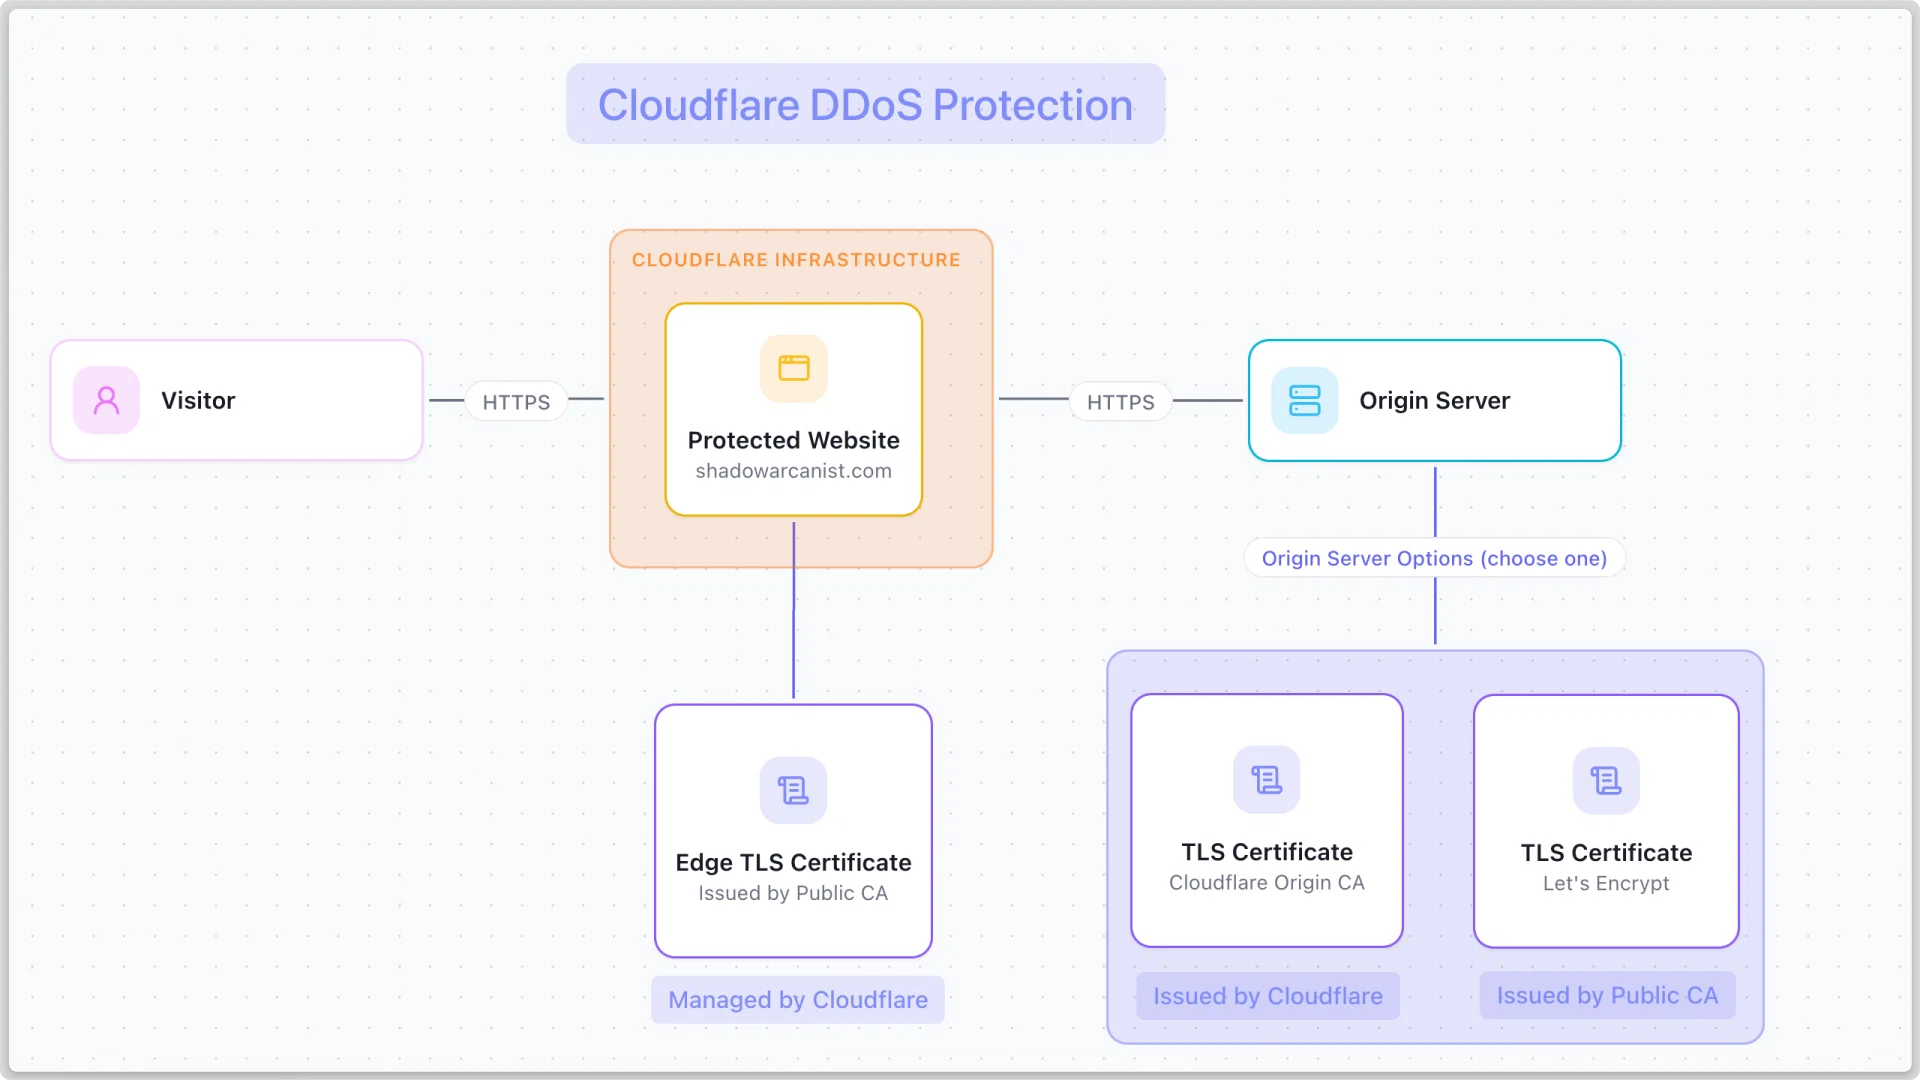
1. Setup Origin TLS Certificate
Communication between your server and Cloudflare is encrypted using a TLS certificate.
There are two ways to do this:
- Use a TLS certificate from Cloudflare
- Get your own TLS certificate from a trusted public Certificate Authority (this requires a DNS challenge)
Here's a concise comparison table between a Cloudflare Origin Certificate and a Public CA Certificate:
| Feature | Cloudflare Origin Certificate | Public CA Certificate |
|---|---|---|
| Trusted By | Cloudflare only | Browsers, OSs, Cloudflare |
| Use Case | Cloudflare ↔ Origin only | Any direct client |
| Direct Browser Access | Shows certificate errors if users bypass Cloudflare | ✅ Works normally |
| Requires CF Proxy | ✅ Yes | ❌ No |
| Works Without CF | ❌ No | ✅ Yes |
| Issuer | Cloudflare | Public CA (eg: Let's Encrypt) |
| Cost | Free | Free |
| DNS Challenge | ❌ No | ✅ Yes |
Tip
If you plan to have Cloudflare always in front of your application, use a Cloudflare Origin Certificate. Otherwise, use a Public CA Cert.
There are 2 ways to setup the Origin TLS Certificate so follow one of the methods from below:
A simple high-level overview diagram to give you a visual idea of how this works:
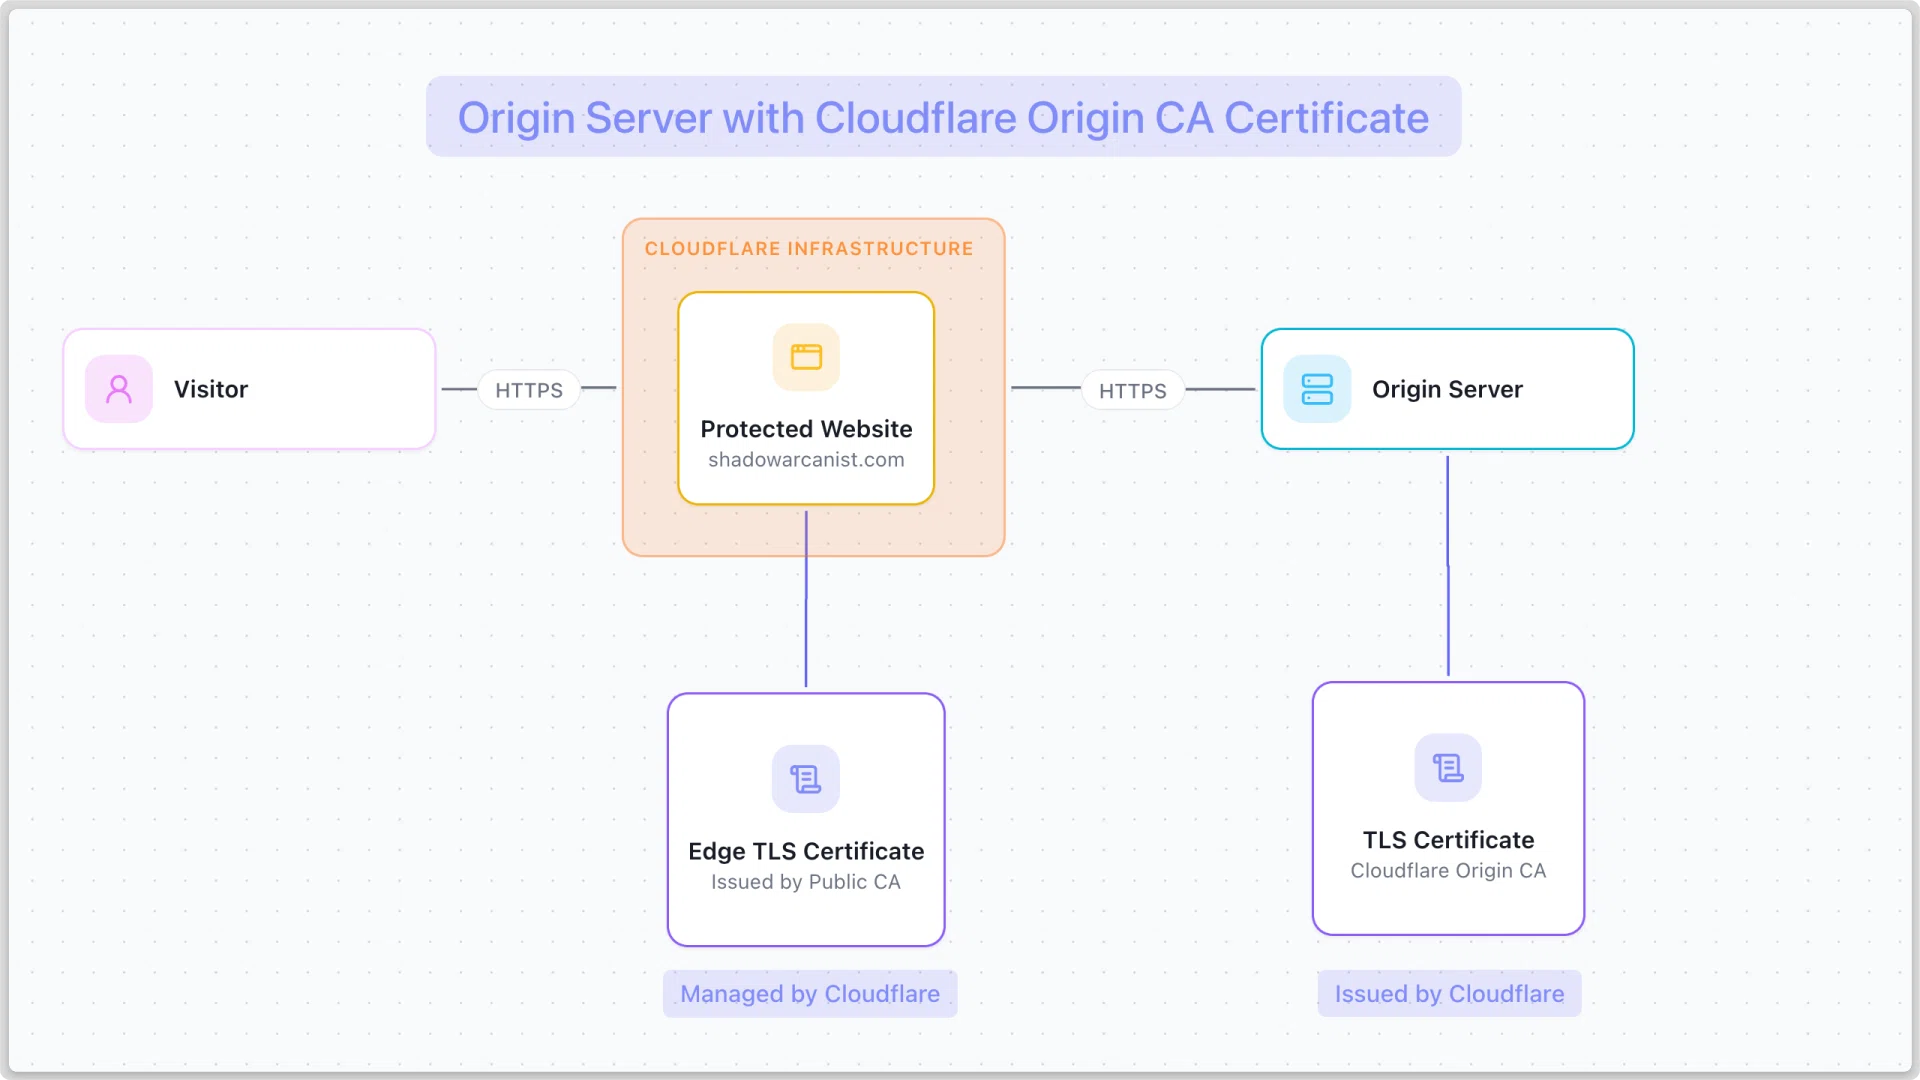
A. Create Cloudflare Origin Certificate

- In your Cloudflare dashboard, go to SSL/TLS.
- Select Origin Server.
- Select Origin Certificates
- Click the Create Certificate button.
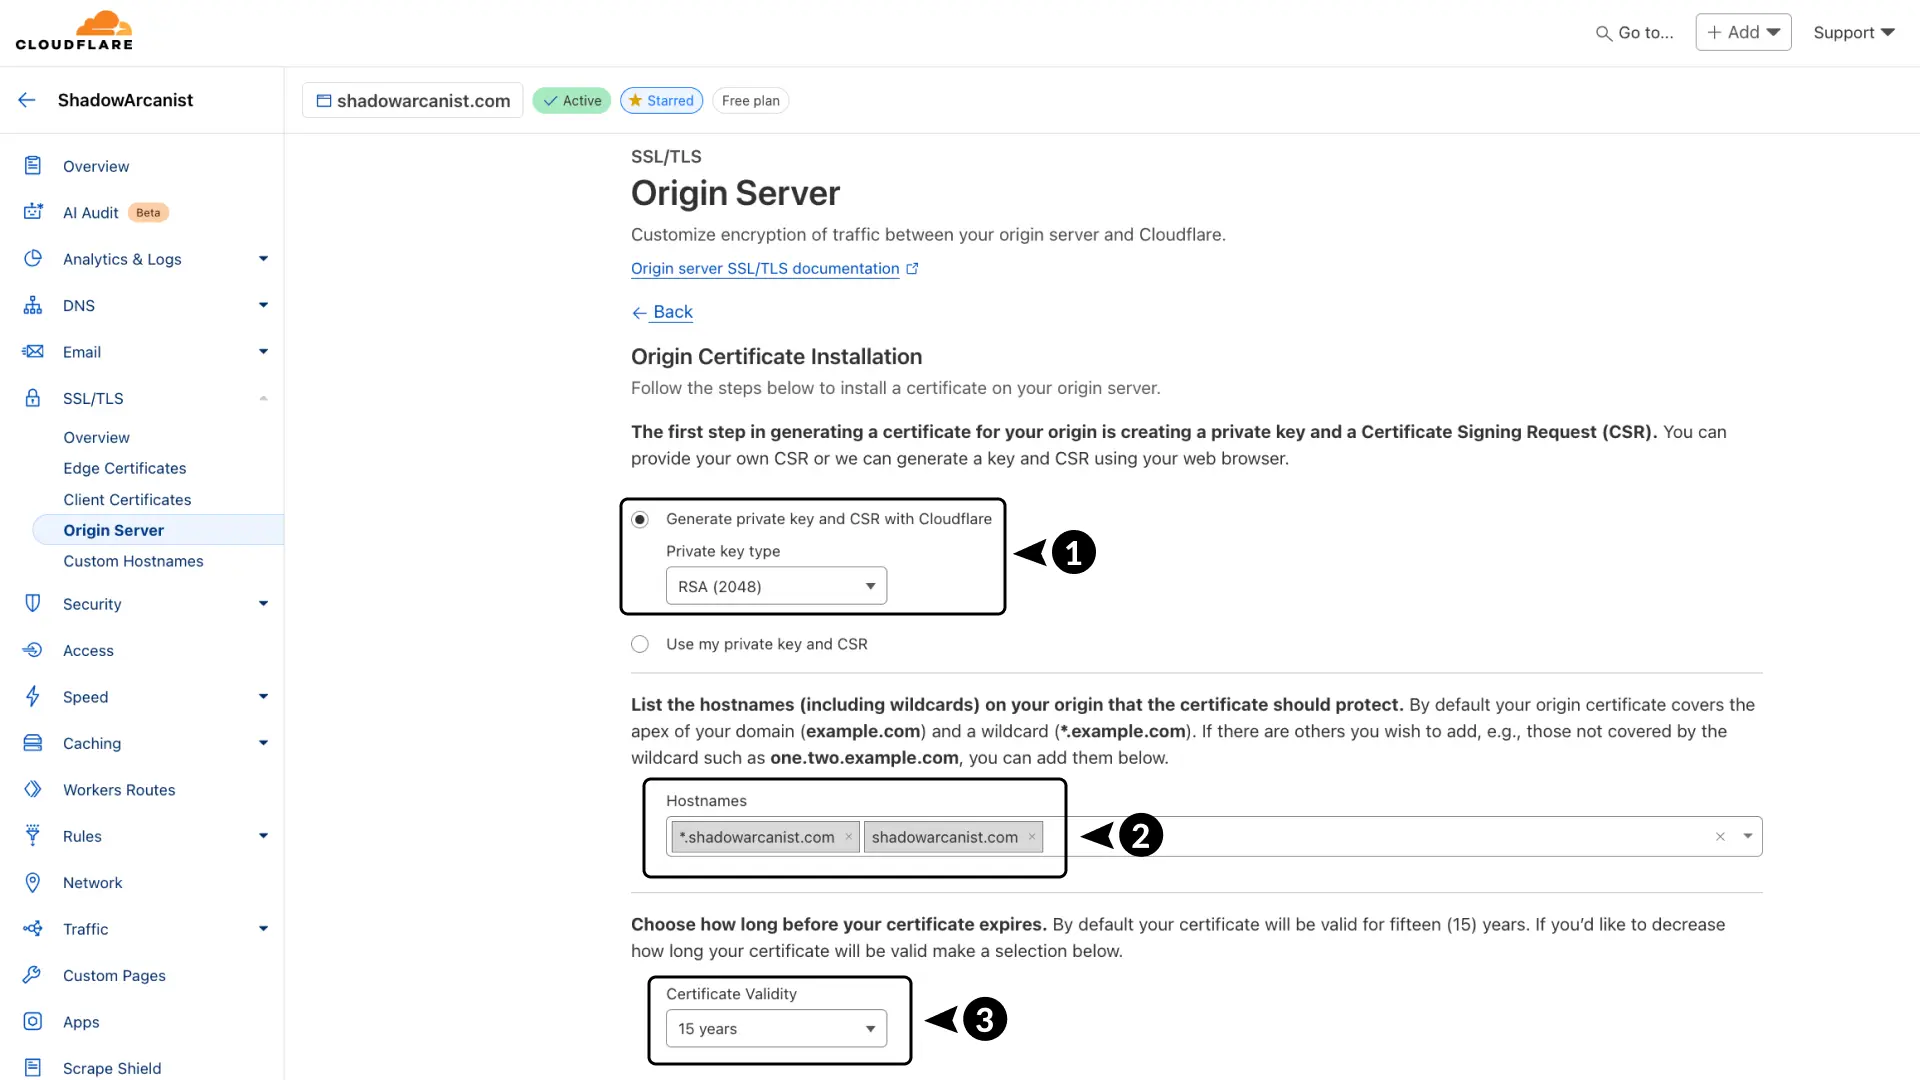
- Choose RSA (2048) for the key type.
- Add the hostnames you want the certificate to cover.
- Set the certificate validity to 15 years.
- Click the Create button.
HEADS UP!
shadowarcanist.comwill cover only the main domain.*.shadowarcanist.comwill cover all subdomains.
On Cloudflare’s free plan, wildcard certificates cover just one level of subdomains
For example, it works for coolify.shadowarcanist.com but not www.coolify.shadowarcanist.com.
To cover multiple levels, you'll need to purchase the Advanced Certificate Manager ↗
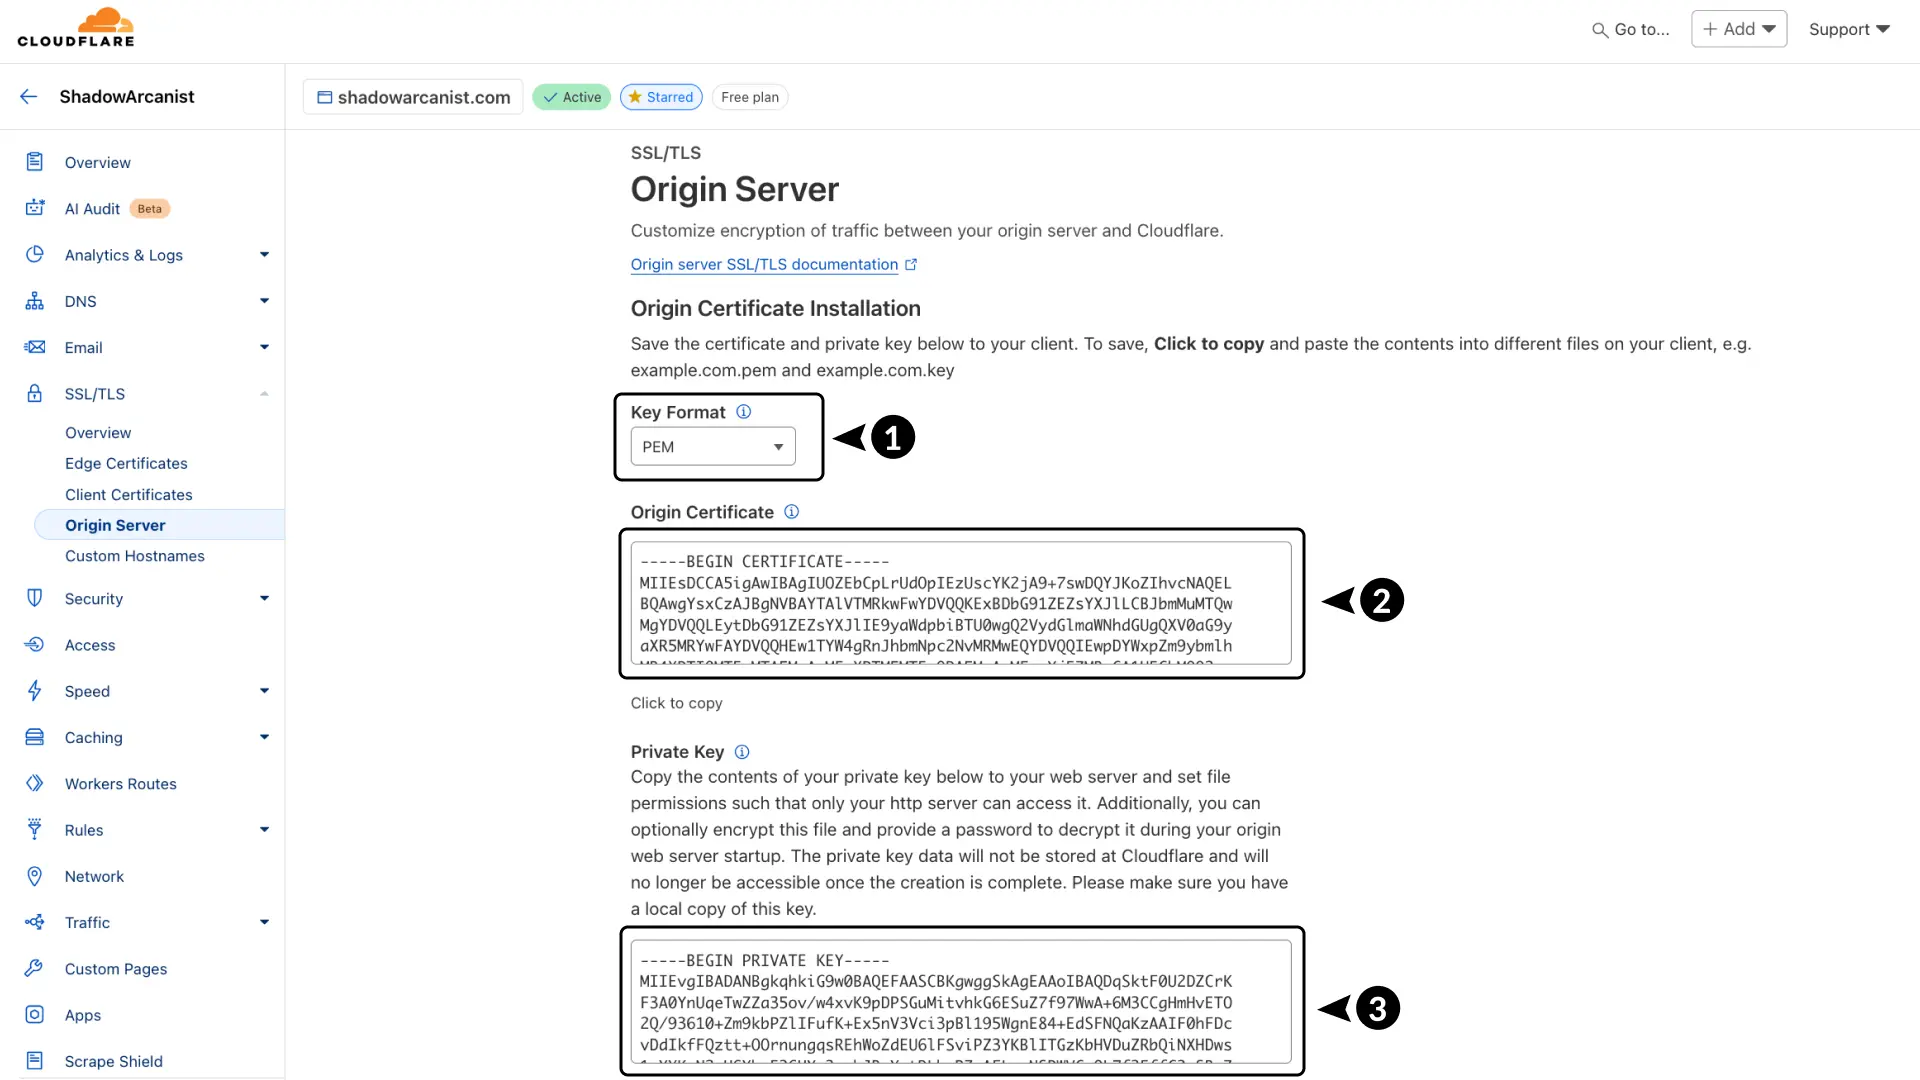
- Choose PEM as the key format.
- Copy your Origin Certificate and save it somewhere safe
- Copy your Private Key and save it somewhere safe
- Click the Ok button.
Next, you'll add these to your server running Coolify and configure Coolify to use this certificate.
B. Add Certificate to Your Server
SSH into your server or use Coolify's terminal feature. For this guide, I’m using my external terminal:
Once logged in, navigate to the Coolify proxy directory:
$ cd /data/coolify/proxyCertificate locations slightly vary between Caddy and Traefik, so choose the one based on the proxy you are using from the section below.
Create the certs directory:
$ mkdir certsVerify it was created:
$ ls
> acme.json  certs docker-compose.yml  dynamic
Now, navigate into the certs directory:
$ cd certsCreate the caddy/data/certs directory:
$ mkdir -p caddy/data/certsVerify it was created:
$ ls caddy/data
> certs
Now, navigate into the certs directory:
$ cd caddy/data/certsCreate two new files for the certificate and private key:
$ touch shadowarcanist.cert shadowarcanist.keyVerify the files were created:
$ ls
> shadowarcanist.cert shadowarcanist.key
Open the shadowarcanist.cert file and paste the certificate from the Cloudflare dashboard:
$ nano shadowarcanist.cert Save and exit after pasting the certificate.
Do the same for the shadowarcanist.key file and paste the private key:
$ nano shadowarcanist.key Save and exit.
Now the origin certificate is installed on your server.
C. Configure Coolify proxy to Use the Origin Certificate
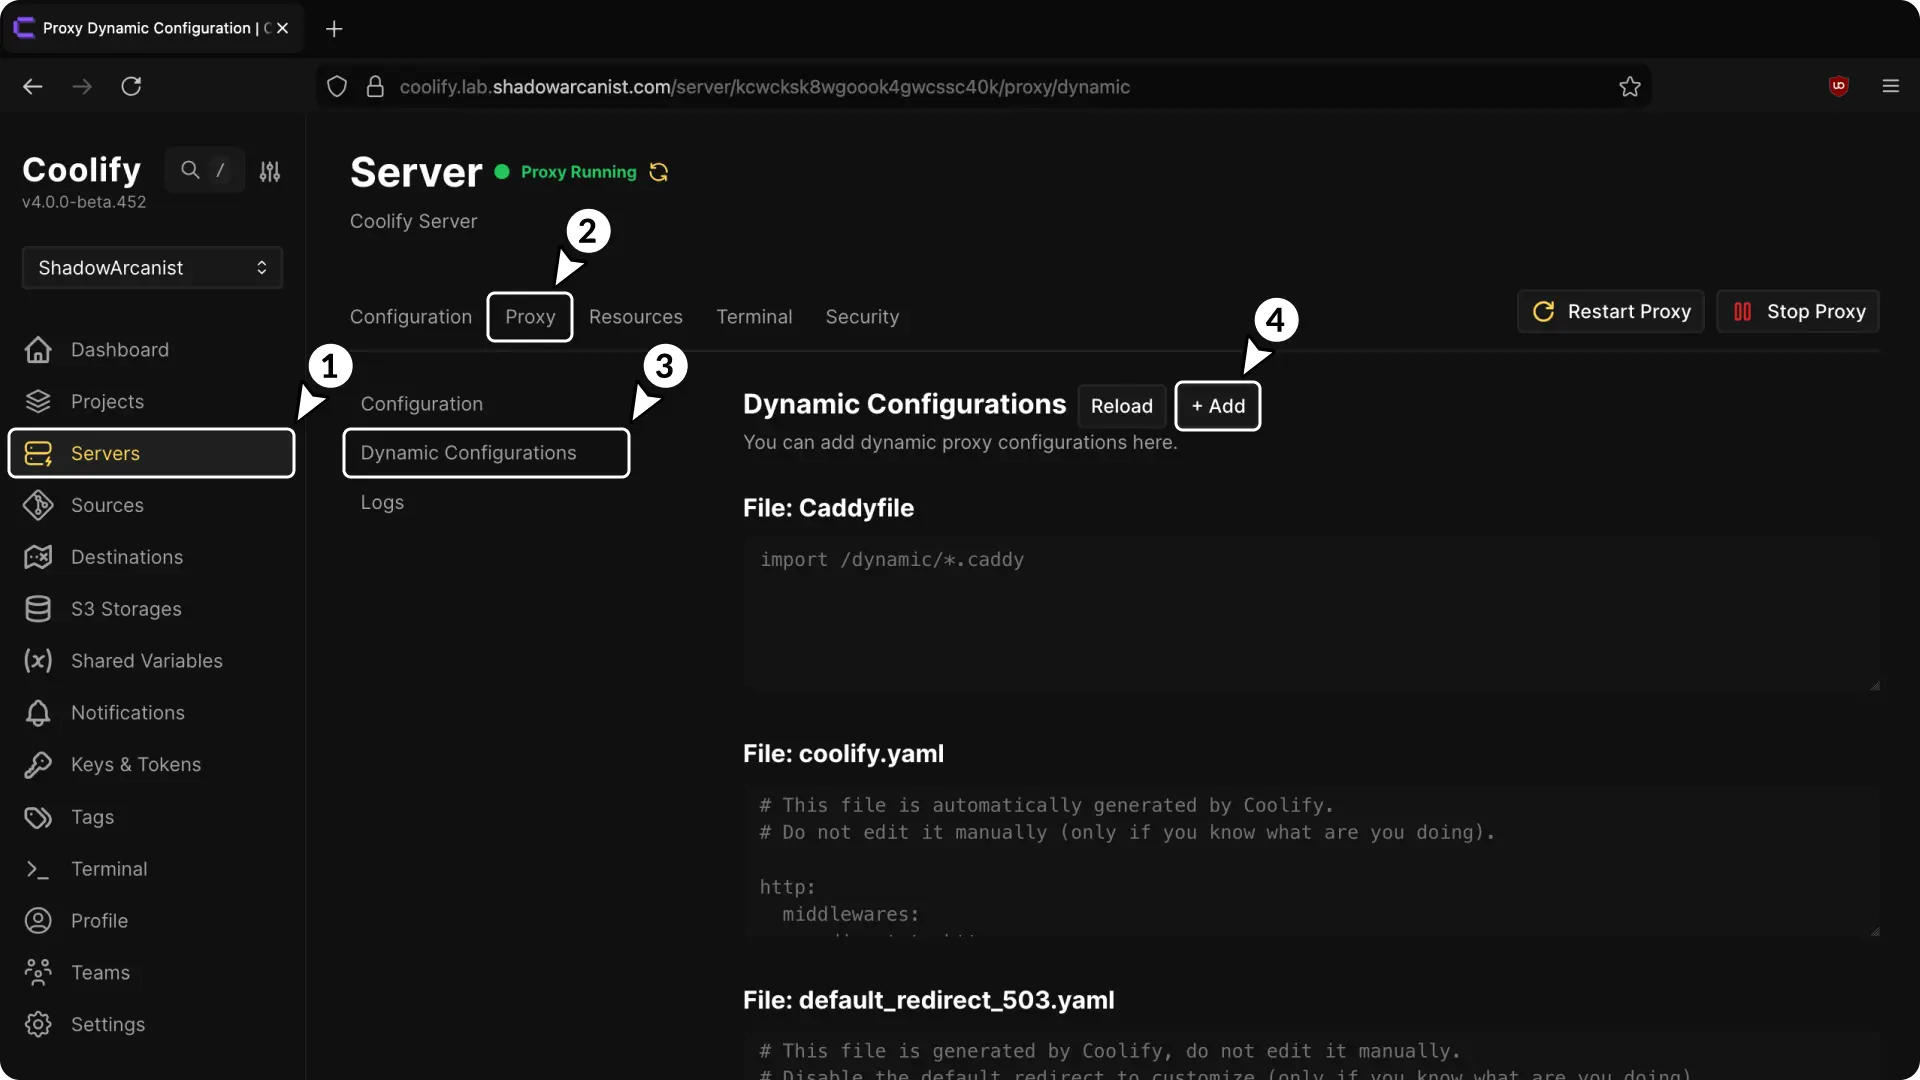
- Go to the Server section in the sidebar.
- Select Proxy.
- Open the Dynamic Configuration page
- Click Add button
You will now be prompted to enter the Dynamic Configuration.
Dynamic configuration file slightly varies between Caddy and Traefik, so choose the one based on the proxy you are using from the section below.
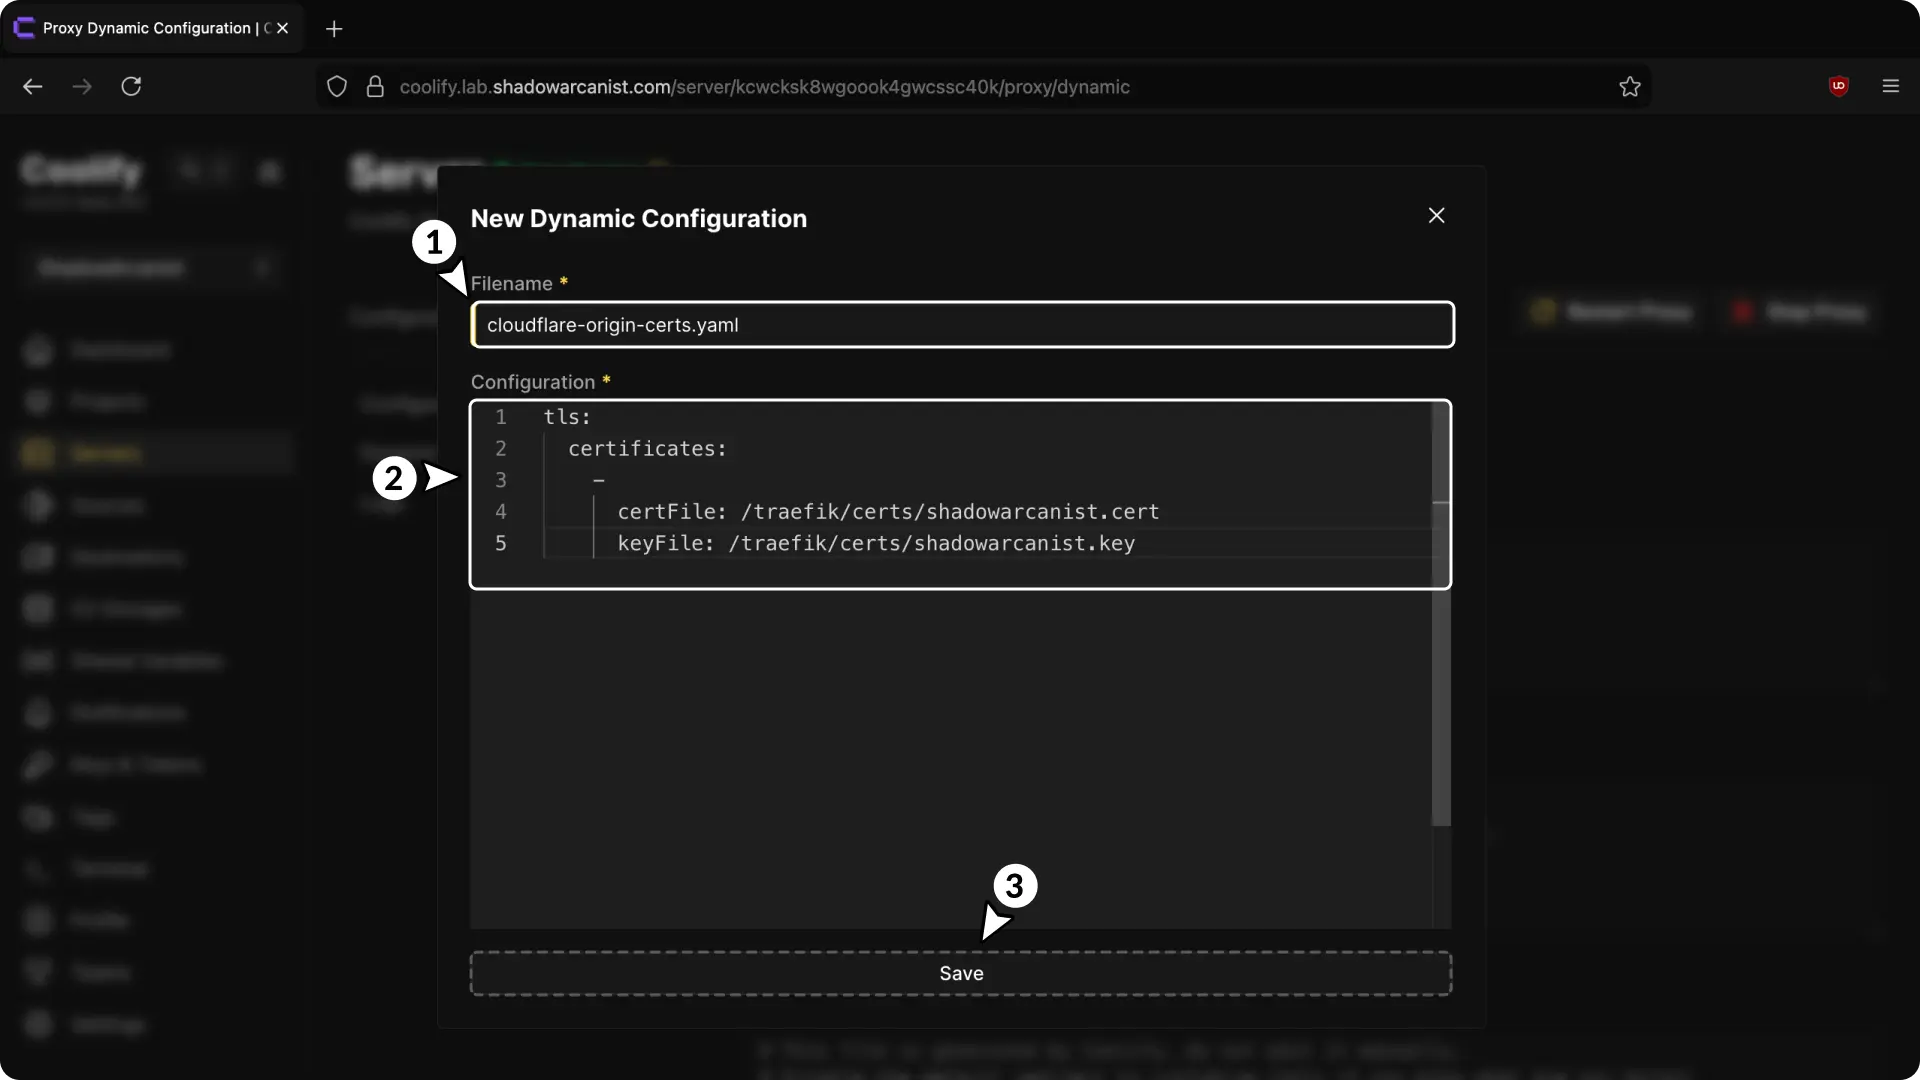
- Choose a name for your configuration (must end with
.yaml). - Enter the following details in the configuration field:
tls:
  certificates:
    -
      certFile: /traefik/certs/shadowarcanist.cert
keyFile: /traefik/certs/shadowarcanist.key- Save the configuration
Adding multiple certificates
If you want to add multiple certificates and keys, you can do it like this:
tls:
  certificates:
    -
      certFile: /traefik/certs/shadowarcanist.cert
      keyFile: /traefik/certs/shadowarcanist.key
    -
      certFile: /traefik/certs/name2.cert
      keyFile: /traefik/certs/name2.key
    -
      certFile: /traefik/certs/name3.cert
      keyFile: /traefik/certs/name3.key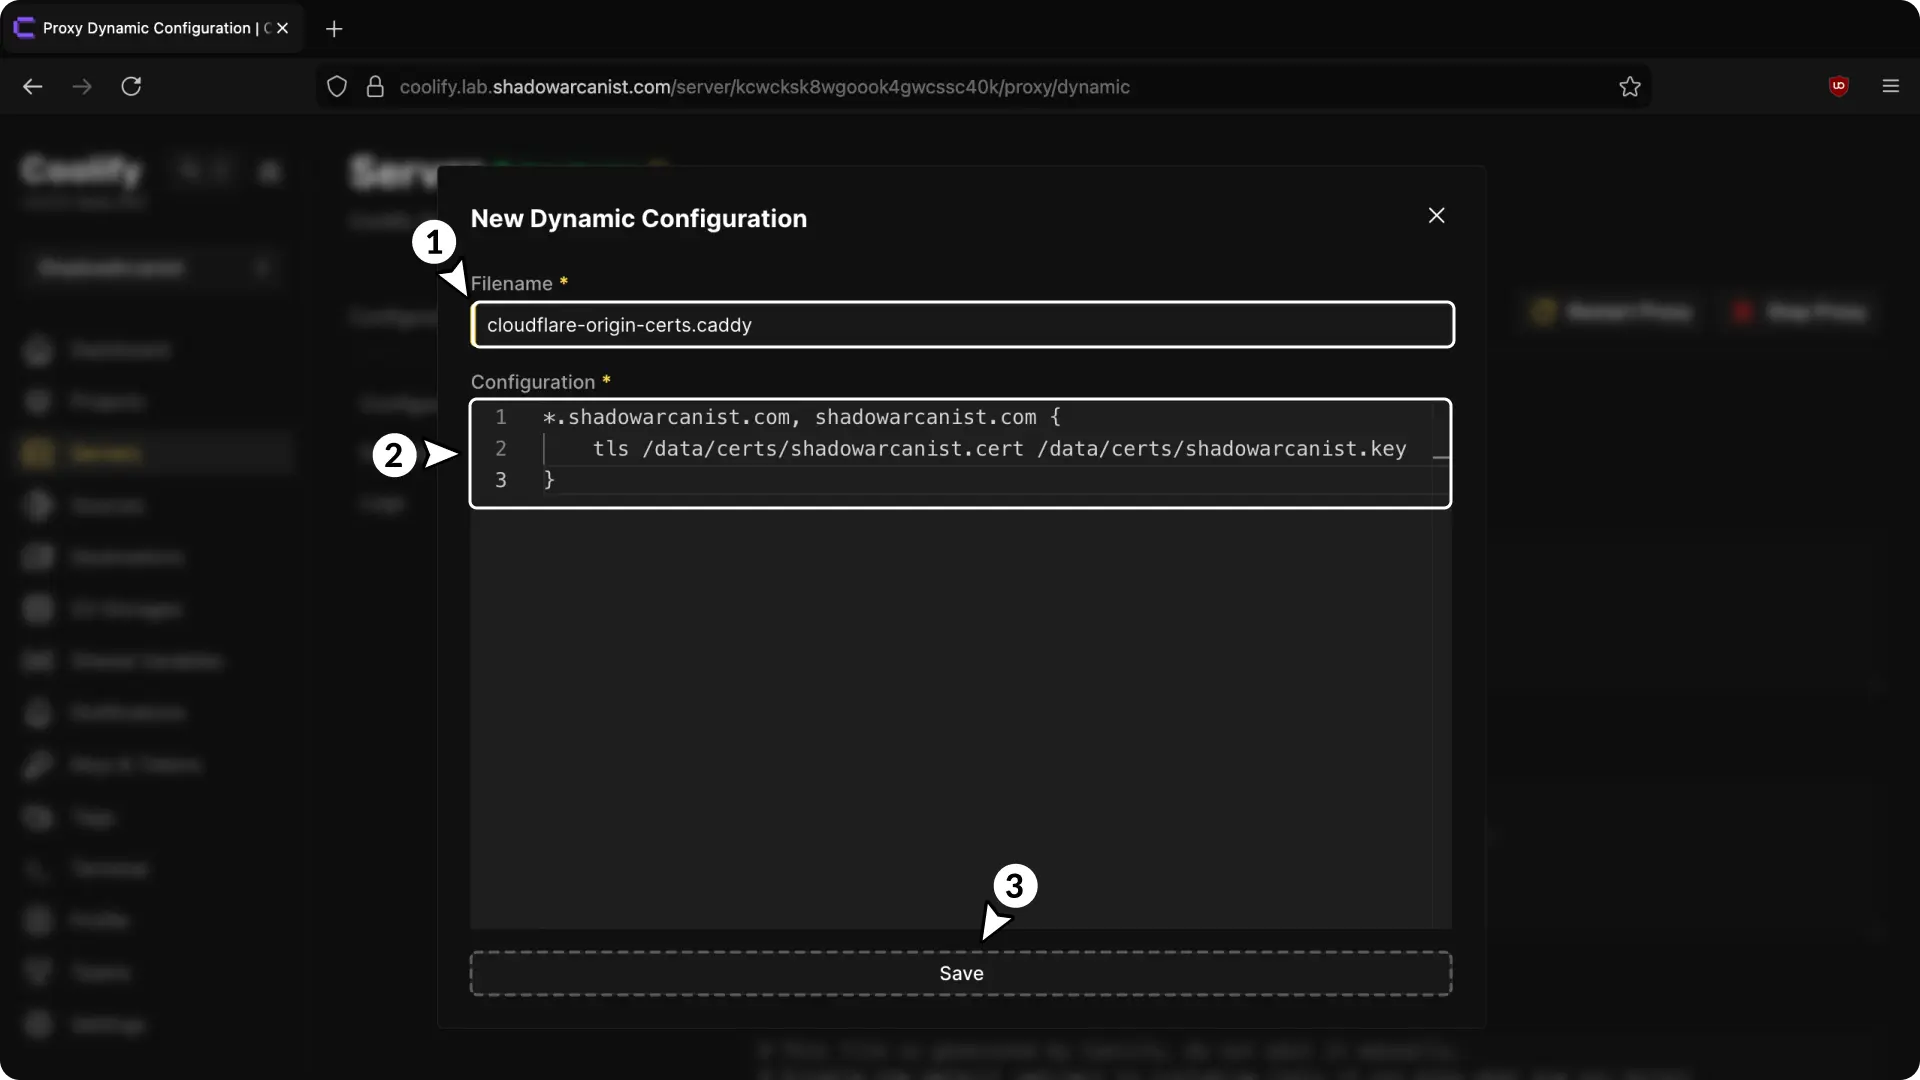
- Choose a name for your configuration (must end with
.caddy). - Enter the following details in the configuration field:
*.shadowarcanist.com, shadowarcanist.com {
    tls /data/certs/shadowarcanist.cert /data/certs/shadowarcanist.key
}
Note
The wildcard *.shadowarcanist.com provides coverage for all subdomains, exclude it if you’re only securing a single domain (i.e, shadowarcanist.com).
- Save the configuration
Adding multiple certificates
If you want to add multiple certificates and keys, you can do it like this:
*.shadowarcanist.com, shadowarcanist.com {
    tls /data/certs/shadowarcanist.cert /data/certs/shadowarcanist.key
}

*.name2.com, name2.com {
    tls /data/certs/name2.cert /data/certs/name2.key
}

*.name3.com, name3.com {
    tls /data/certs/name3.cert /data/certs/name3.key
}
From now on, Coolify will use the origin certificate for requests matching the hostname.
A simple high-level overview diagram to give you a visual idea of how this works:
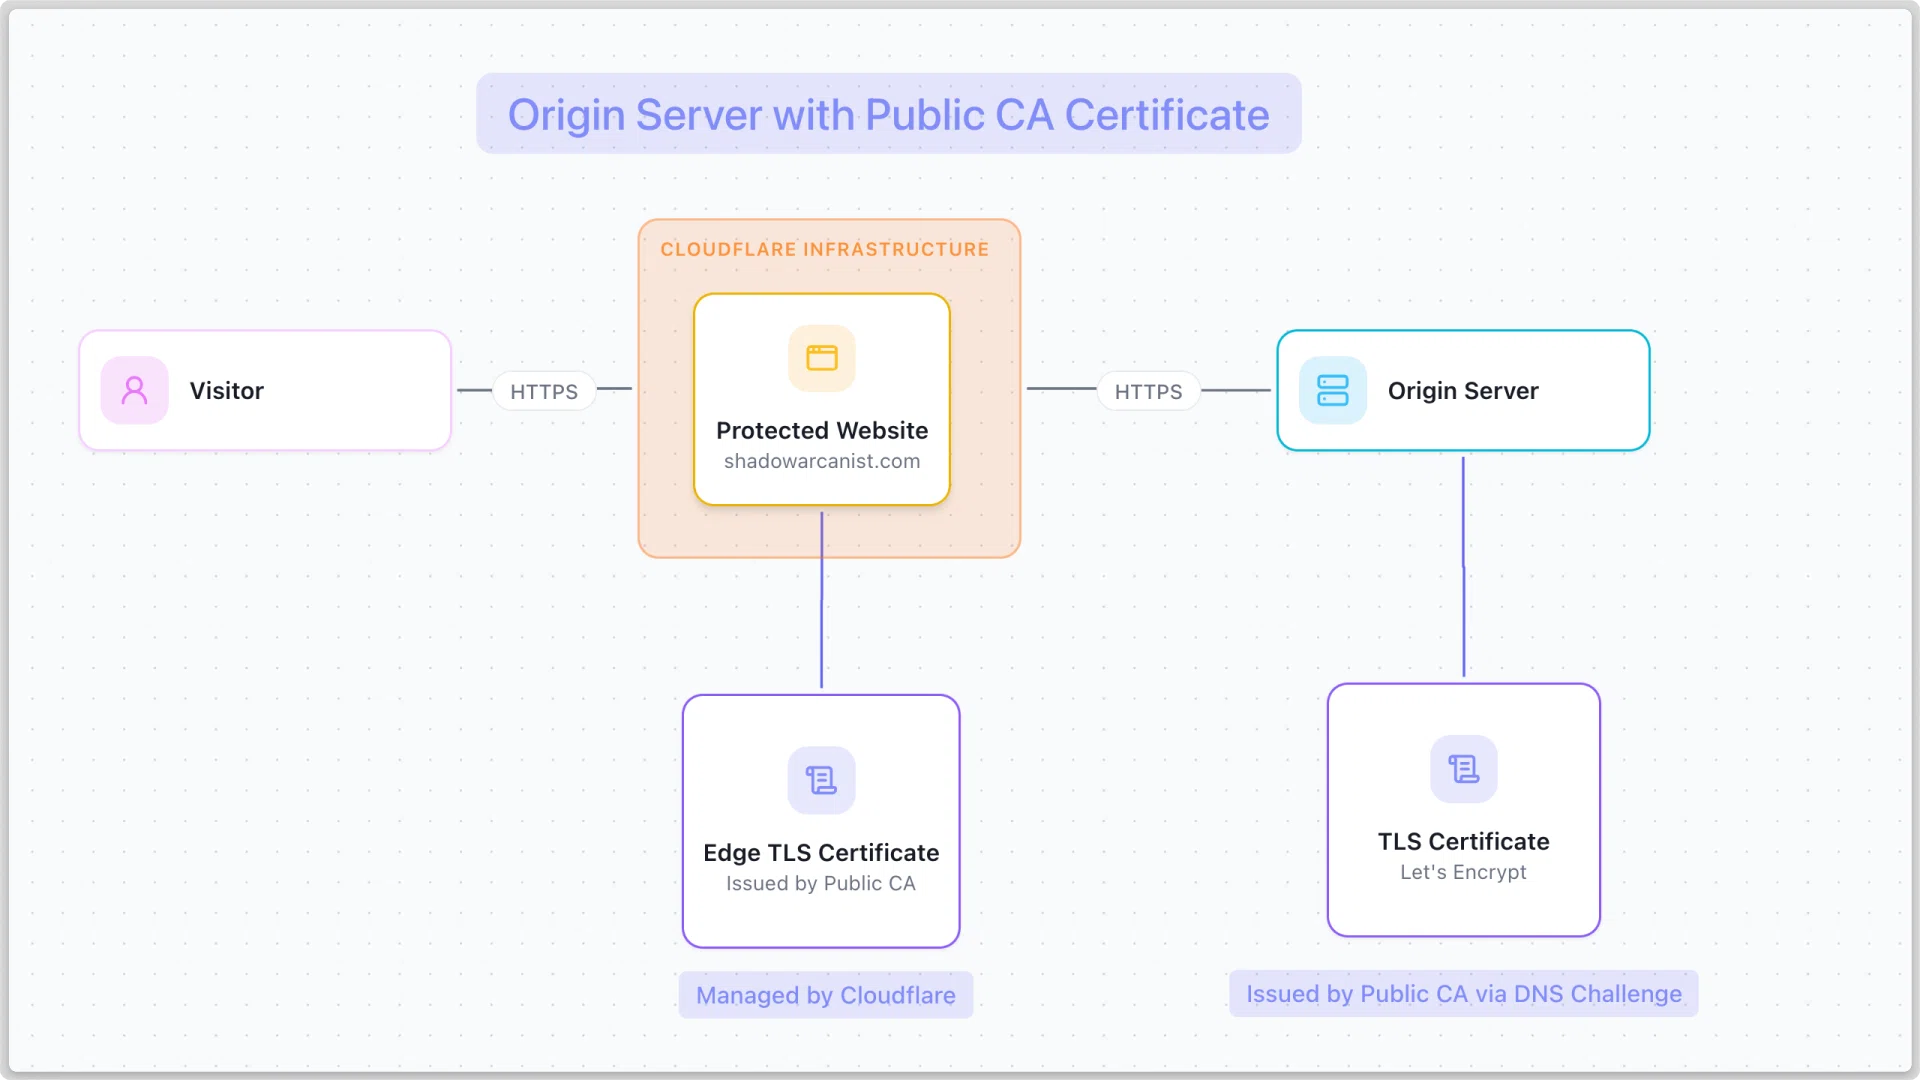
We already have guides to set up DNS challenge for TLS certificates, you can follow them here:
Come back to this guide after you finish setting up the DNS challenge using the guides above.
2. Set Up DNS Records
To route traffic through Cloudflare, configure your DNS records in Cloudflare:
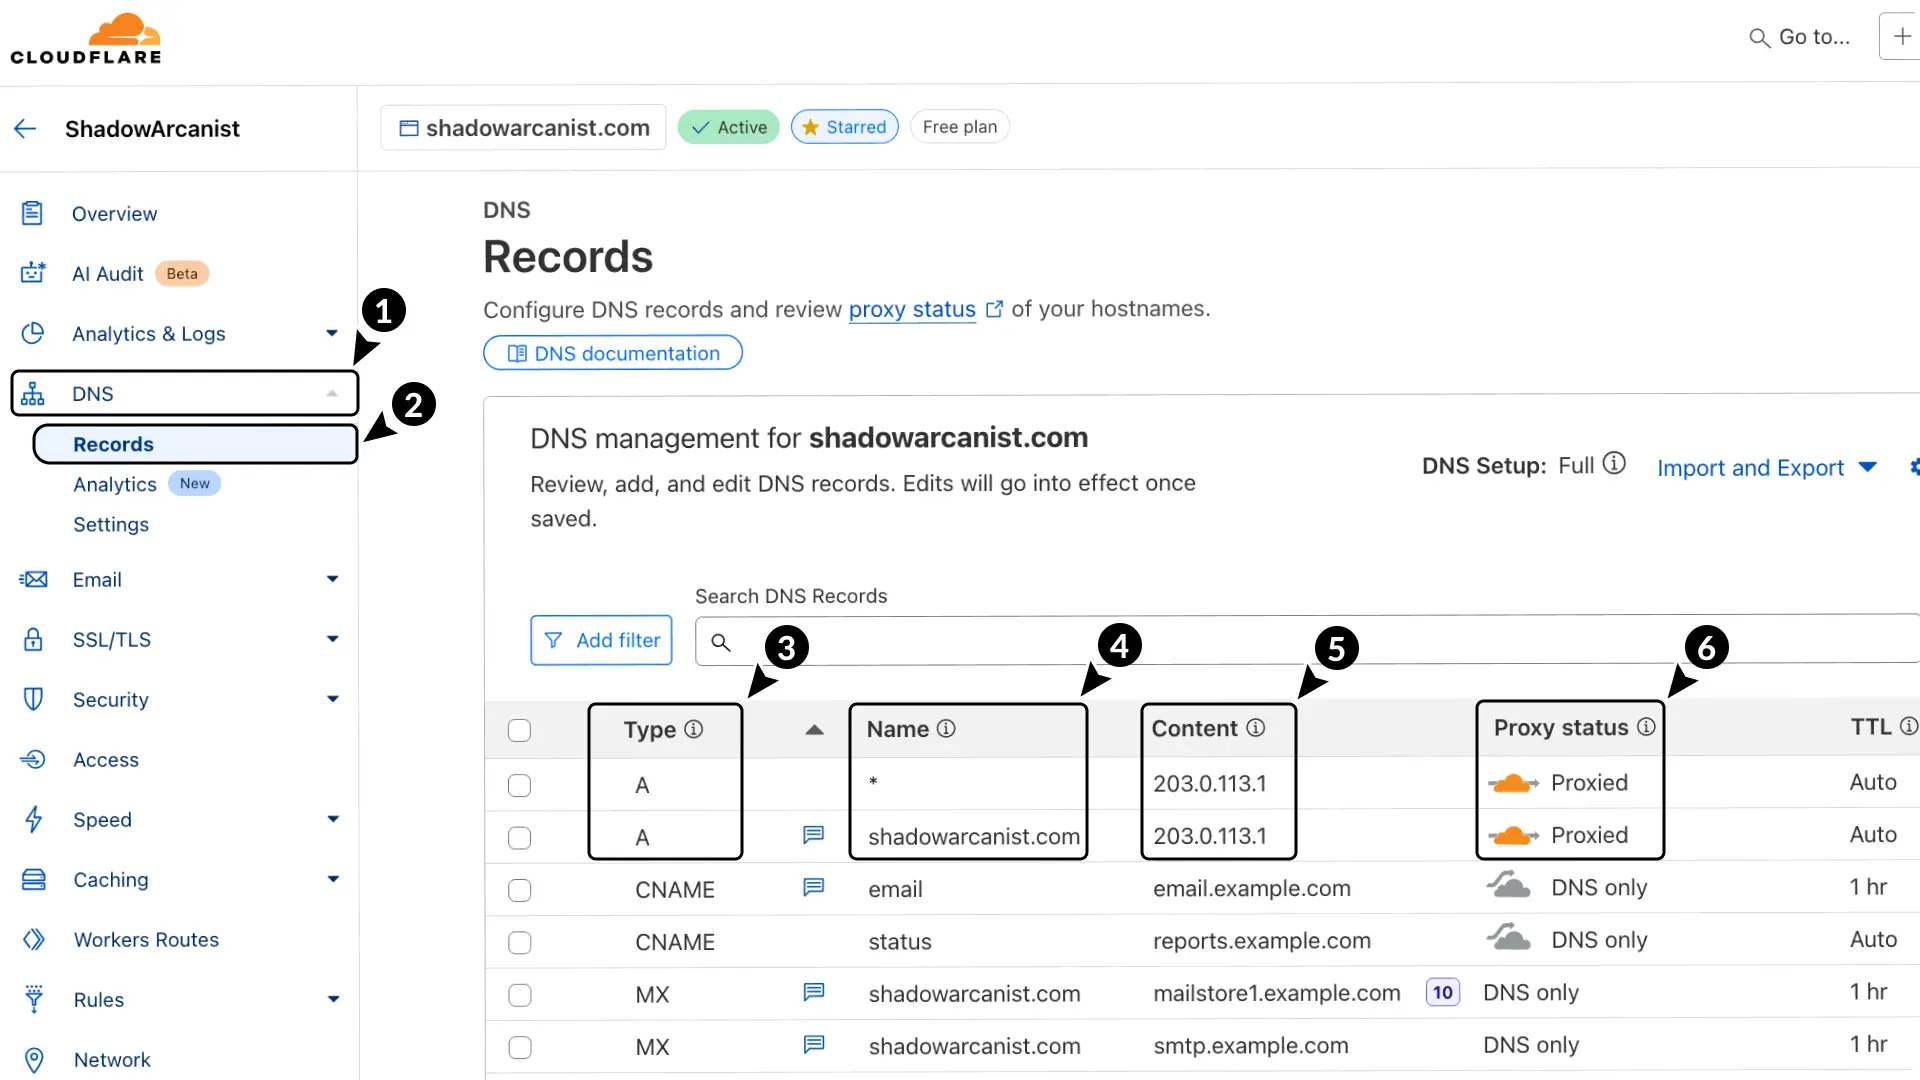
- In Cloudflare dashboard, go to DNS.
- Select Records.
- Add 2 A records:
- Enter name as
shadowarcanist.comand* - Use the IP address of your server as the content for both records.
- Set the proxy status to Proxied for both records.
Note
Enabling the "Proxied" (orange cloud) option for both A records: shadowarcanist.com and * will proxy the root domain and all one-level subdomains via a wildcard.
This isn't necessary if you only need to proxy (or protect against DDoS) for a specific domain. In that case, simply enable proxying for the domain you want protection for.
3. Set Up TLS Encryption
To make Cloudflare use stricter encryption when connecting to your server, configure your TLS encryption in Cloudflare:
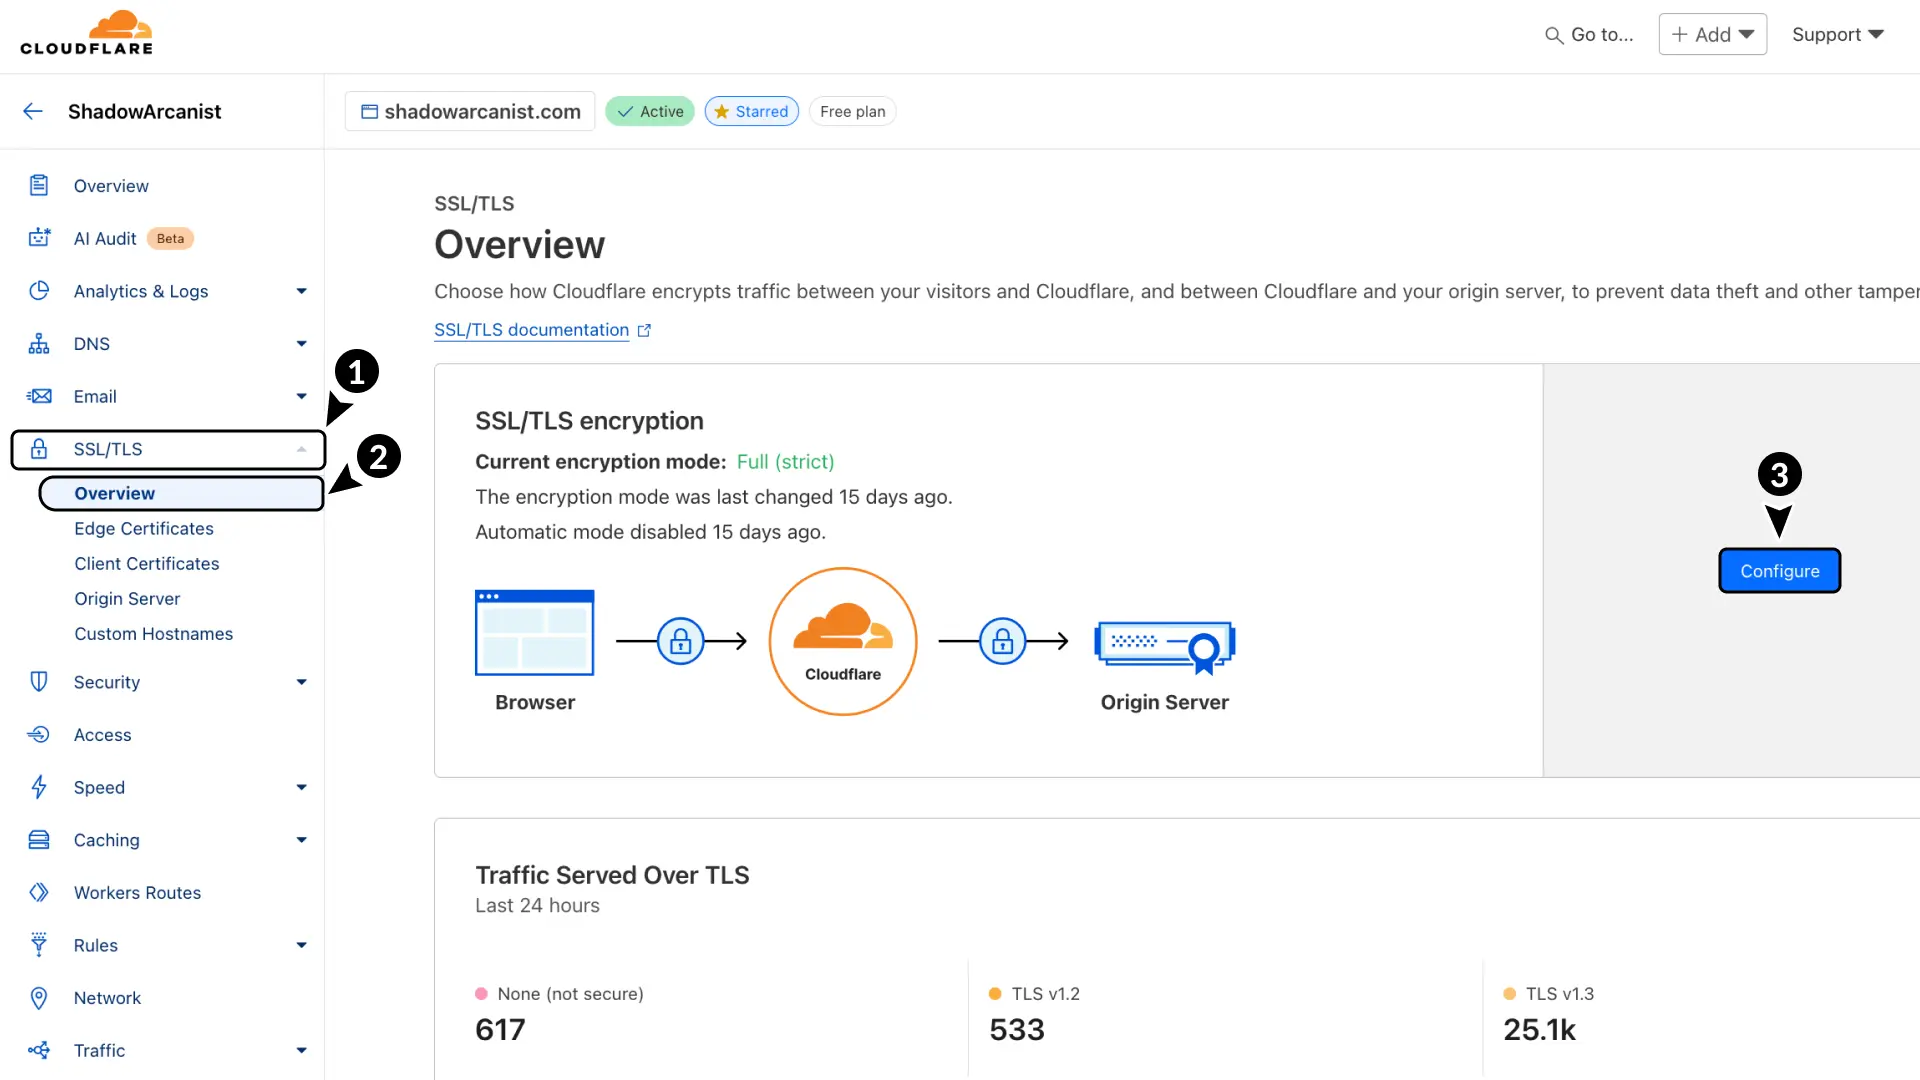
- Go to SSL/TLS in Cloudflare.
- Select Overview.
- Click Configure button

- Choose Full (Strict) as the encryption mode.
- Click Save button
4. Set Up Always Use HTTPS
To make Cloudflare automatically redirect HTTP requests to HTTPS, configure your redirects in Cloudflare:
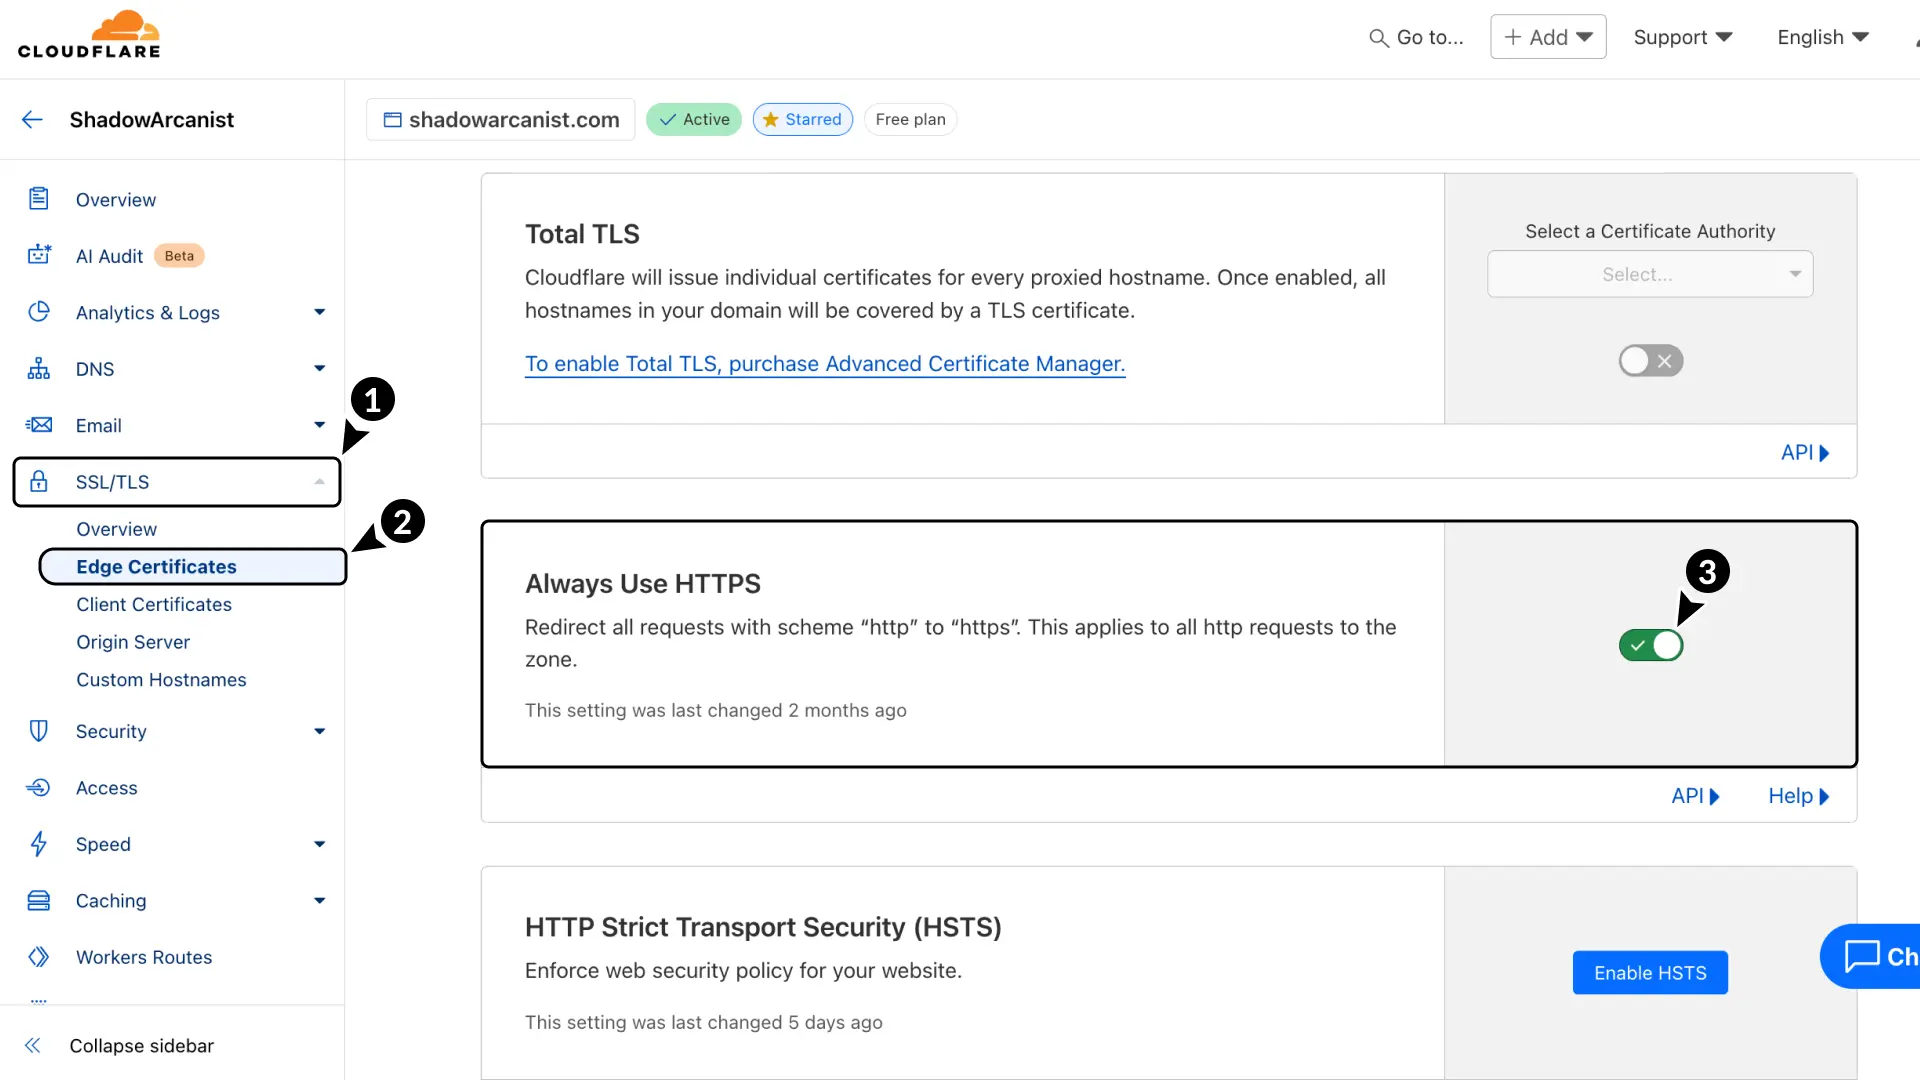
- In Cloudflare, go to SSL/TLS
- Select Edge Certificates.
- Enable Always Use HTTPS.
5. Configure Firewall
Note
This step is completely optional but recommended.
Configure your firewall to allow incoming traffic on port 443 only from Cloudflare’s IP ranges ↗.
Block all other inbound traffic, except for your SSH port.
This prevents attackers from bypassing Cloudflare and directly targeting your server with traffic on ports 80 or 443.
Now you’re done! Your server is set up to use Origin TLS Certificate, and all traffic is proxied through Cloudflare's network so all incoming attacks like DDoS are prevented by Cloudflare before it reaches your server.
Full HTTPS/TLS Setup for All Resources
Configure end-to-end HTTPS for Coolify resources through Cloudflare Tunnels with Origin Certificates, strict TLS encryption, and proper domain setup.
MCP Server
Connect AI assistants like Claude Desktop and Cursor to your Coolify instance using the Model Context Protocol (MCP) for read-only infrastructure visibility.