Server SSH Access via Cloudflare Tunnels
Accessing your server using SSH over a Cloudflare Tunnel is a secure and easy way to connect to a remote server while keeping its IP address hidden.
Who this is for?
This setup is ideal for people who:
- Want to keep their server's IP address private.
- Want to close SSH ports on their server.
- Don’t want to rely on static public IPs for accessing their remote server.
- Don't have a static public IP for the server (only applies if you're doing the manual setup).
Before We Start
- We assume you already have a server running Coolify and you are looking to set up a tunnel to connect a different server to Coolify.
- If you are trying to set up a tunnel on the server where Coolify is running and you don’t have any other servers to connect, you don’t need a SSH tunnel. Coolify already has full root access to the server it’s running on, so there’s no need for an SSH tunnel in this case.
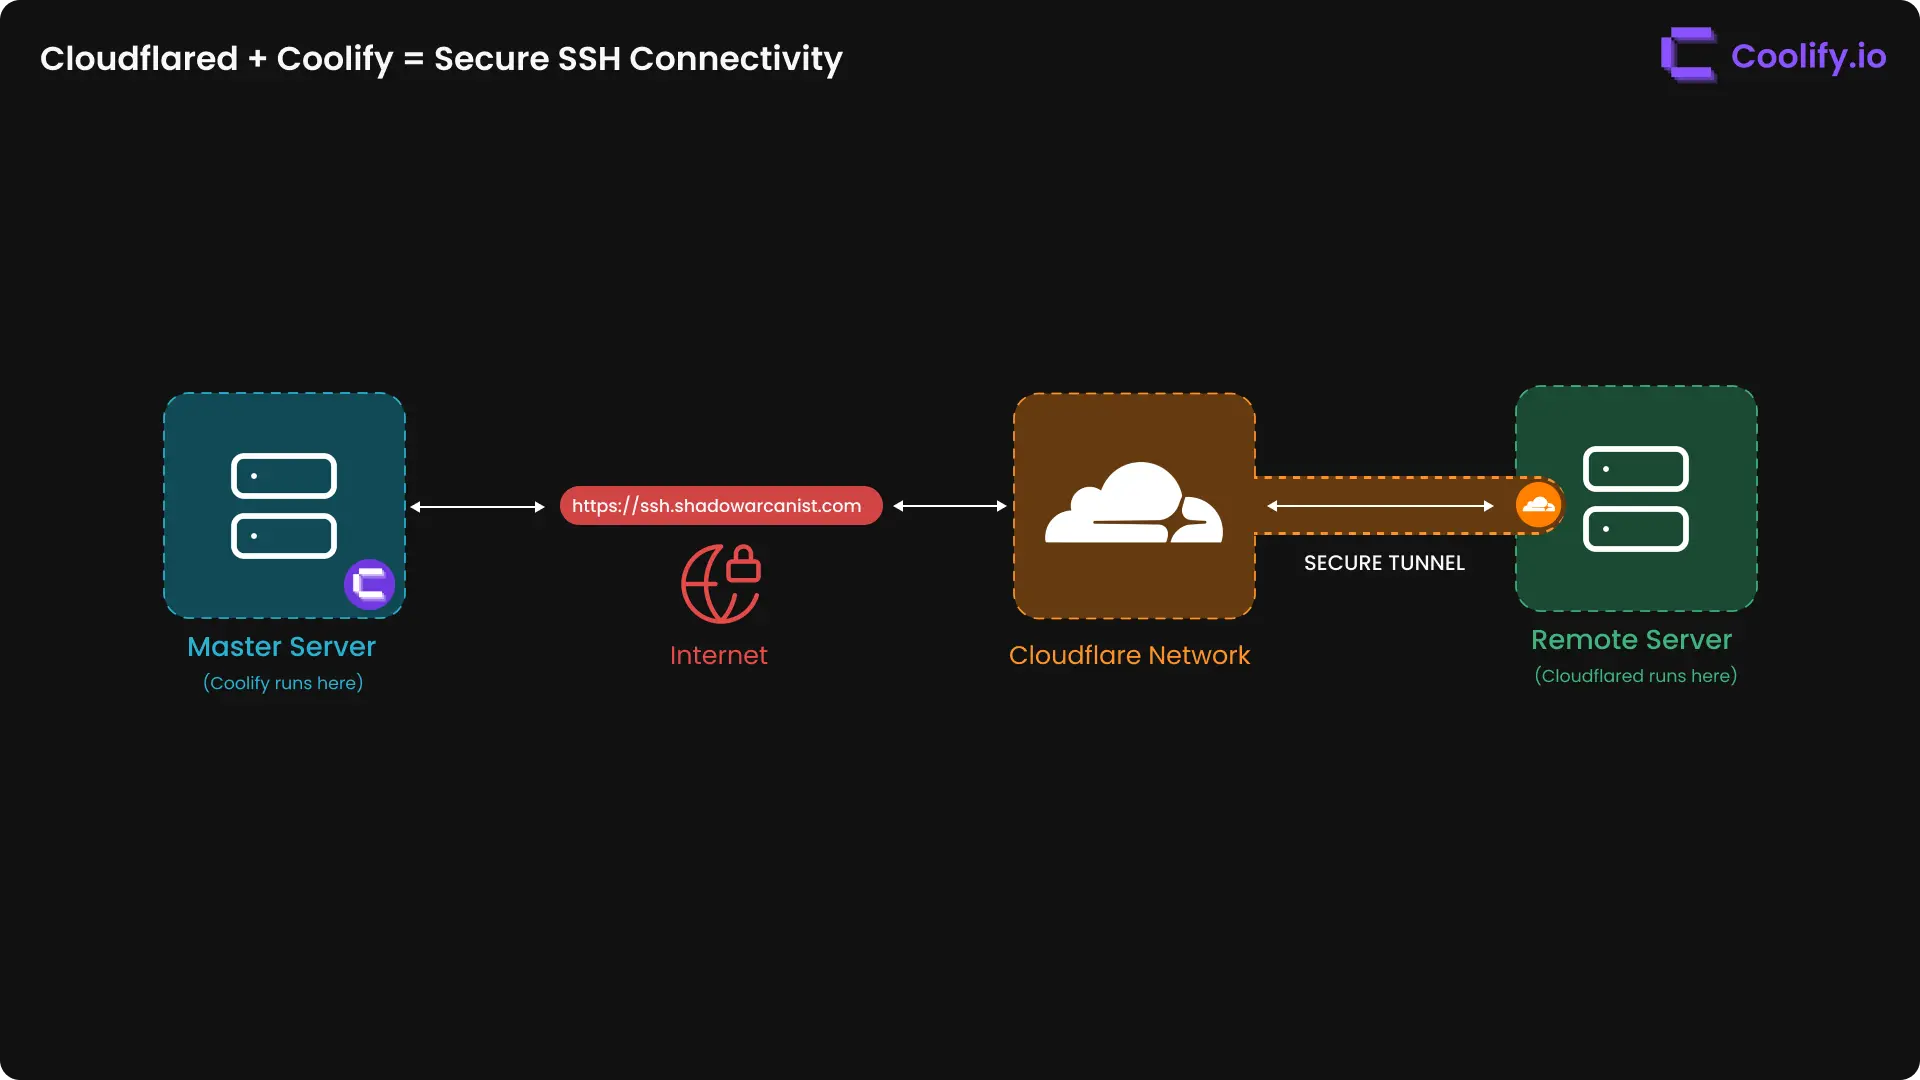
How It Works?
A simple high-level overview diagram to give you a visual idea of how this works:
Setup Methods
There are two ways to set this up:
- Automated
- Manual
The main difference is that in the manual setup, you install cloudflared yourself, while in the automated setup, Coolify does it for you.
To use Coolify's automated setup for a Cloudflare Tunnel:
- Your remote server must have a public IP address and an active SSH port during the initial setup for Coolify to configure the tunnel. After setup, you can close all ports on the server.
- If your server doesn’t have a public IP address, then this automated setup is not for you. Please follow the Manual setup guide instead.
- You need a domain that has it's DNS managed by Cloudflare.
Example Data
The following data is used as an example in this guide. Please replace it with your actual data when following the steps:
- IPv4 Address of Remote Server:
192.168.1.93 - SSH Domain Name:
helixa.shadowarcanist.com - Username:
root - SSH Port:
22
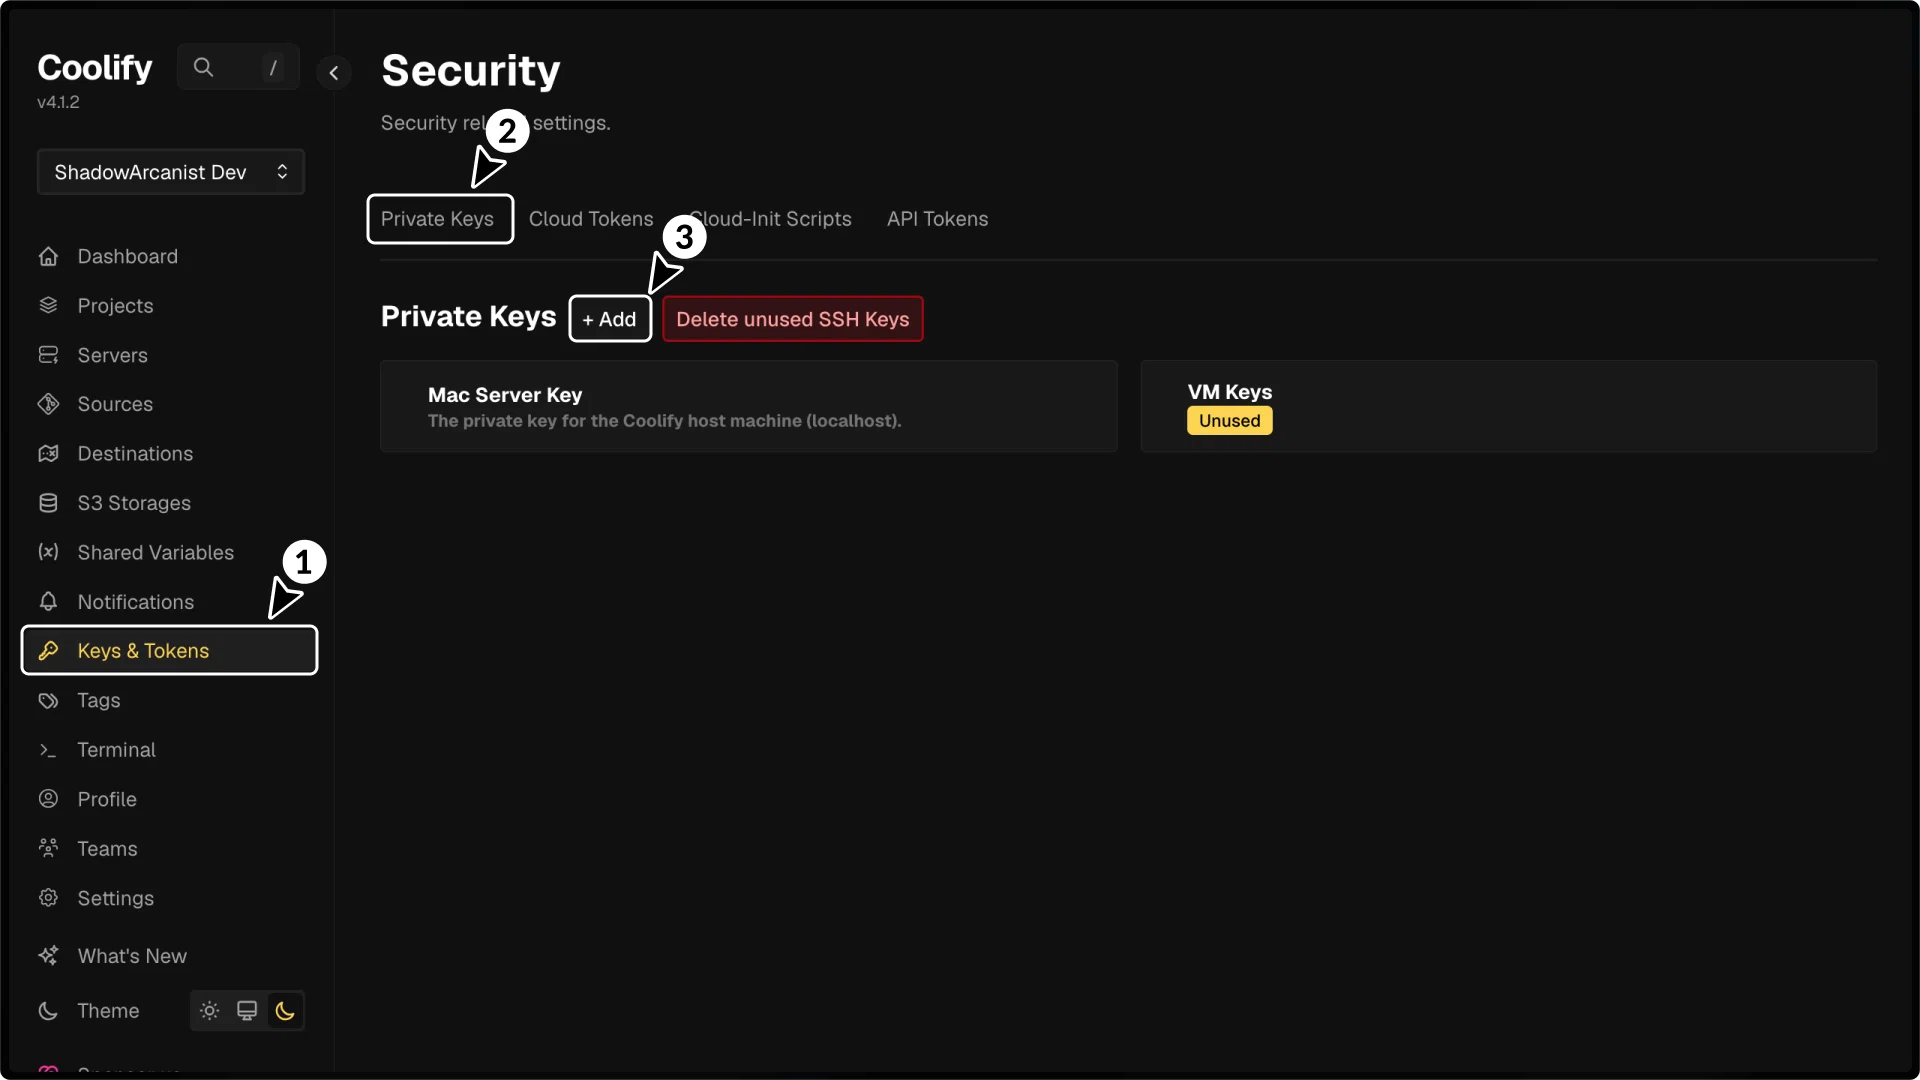
1. Create a Private SSH Key

- In your Coolify Dashboard, go to Keys & Tokens
- Click on Private Keys tab
- Click the + Add button
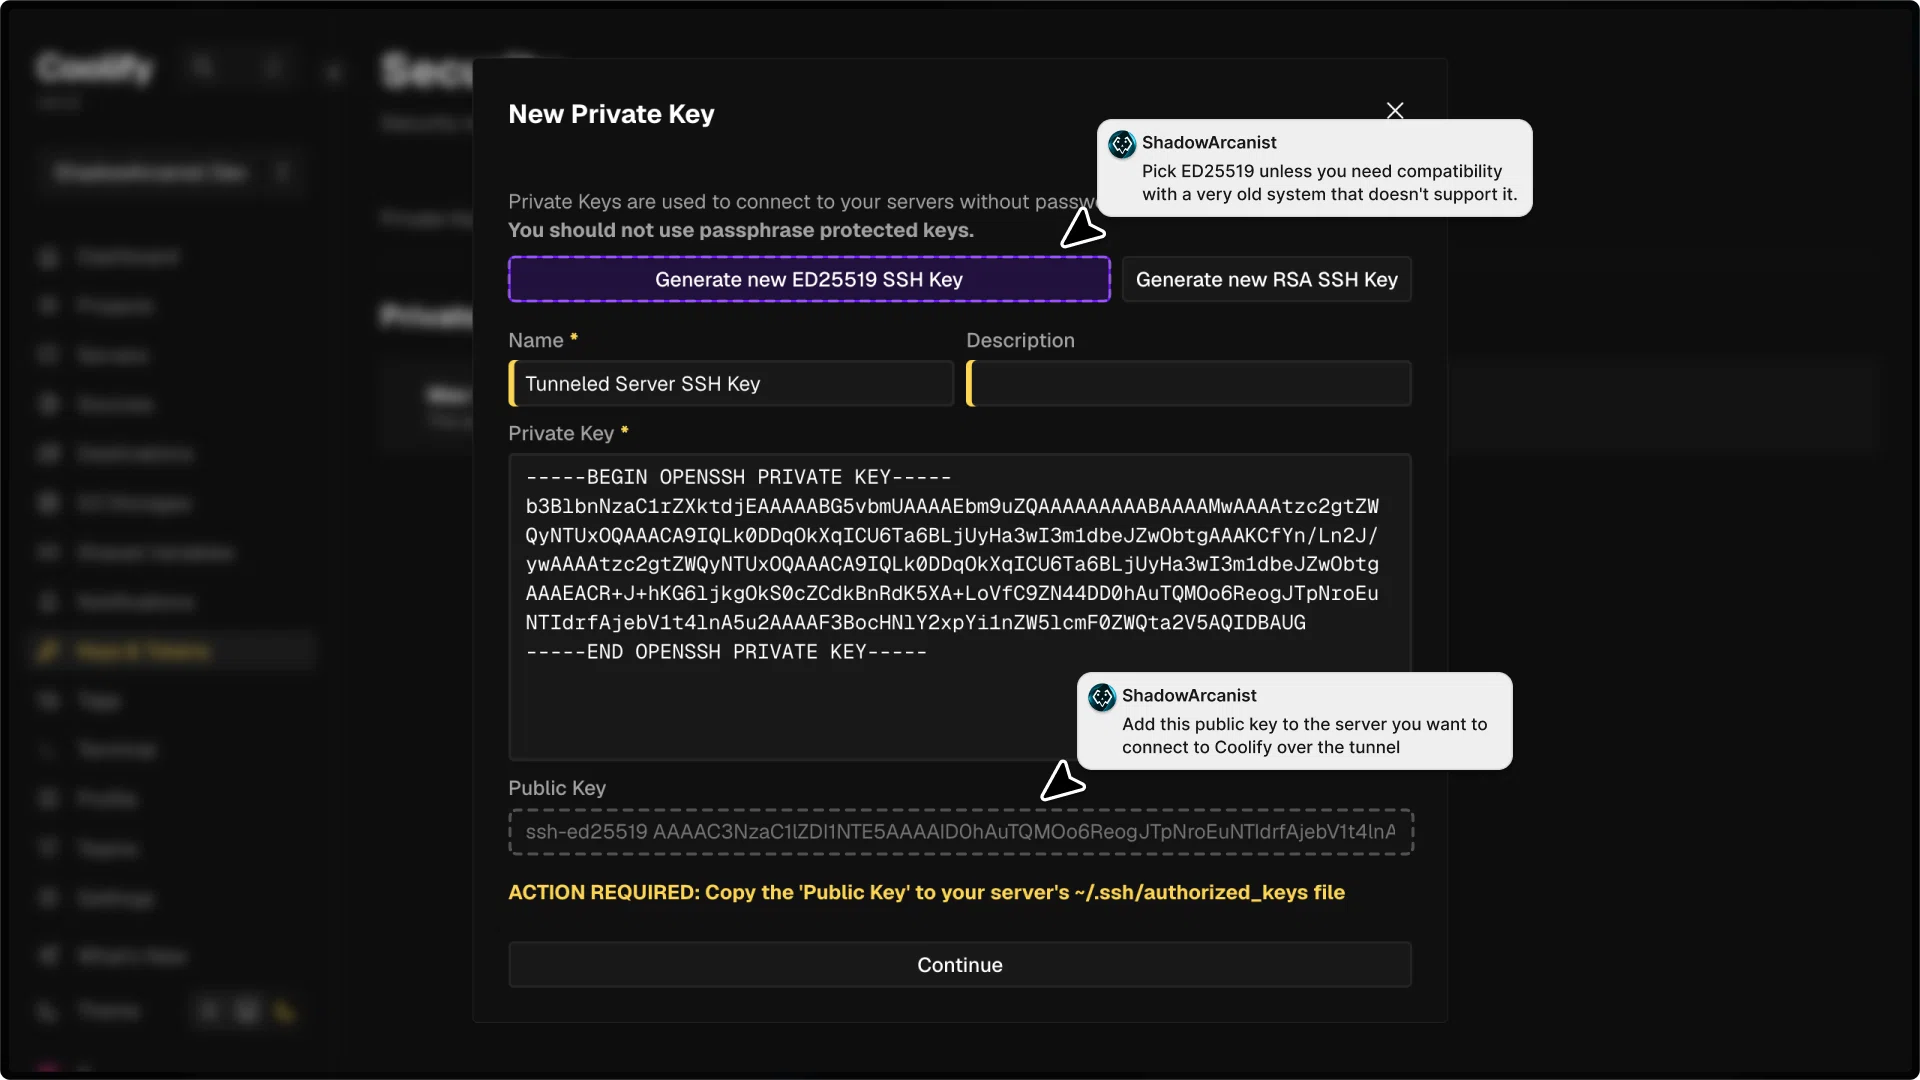
You will be prompted to choose a key type, along with providing a name and description for the key.

- Click on Generate new ED25519 or RSA button to generate a new SSH key.
- Copy the public key and save it somewhere safe (you'll need it in the next step).
- Click Continue button.
2. Add Public Key to Your Server
SSH into the server you want to connect to Coolify:
Once logged in, add your public key to the authorized keys file:
echo "<PASTE YOUR PUBLIC KEY INSIDE OF THESE QUOTES>" >> ~/.ssh/authorized_keys3. Add your Server to Coolify

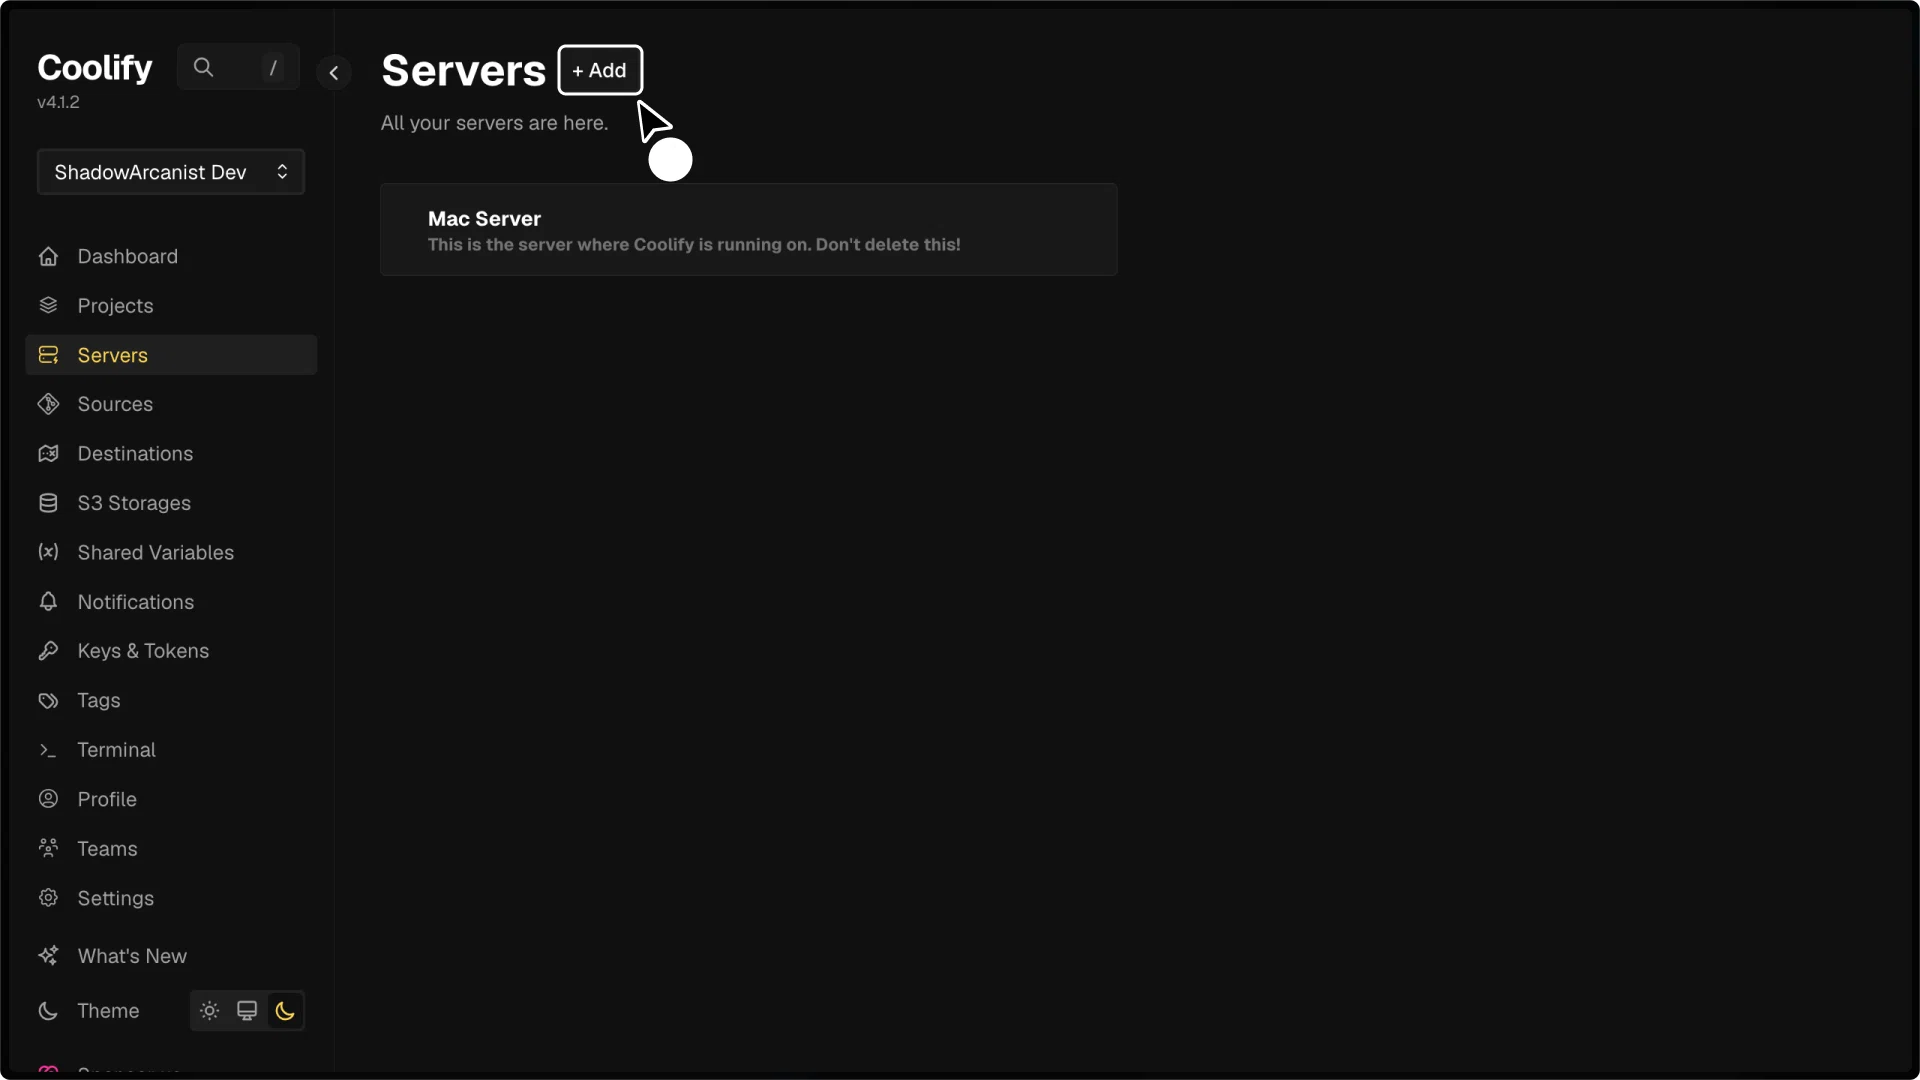
- In your Coolify Dashboard, go to Servers
- Click the + Add button
You will be prompted to enter details about your server. Make sure the information you provide is accurate, as Coolify will use these details to access your server.
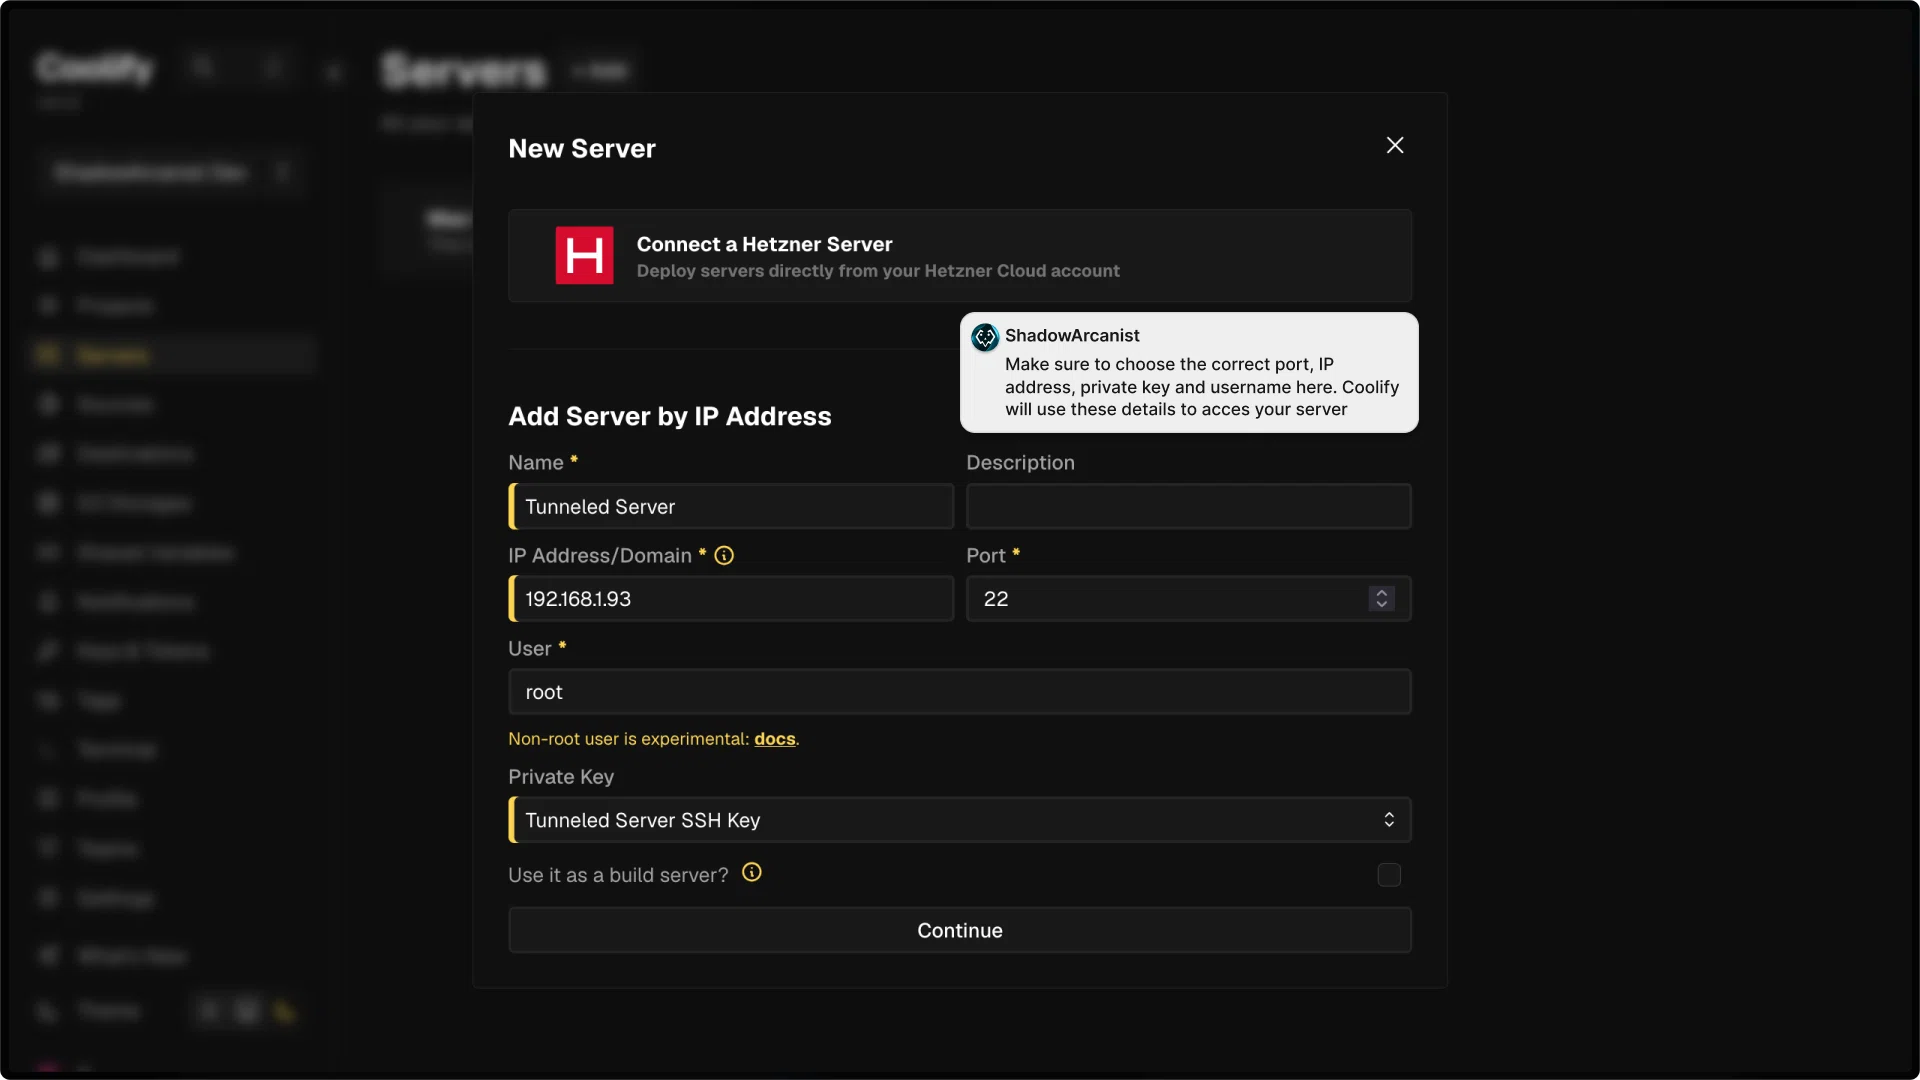
- Name - Choose a name to easily identify your server in the dashboard.
- Description - (Optional) Provide a description for your server.
- IP Address/Domain - Enter the public IP address of your server.
- Port - Enter the port number your server uses for SSH connections.
- User - Enter the username Coolify will use (it should have root privileges on the server).
- Private key - Select the private key you created in Step 1
- After filling in the details, click the Continue button.
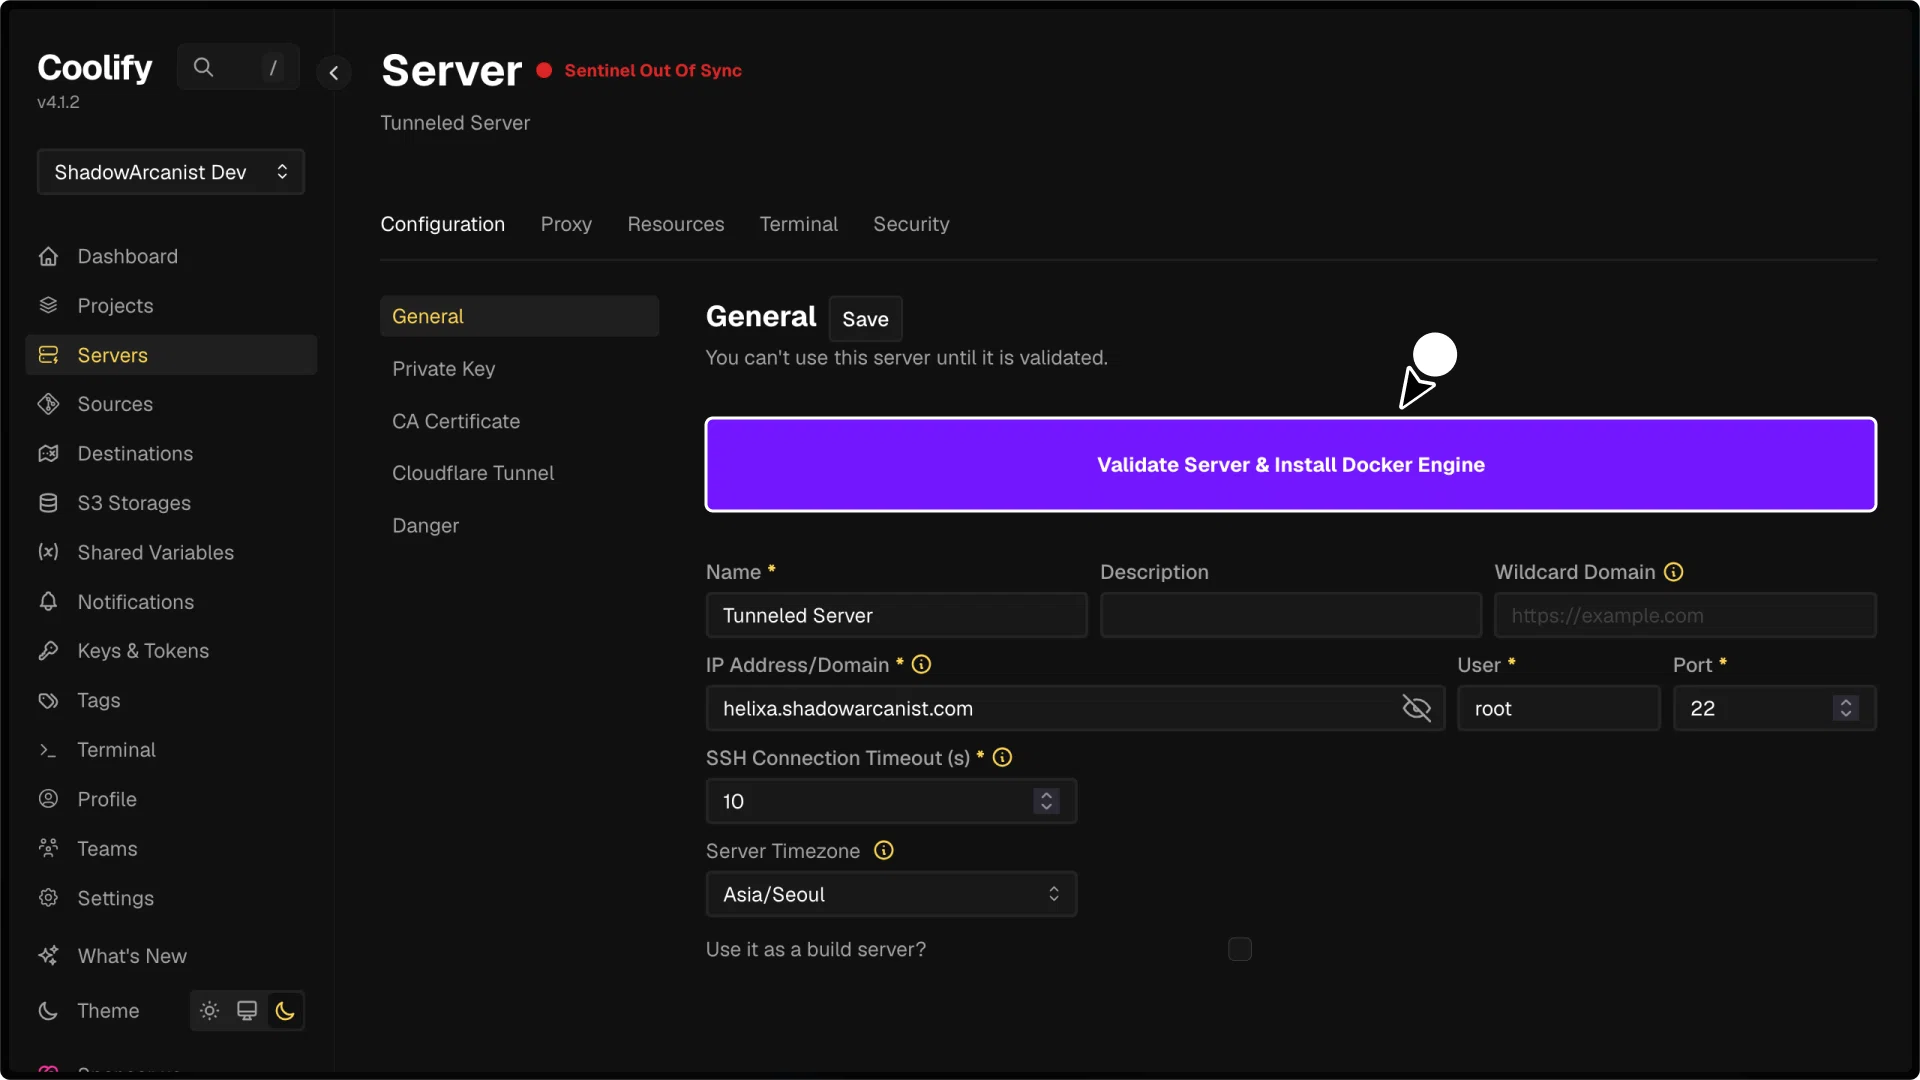
4. Validate your Server on Coolify
To validate your server, simply click the Validate Server & Install Docker Engine button.
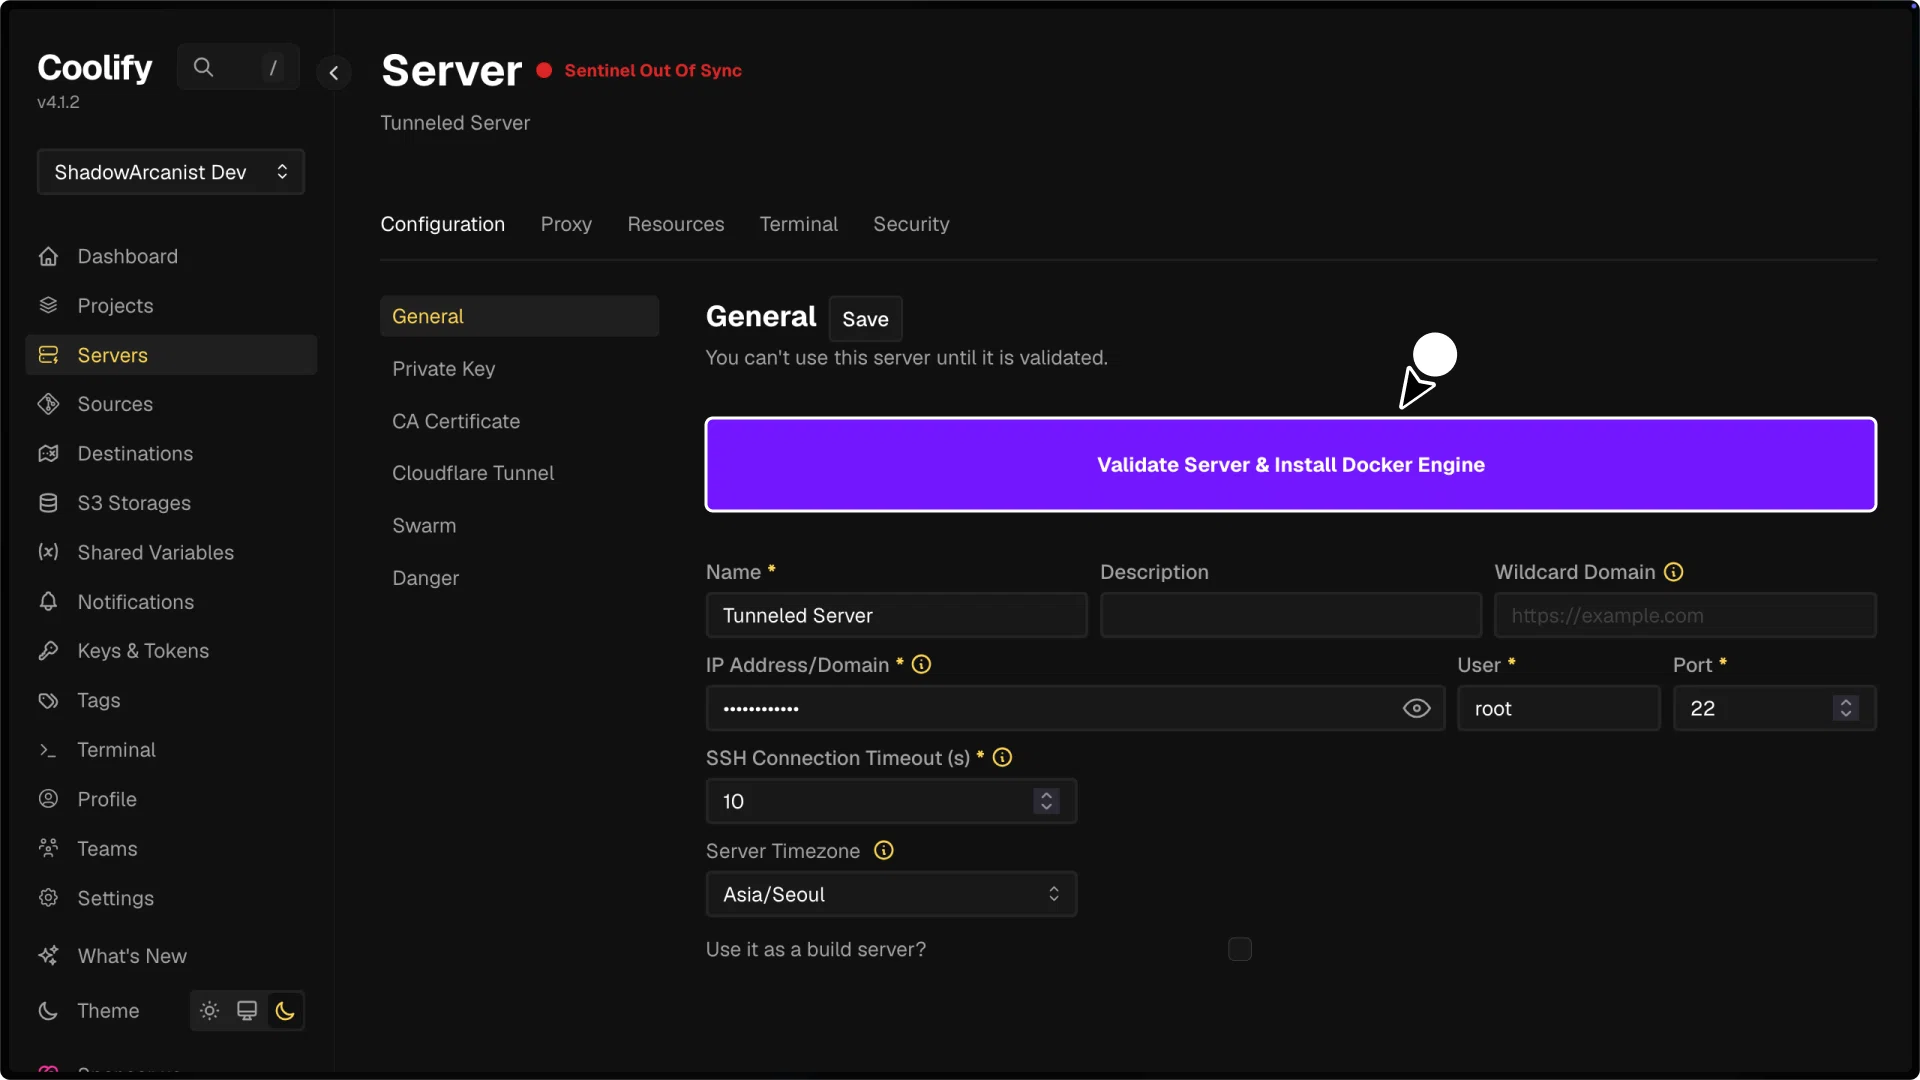
During this process, Coolify will log in to your server and set up everything needed for Coolify to use the server.
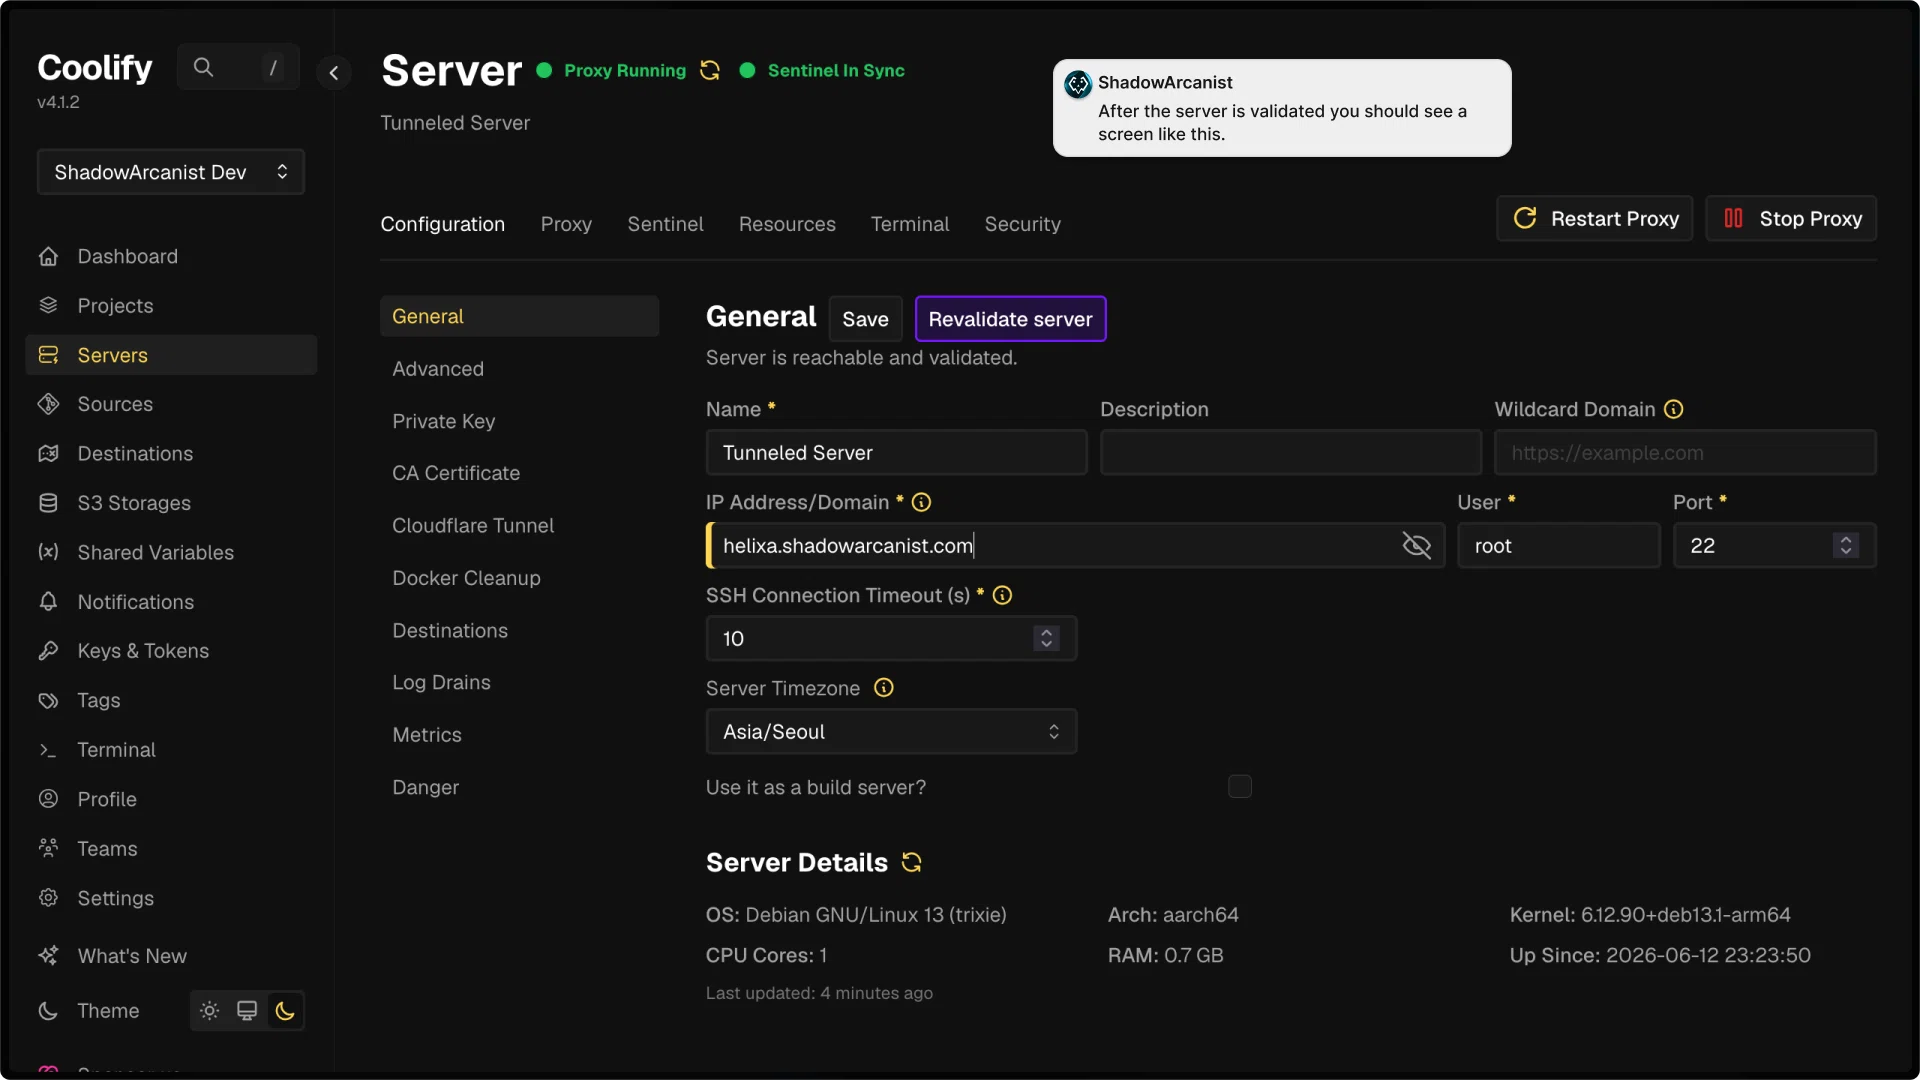
Once the validation is completed, your server page will look like this:

5. Create a Cloudflare Tunnel
To create a Cloudflare Tunnel, first log in to your Cloudflare dashboard

- Go to Networking in the sidebar.
- Click on Tunnels
- Click on Create tunnel button

You will be prompted to enter a tunnel name. Enter a name that you prefer and click on Create tunnel button.
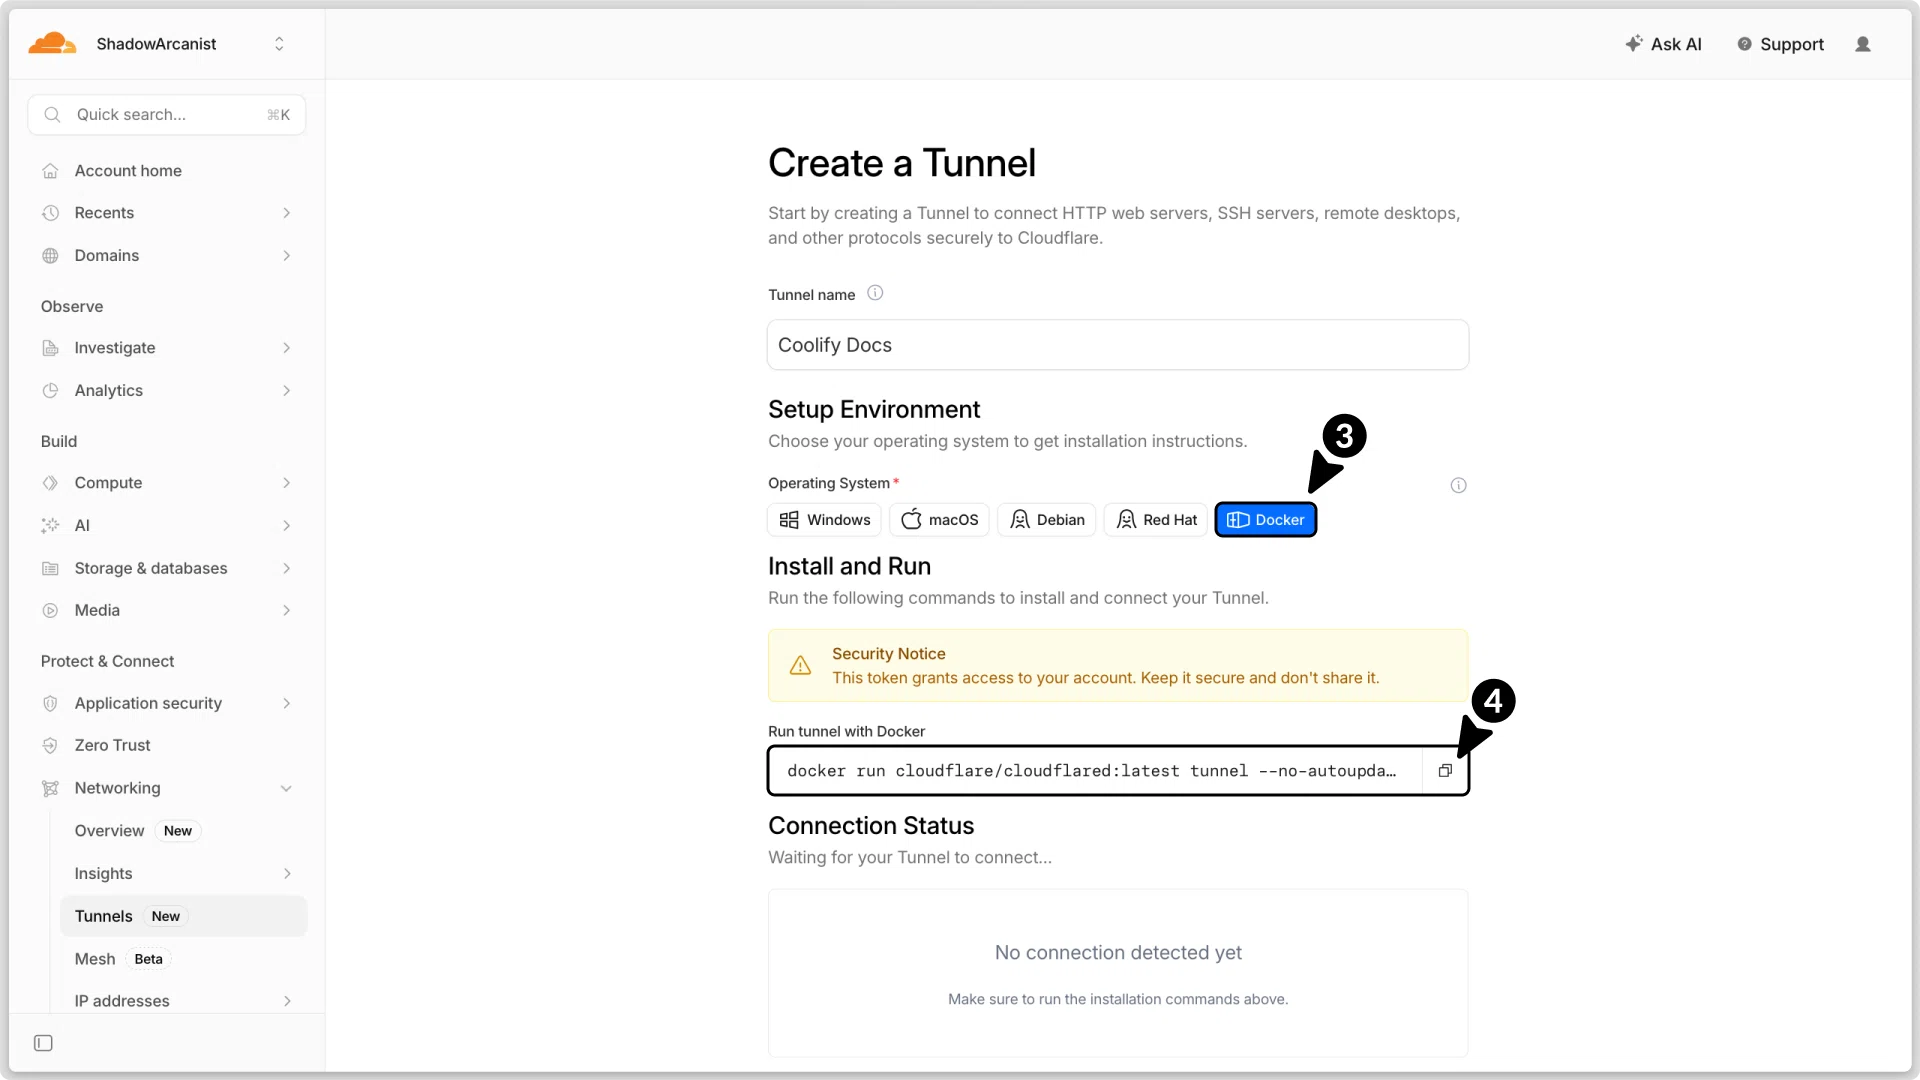
- Select the Docker option
- Copy the docker run command, which contains the token for your tunnel (token starts with "
eyJ"). Make sure to save only the token, removing the command part before it, and store it in a safe place, as we need it later.
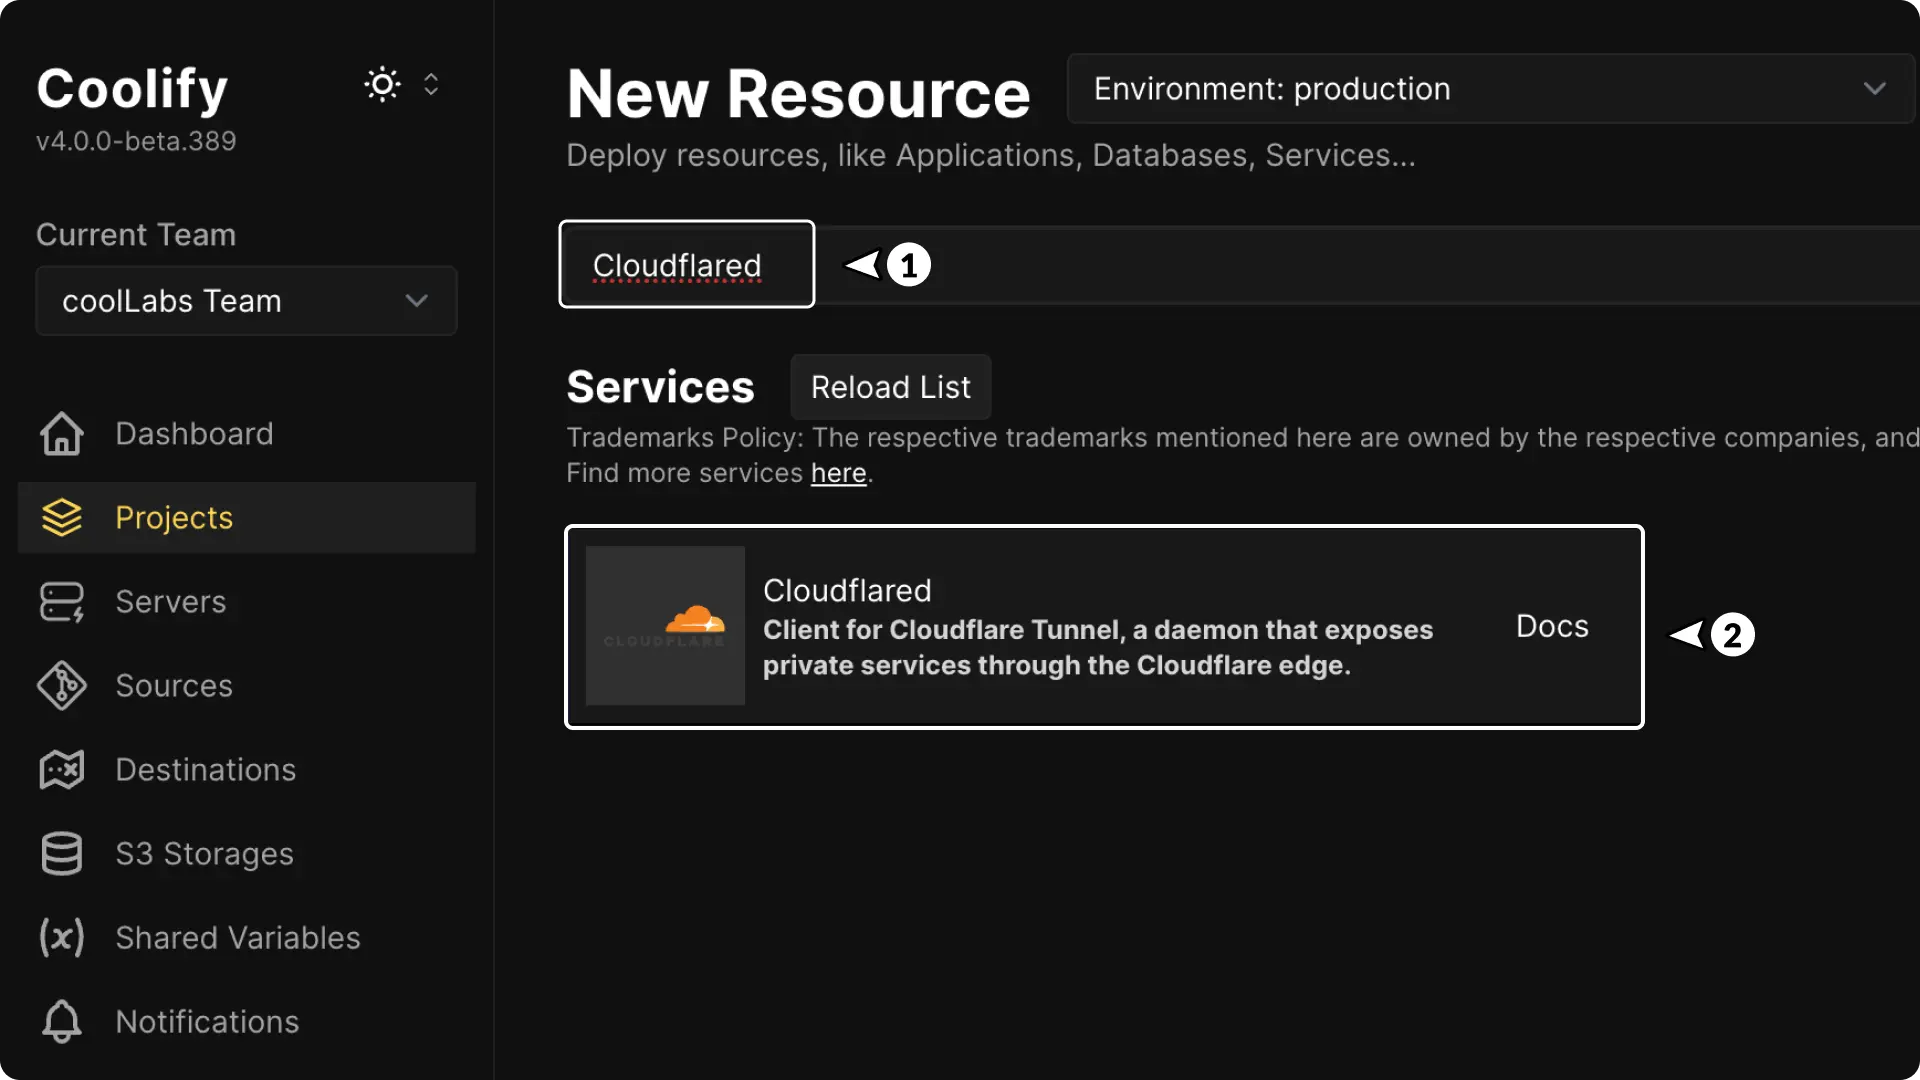
6. Configure Cloudflare tunnel on Coolify
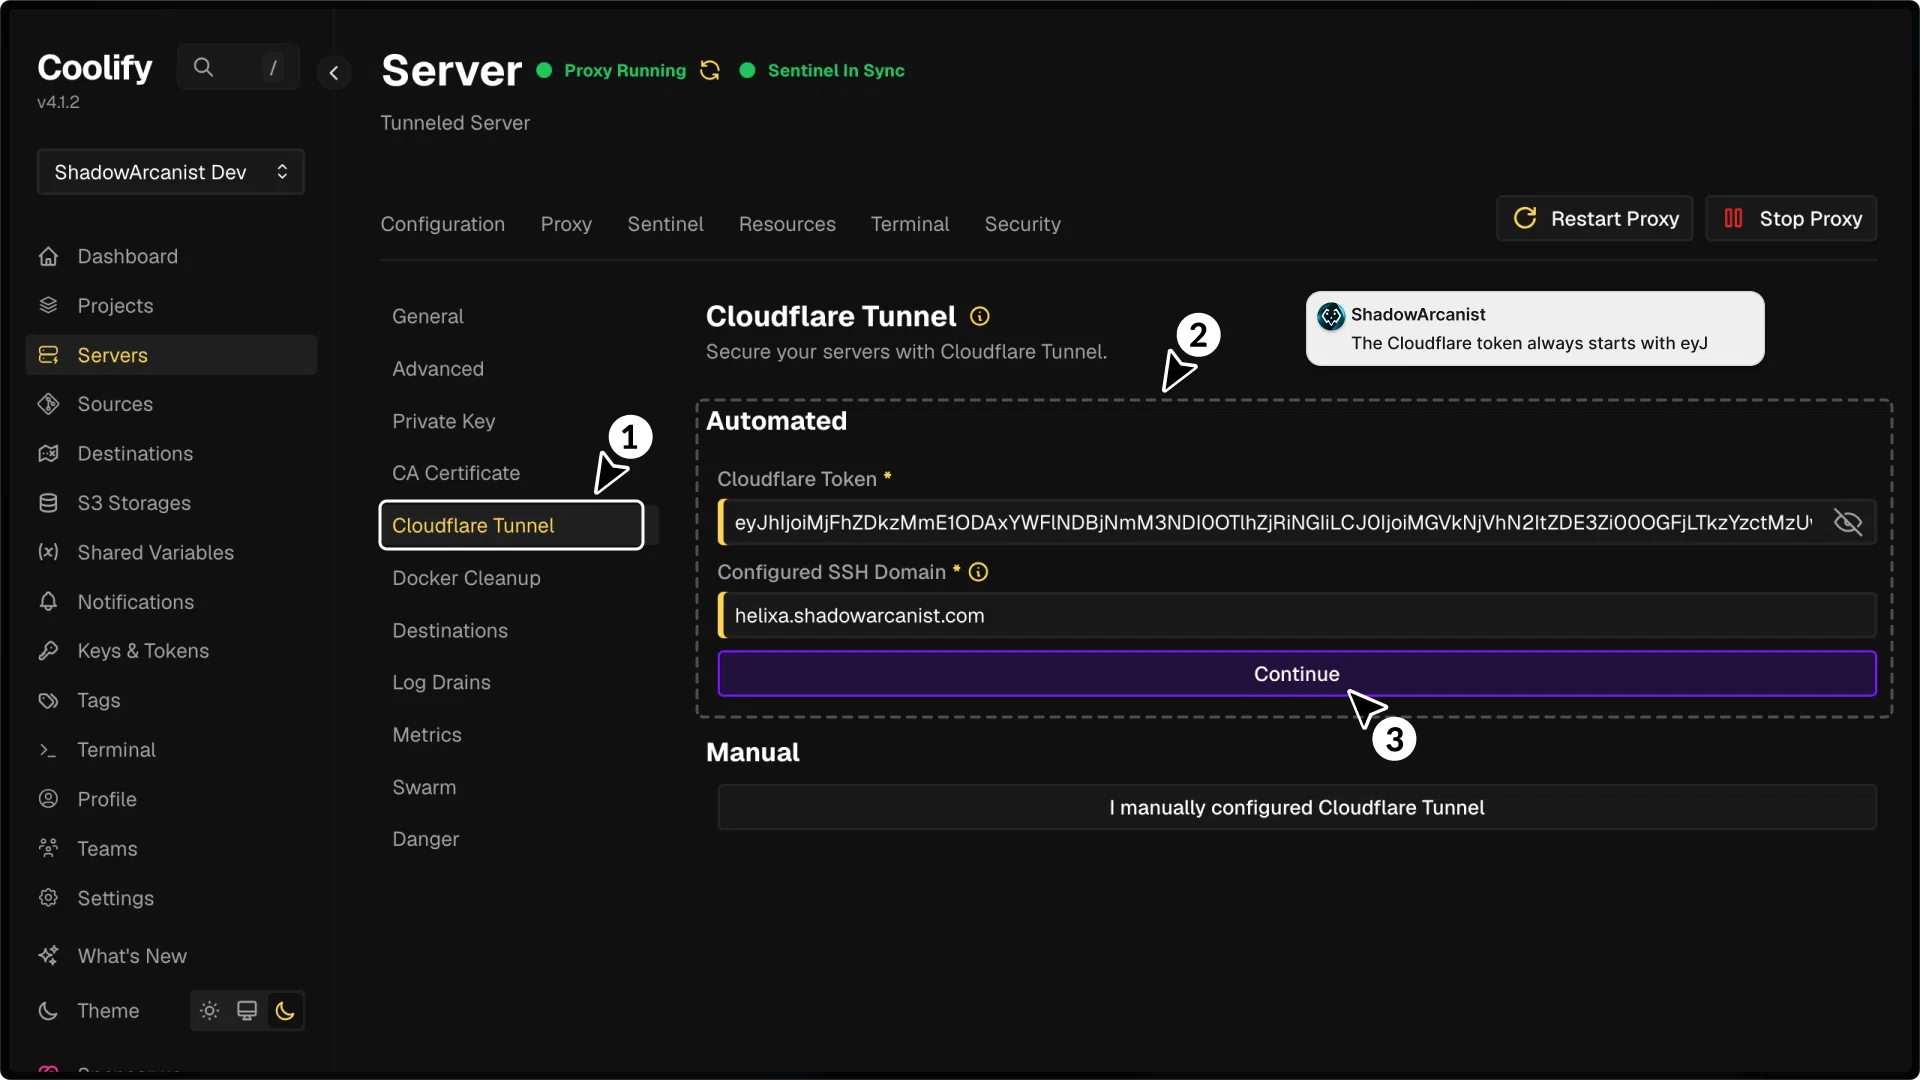
- In your Coolify Dashboard, go to Cloudflare Tunnel
- Under manual section enter your Cloudflare Token and SSH Domain
- Click on Continue button
TIP
The Cloudflare token is included in the docker run command you copied in the previous step. The token begins with eyJ.
Once cloudflared starts running you will be able to see it's status on Cloudflare dashboard:

Click on continue button to create the tunnel.
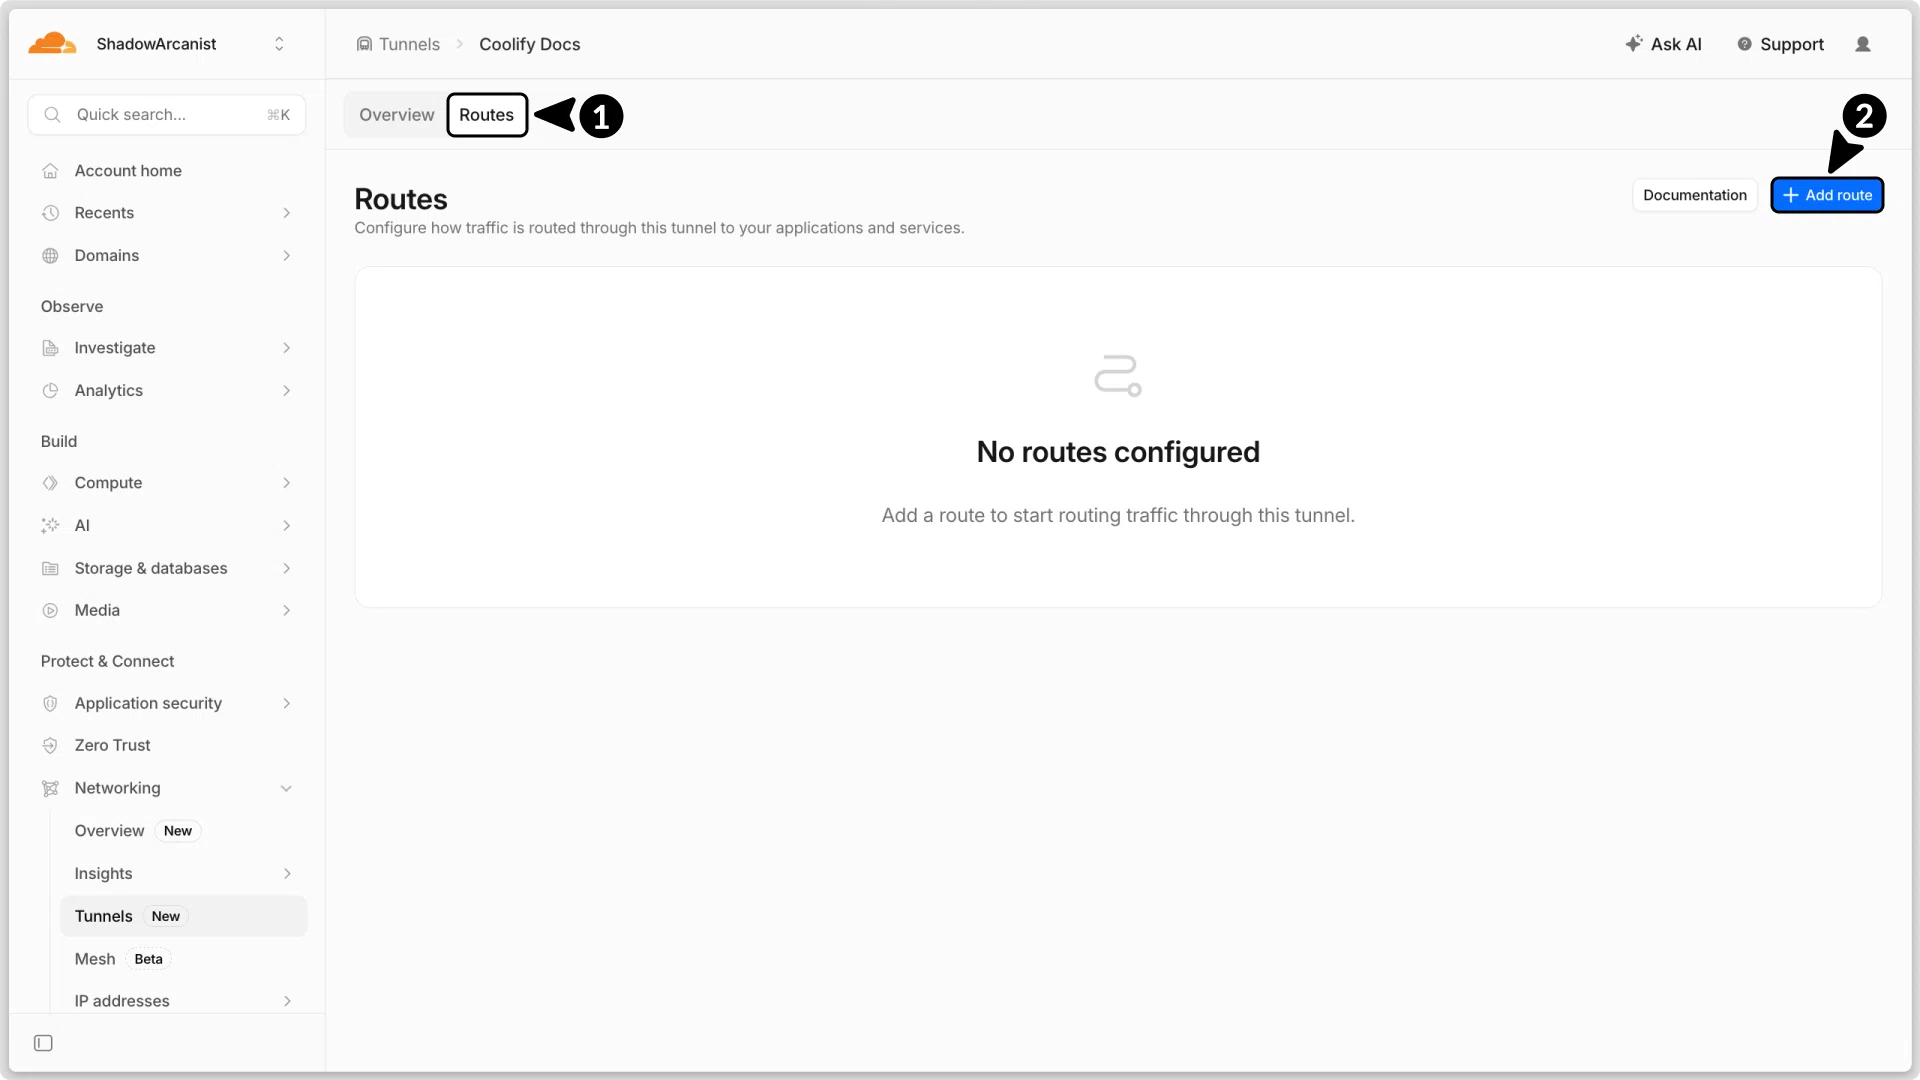
7. Configure tunnel routes
- Click on your tunnel
- Click on Configure option

- Select Routes.
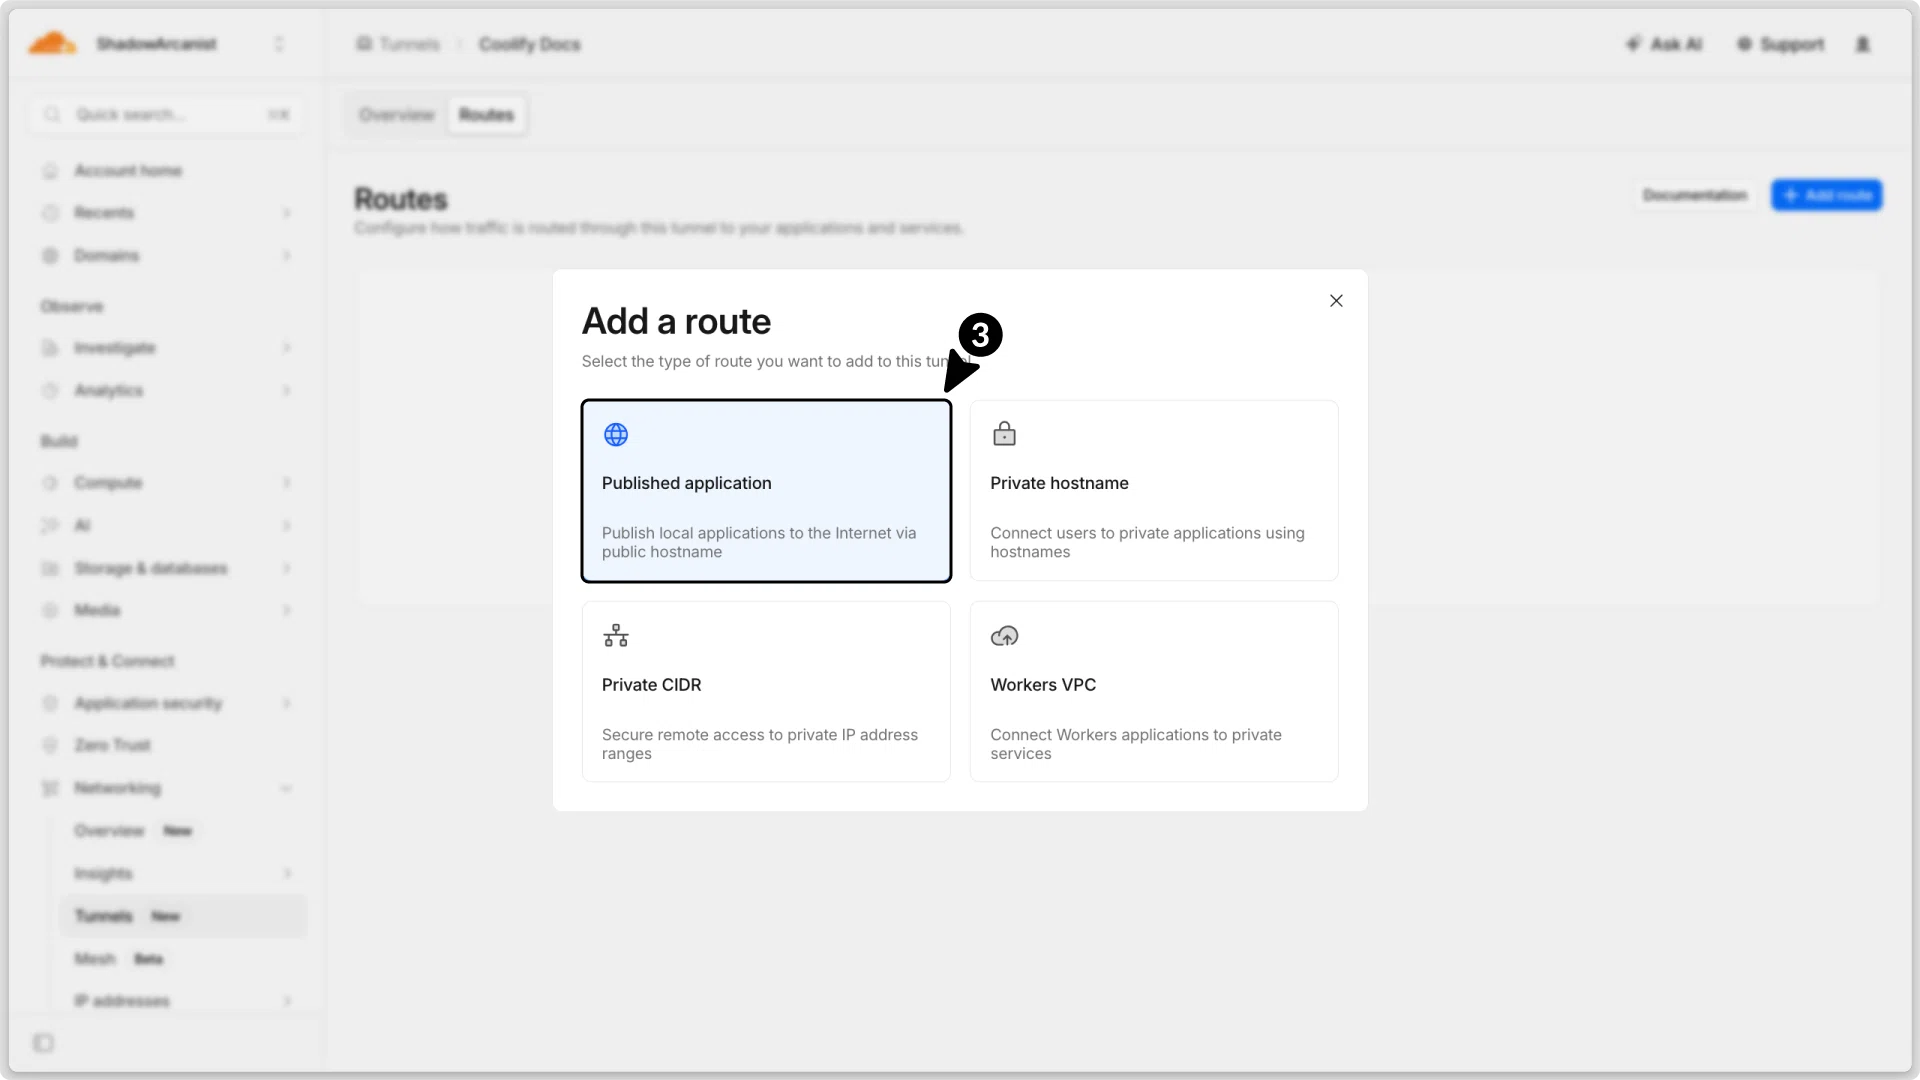
- Click Add route button
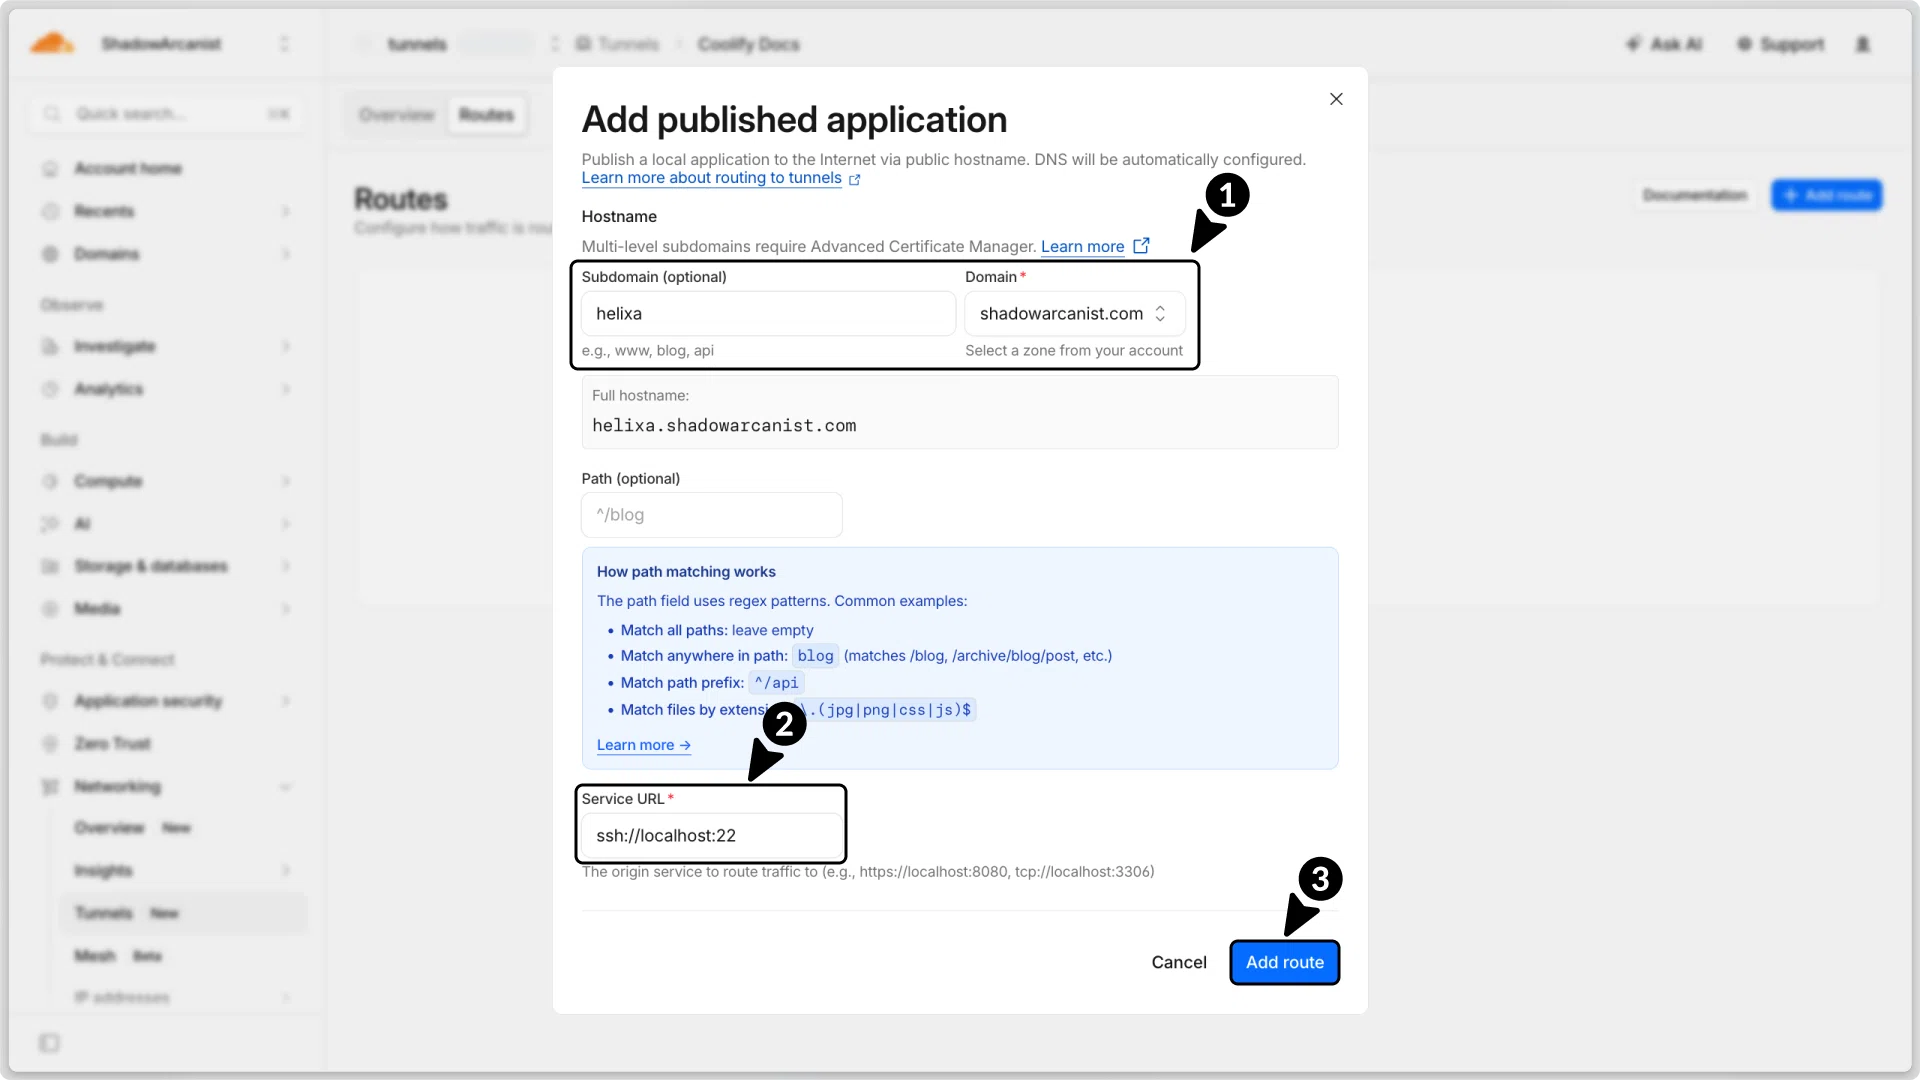
- Select Published Application as the route type

- Subdomain - (Optional) You can make your resource accessible on any subdomain/domain. For this guide, we are using the
helixasubdomain. - Domain - Choose the domain you want to use for the tunnel.
- Path - Leave this field empty.
- Service URL - Enter ssh://localhost:22 (this is very important). If your SSH port is different from 22, use that port instead.
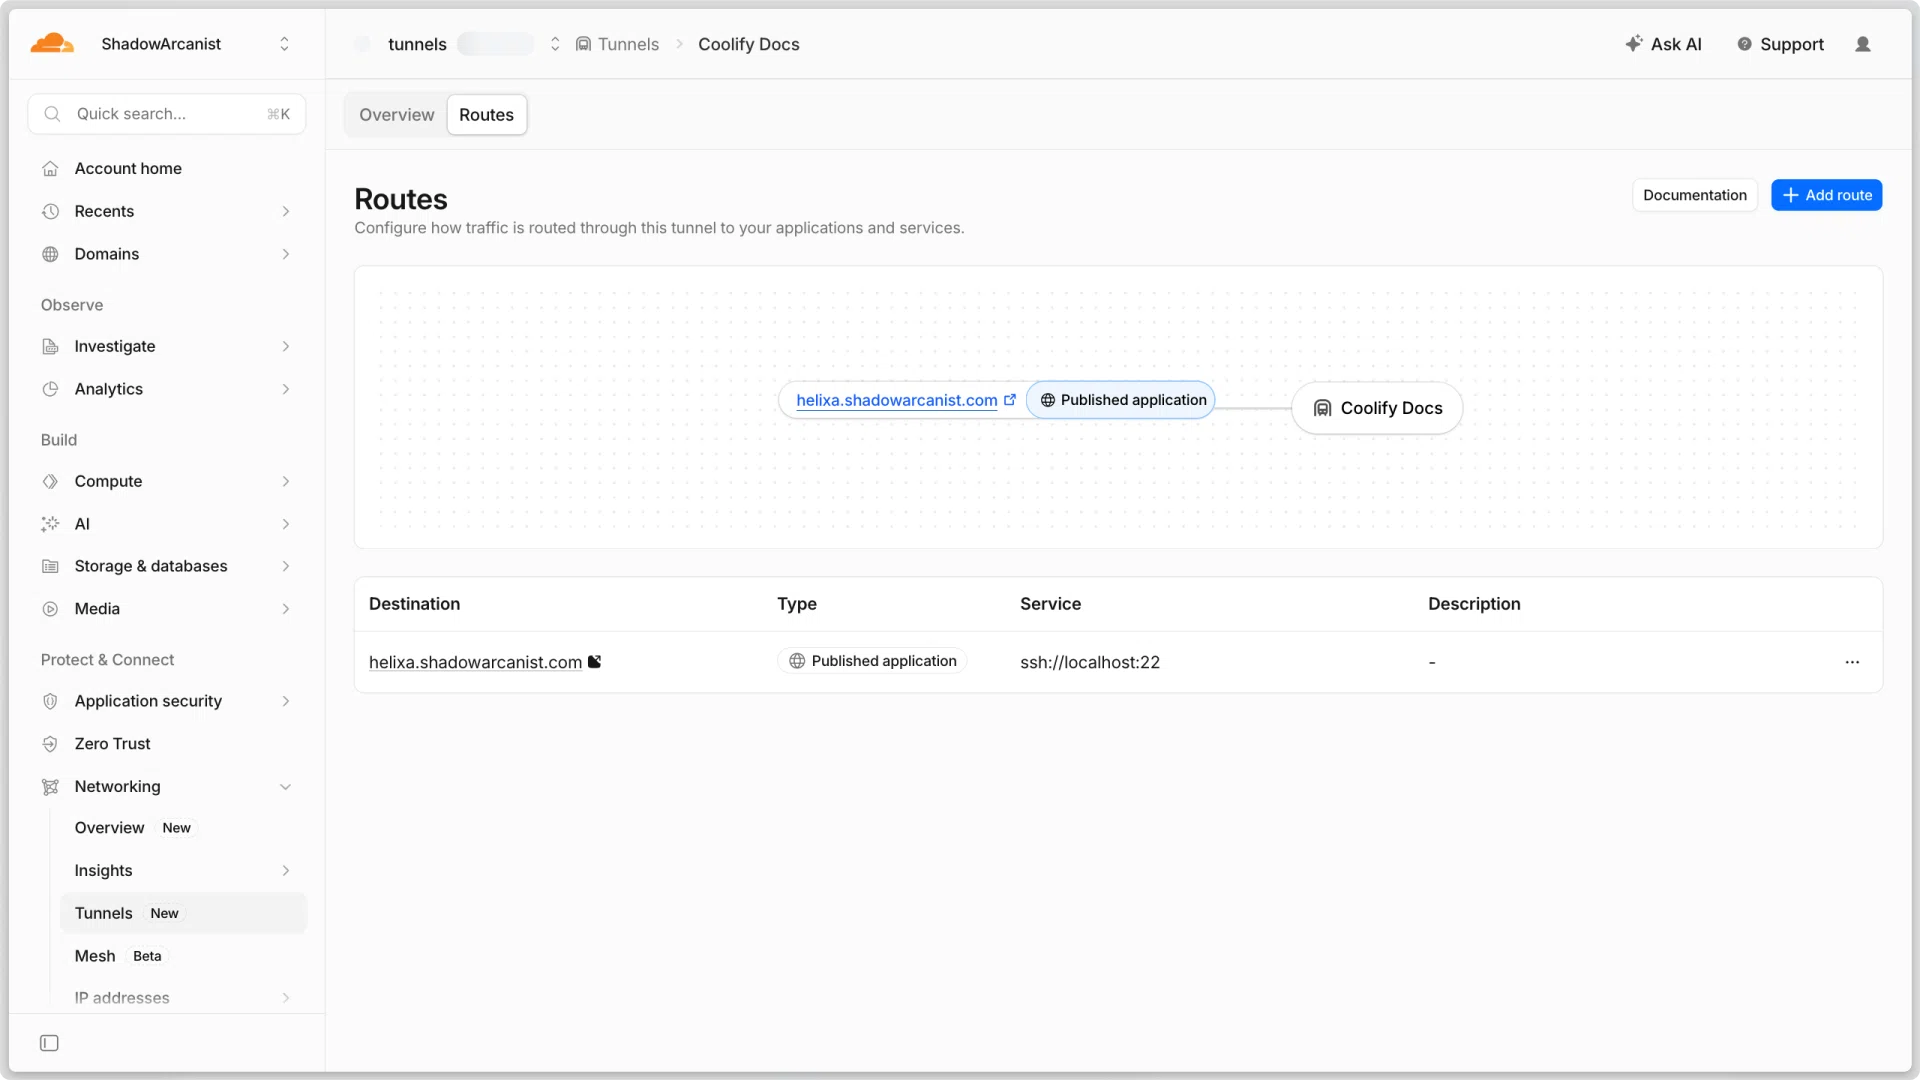
- After filling in the details, click the Add route button.

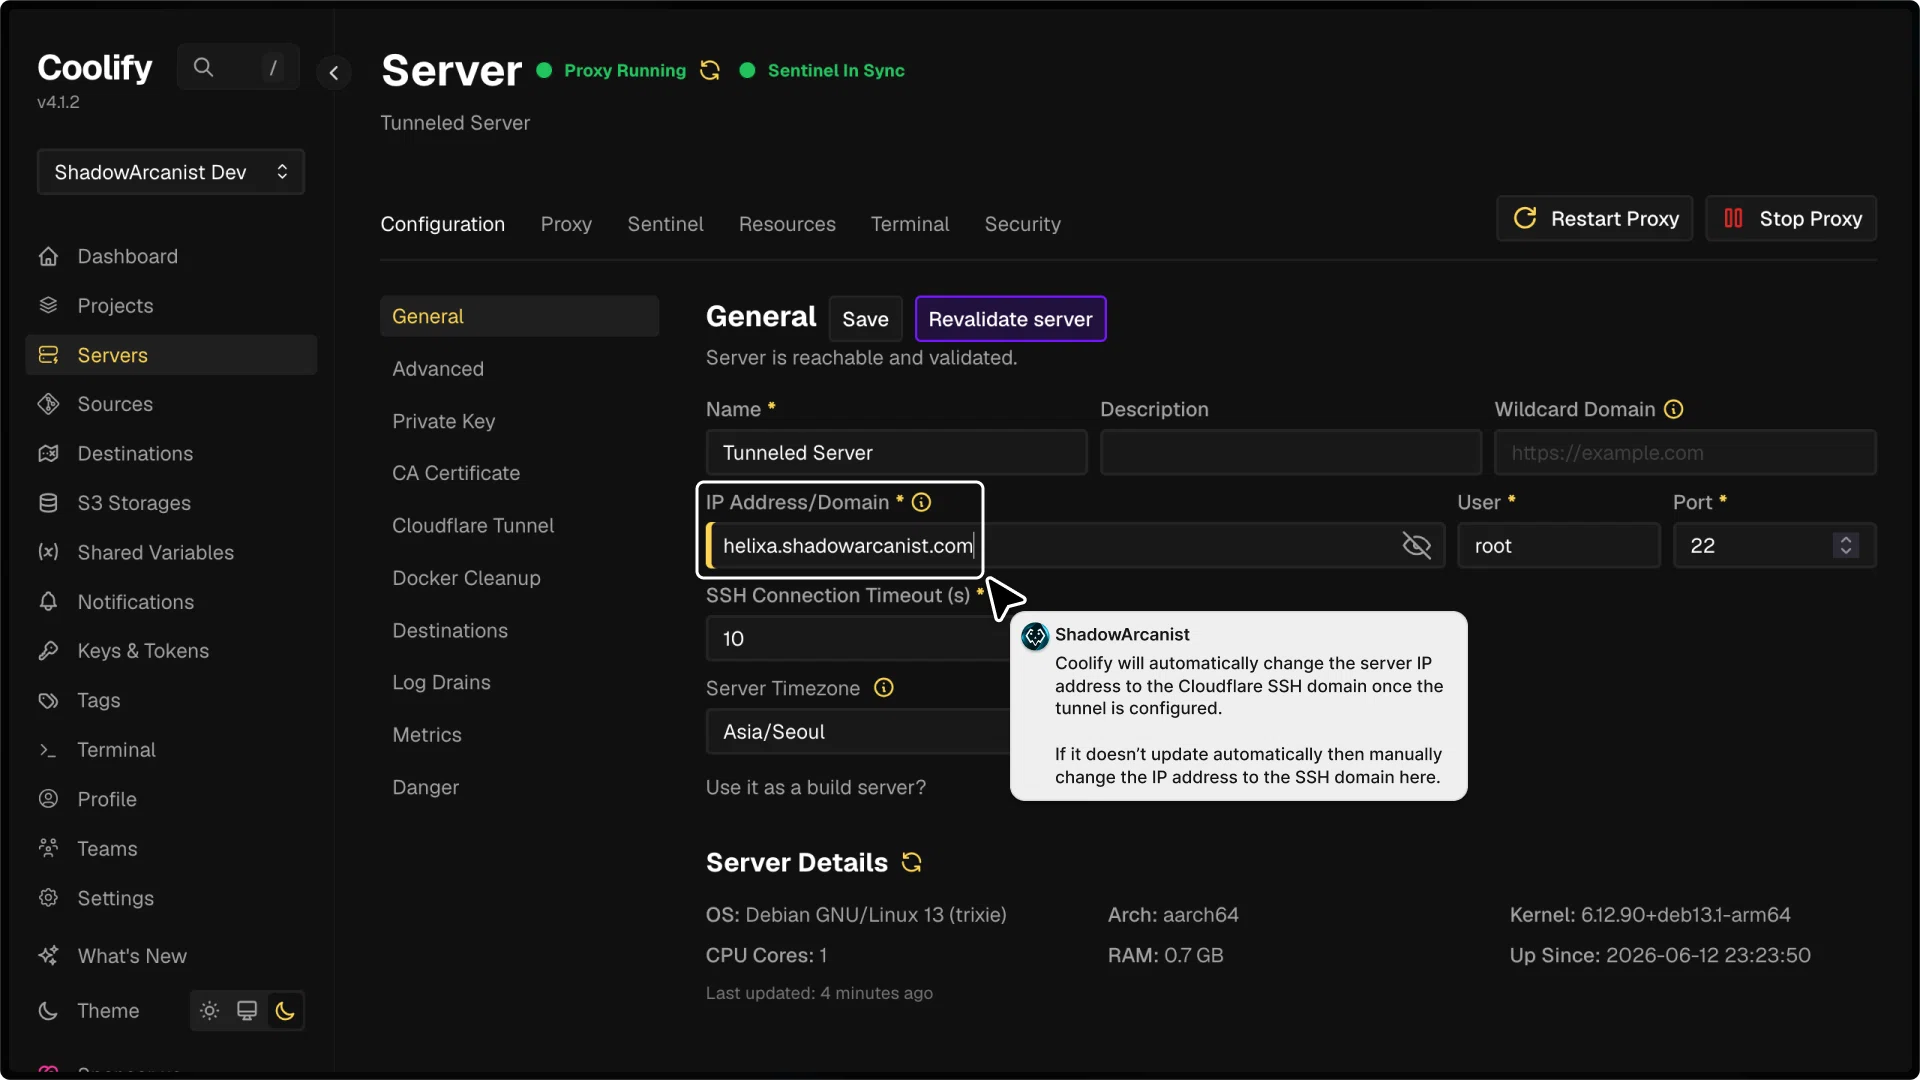
Coolify will automatically change the server IP address to the Cloudflare SSH domain once the tunnel is configured.
If it doesn’t update automatically then manually change the IP address to the SSH domain here:
Congratulations! You've successfully set up a server that can be accessed by Coolify over SSH using Cloudflare tunnels via your domain.
You can now block your SSH port on the server if you wish.
To manually setup Cloudflare Tunnel:
- You need access to your remote server to install cloudflared (a public IP for your server is not required).
- You need a domain that has it's DNS managed by Cloudflare.
Example Data
The following data is used as an example in this guide. Please replace it with your actual data when following the steps:
- IPv4 Address of Remote Server:
192.168.1.93 - SSH Domain Name:
helixa.shadowarcanist.com - Username:
root - SSH Port:
22
1. Create a Private SSH Key
- In your Coolify Dashboard, go to Keys & Tokens
- Click on Private Keys tab
- Click the + Add button
You will be prompted to choose a key type, along with providing a name and description for the key.
- Click on Generate new ED25519 or RSA button to generate a new SSH key.
- Copy the public key and save it somewhere safe (you'll need it in the next step).
- Click Continue button.
2. Add Public Key to Your Server
SSH into the server you want to connect to Coolify:
Once logged in, add your public key to the authorized keys file:
echo "<PASTE YOUR PUBLIC KEY INSIDE OF THESE QUOTES>" >> ~/.ssh/authorized_keys3. Add your Server to Coolify
- In your Coolify Dashboard, go to Servers
- Click the + Add button
You will be prompted to enter details about your server.
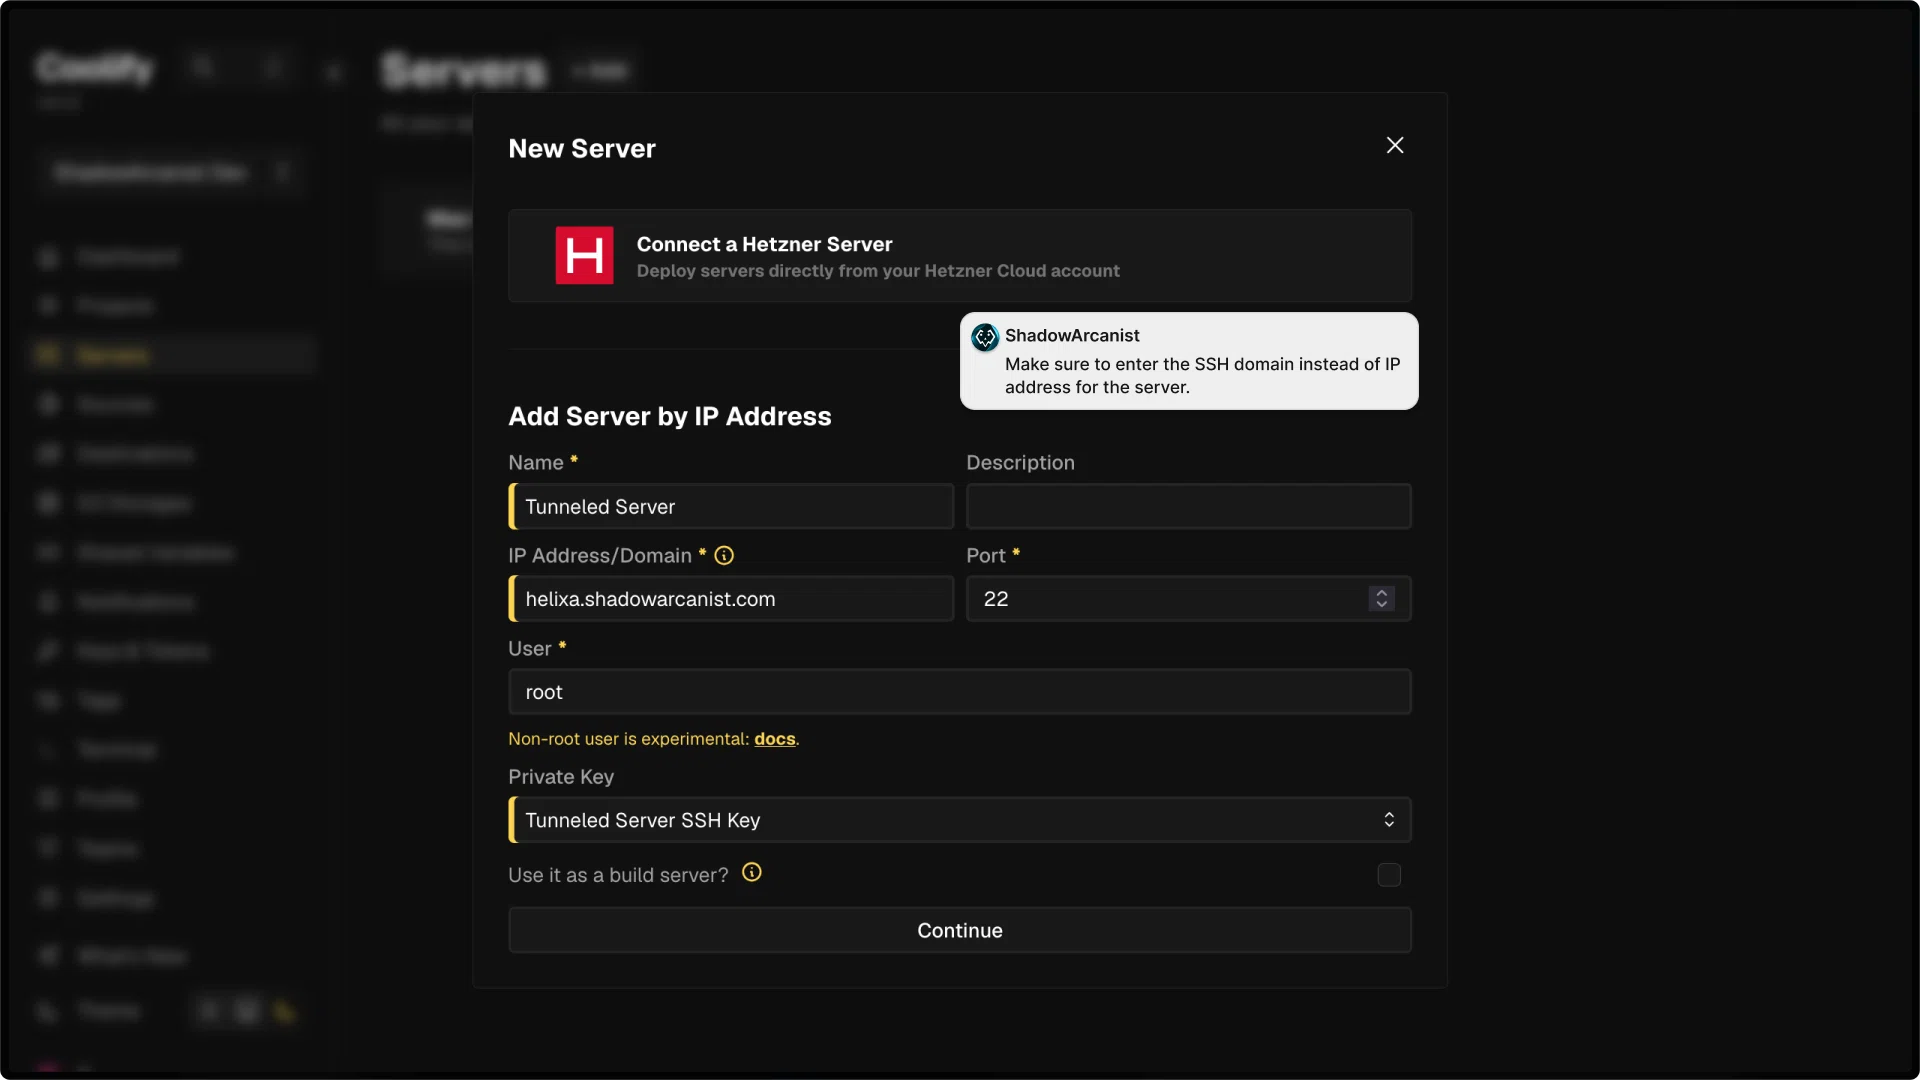
- Name - Choose a name to easily identify your server in the dashboard.
- Description - (Optional) Provide a description for your server.
- IP Address/Domain - Enter the SSH domain that you want to acesss the server via Cloudflare tunnels.
- Port - Enter the port number your server uses for SSH connections.
- User - Enter the username Coolify will use (it should have root privileges on the server).
- Private key - Select the private key you created in Step 1
- After filling in the details, click the Continue button.
4. Configure Cloudflare tunnel on Coolify
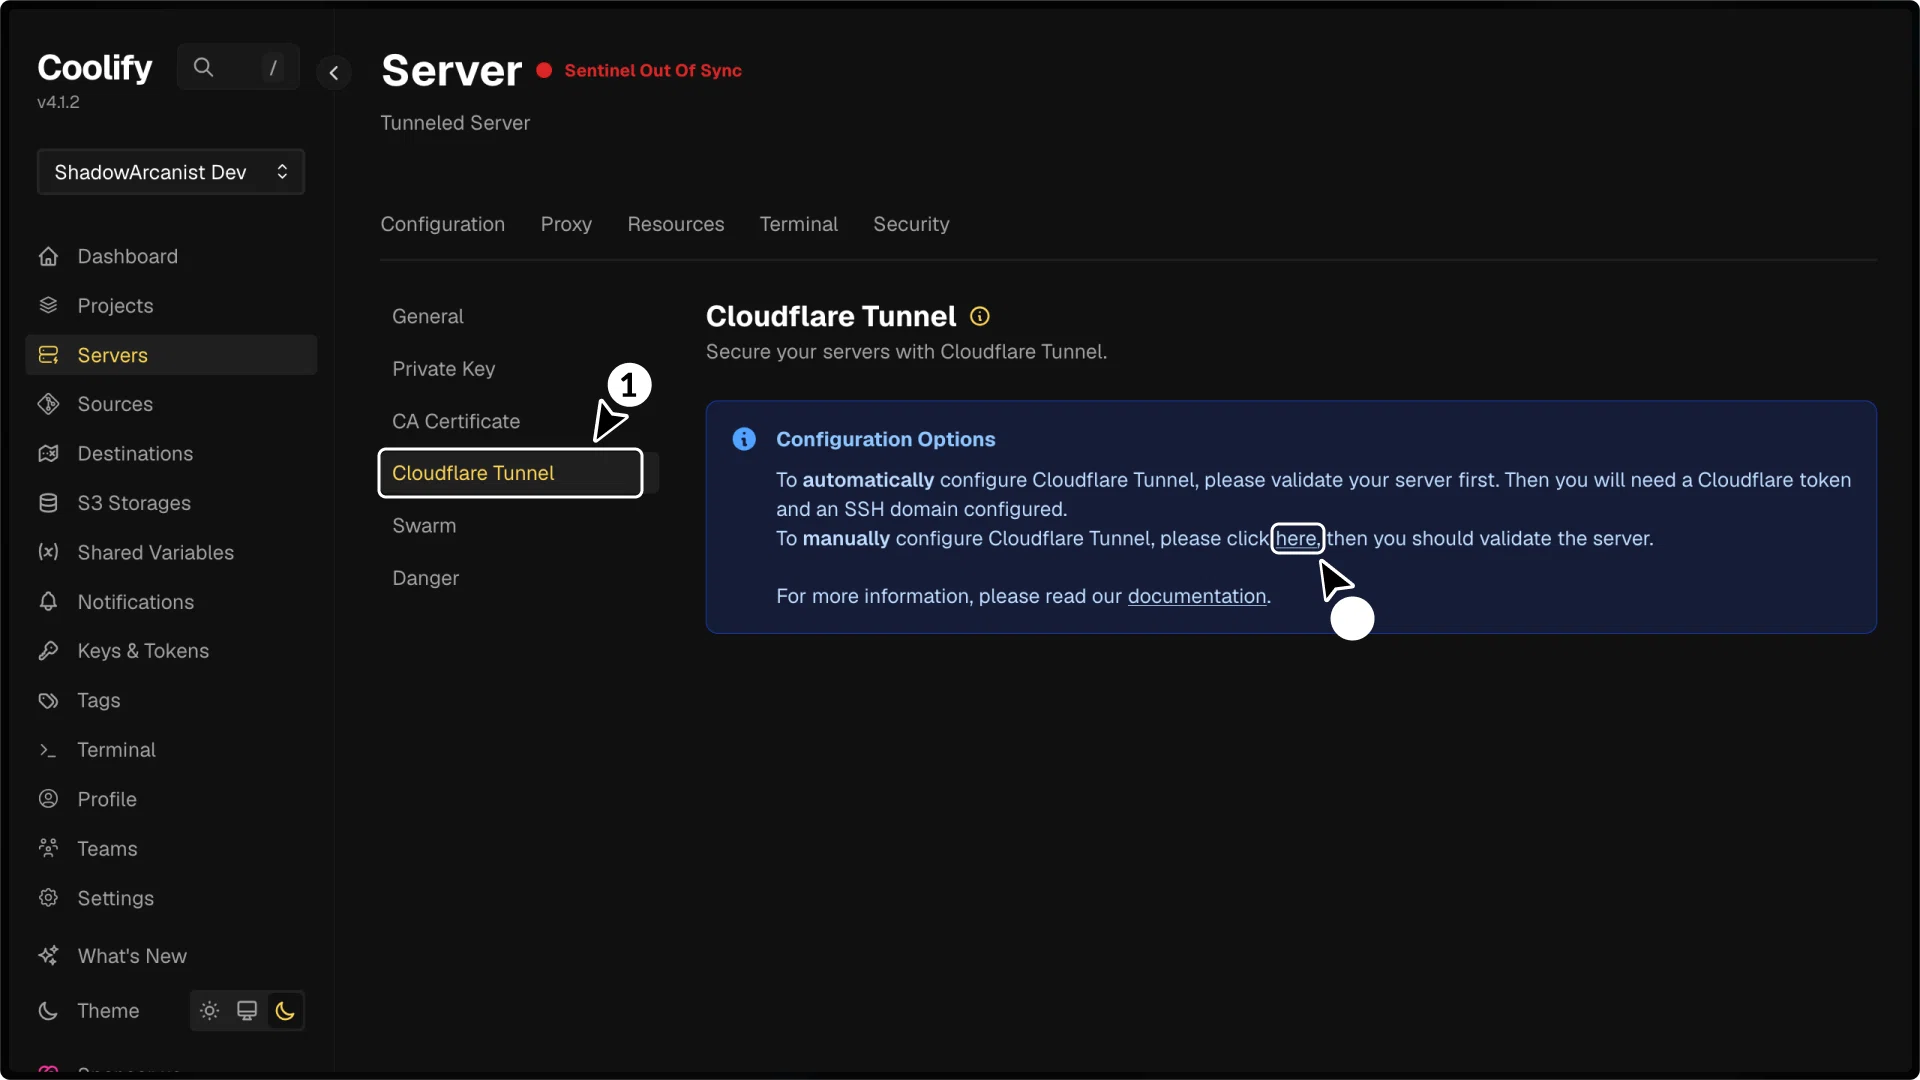
- In your Coolify Dashboard, go to Cloudflare Tunnel
- Click the "here" text on the information message you see on the dashboard
5. Create a Cloudflare Tunnel
To create a Cloudflare Tunnel, first log in to your Cloudflare dashboard

- Go to Networking in the sidebar.
- Click on Tunnels
- Click on Create tunnel button
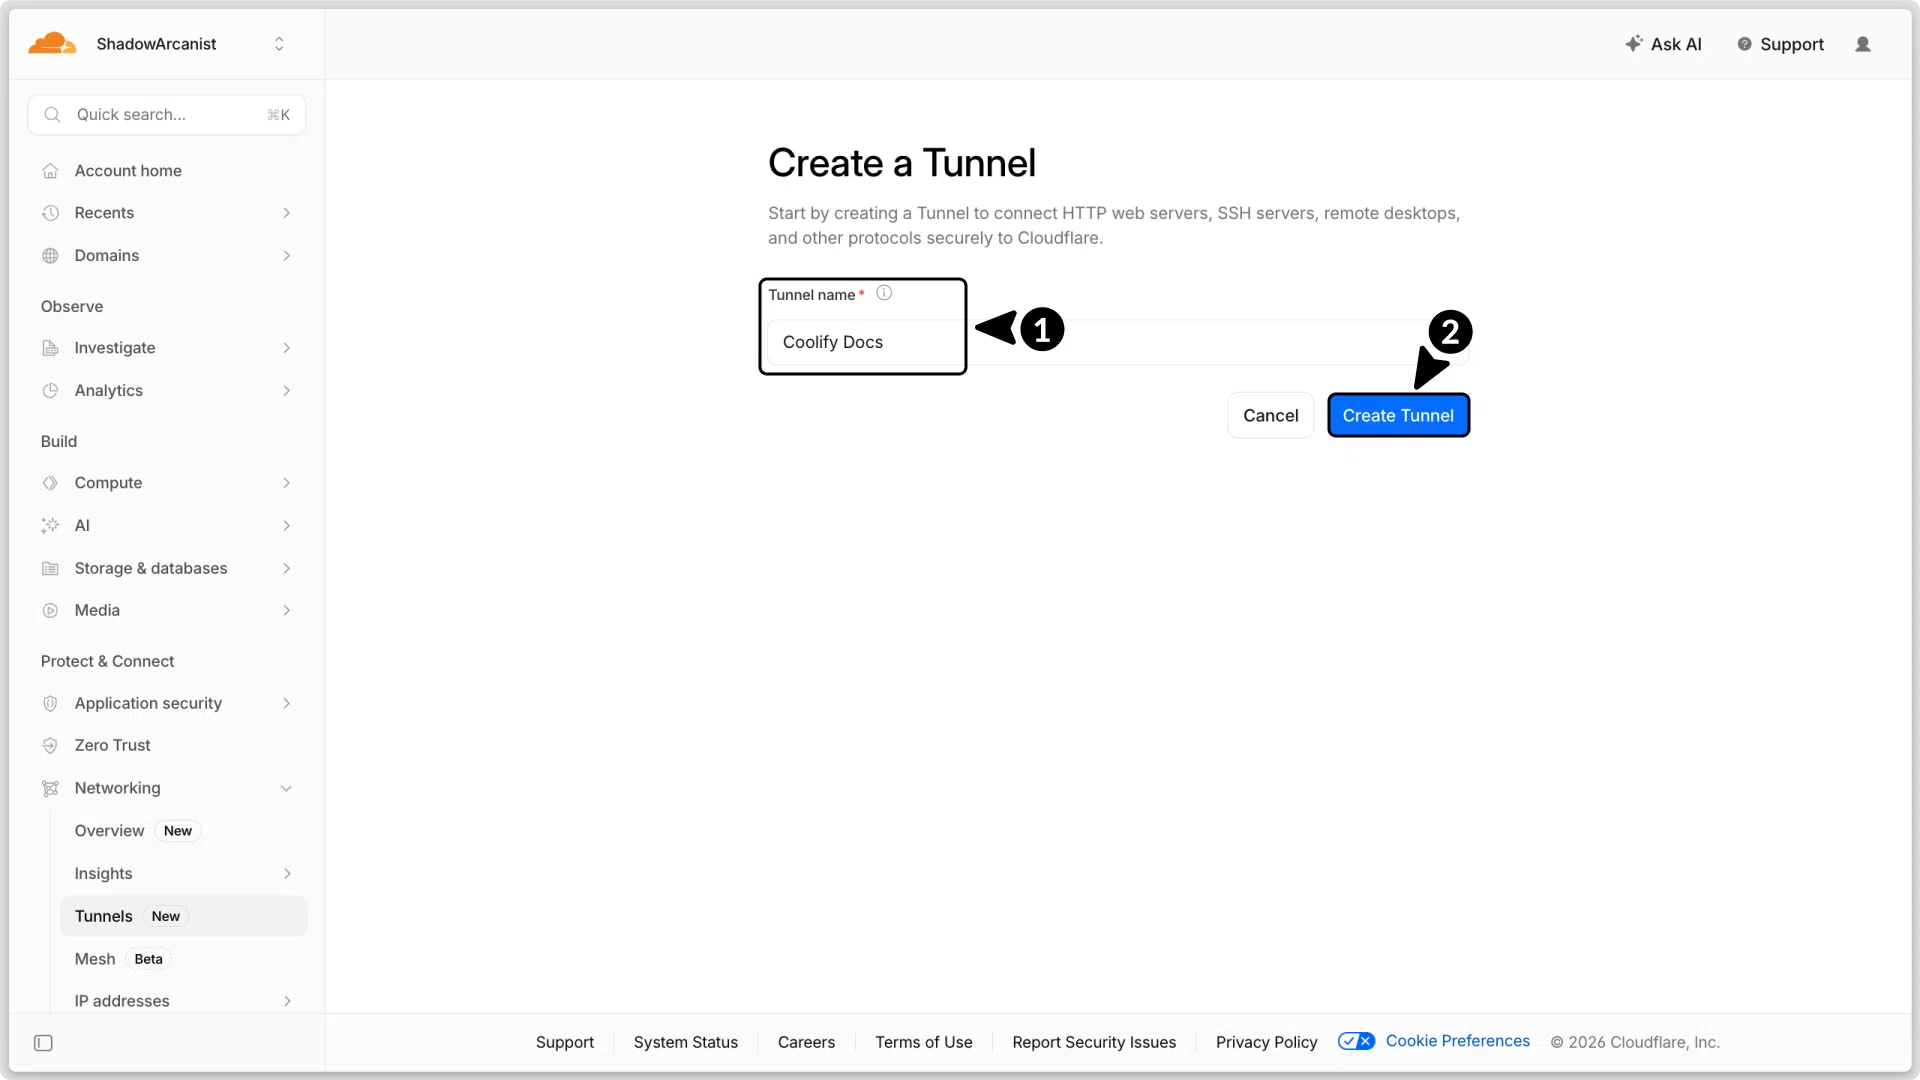
You will be prompted to enter a tunnel name. Enter a name that you prefer and click on Create tunnel button.

- Select the Docker option
- Copy the docker run command, and run it on the server terminal which you want connect to Coolify.
TIP
By default, the docker run command runs in the foreground. This means the cloudflared container will stop if you close the terminal. To keep the container running in the background, add the -d flag when running the command.
For example: docker run -d cloudflare/...
Once cloudflared starts running you will be able to see it's status on Cloudflare dashboard:
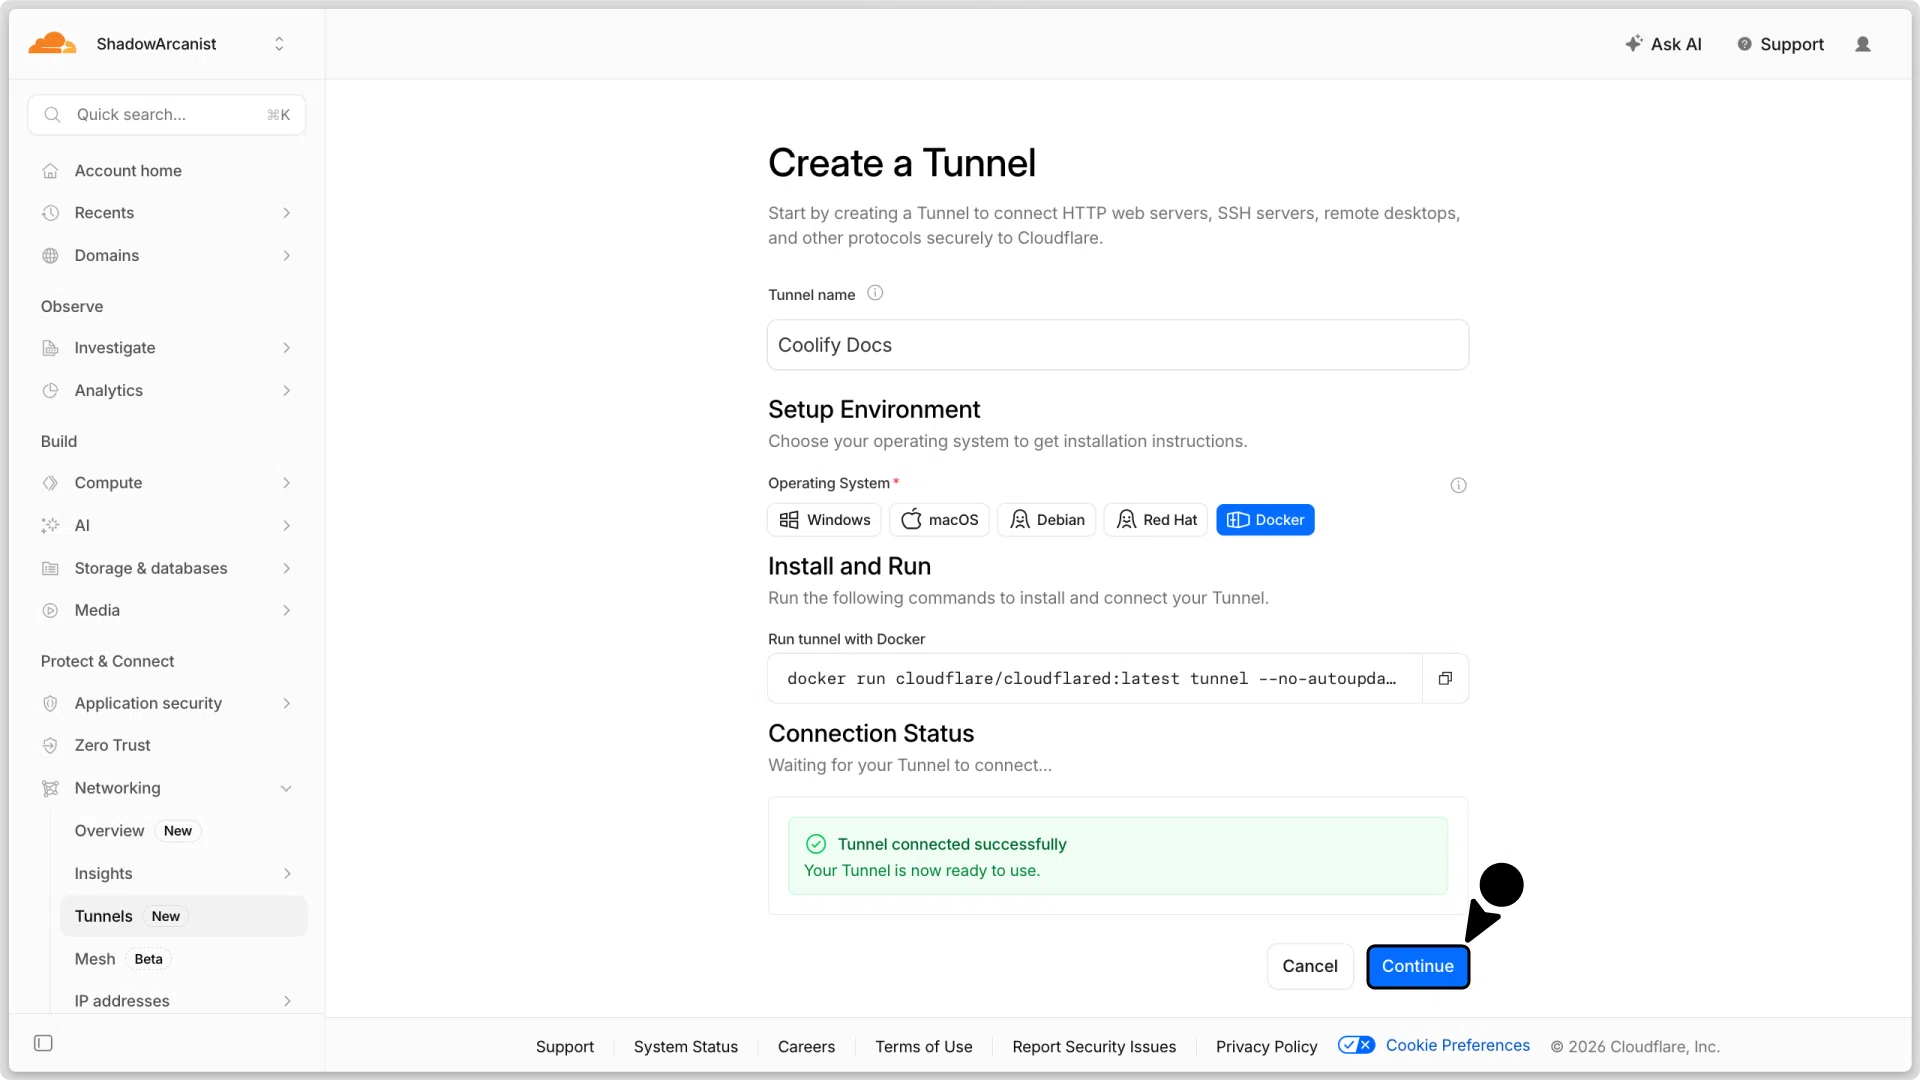
Click on continue button to create the tunnel.
6. Configure tunnel routes
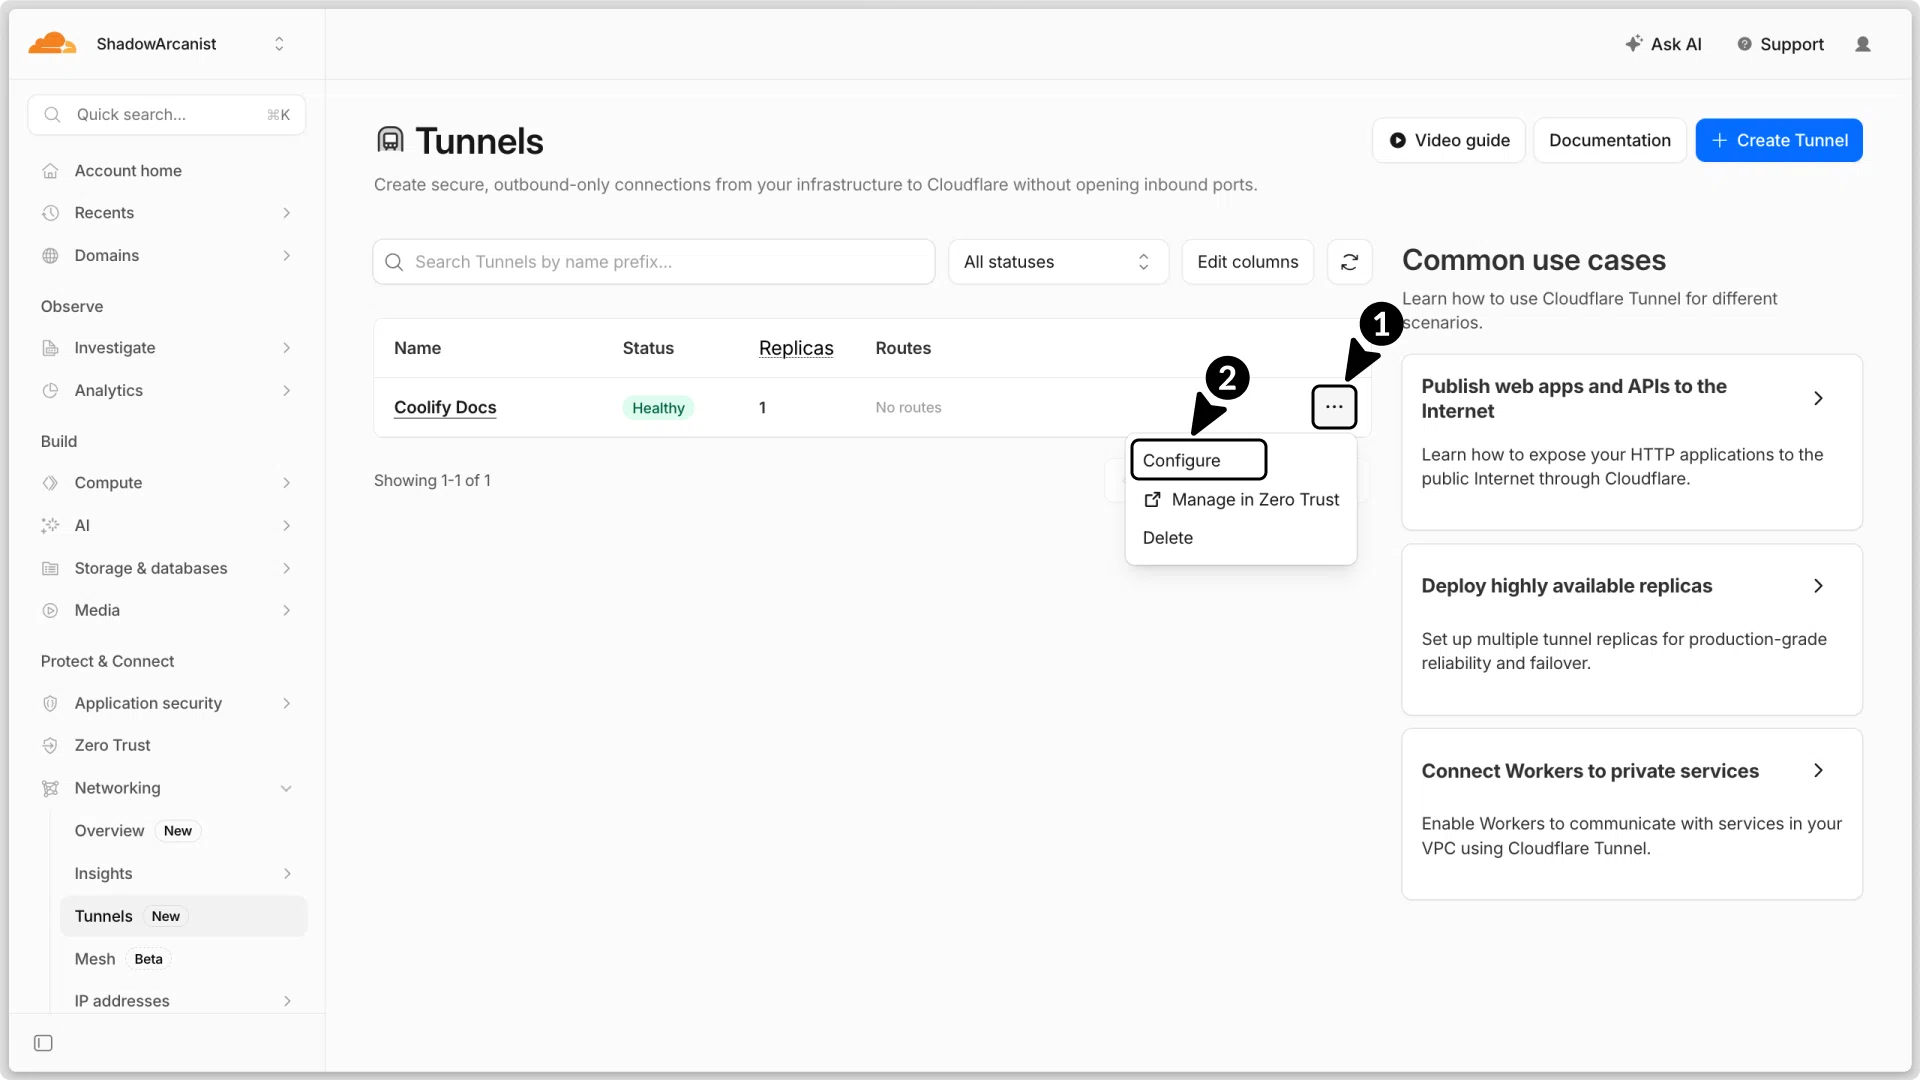
- Click on your tunnel
- Click on Configure option

- Select Routes.
- Click Add route button
- Select Published Application as the route type

- Subdomain - (Optional) You can make your resource accessible on any subdomain/domain. For this guide, we are using the
helixasubdomain. - Domain - Choose the domain you want to use for the tunnel.
- Path - Leave this field empty.
- Service URL - Enter ssh://localhost:22 (this is very important). If your SSH port is different from 22, use that port instead.
- After filling in the details, click the Add route button.
7. Validate server on Coolify
To validate your server, simply click the Validate Server & Install Docker Engine button.
During this process, Coolify will log in to your server and set up everything needed for Coolify to use the server.
Once the validation is completed, your server page will look like this:
Congratulations! You've successfully set up a server that can be accessed by Coolify over SSH using Cloudflare tunnels via your domain.
You can now block your SSH port on the server if you wish.
Known issues and Solutions
When you create a new routes on Tunnel, Cloudflare will create a DNS record for the hostname.
However, if a DNS record for the hostname already exists, Cloudflare won’t update existing record.
In this case, your app won’t work. To fix this issue, follow the steps below:
- Click on your tunnel
- Click on Configure option
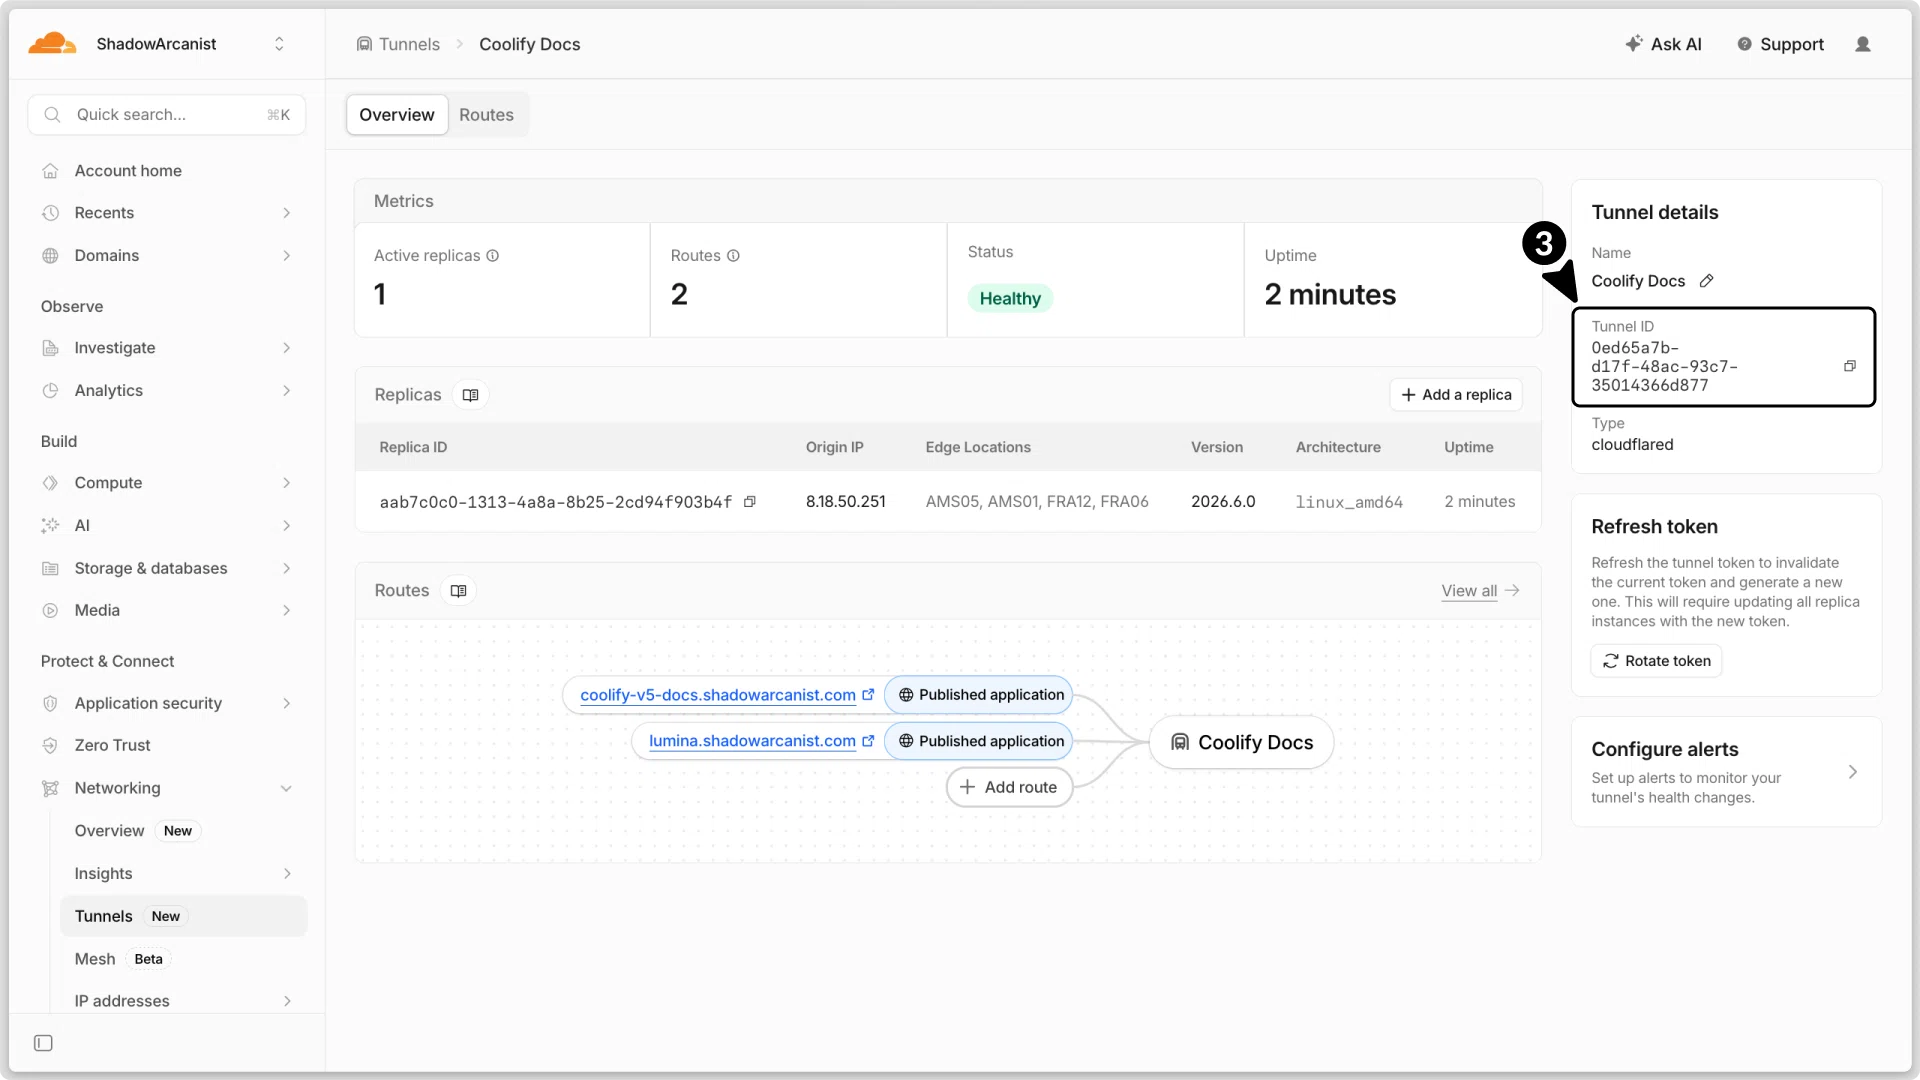
- Copy your tunnel ID from the Tunnels details section.
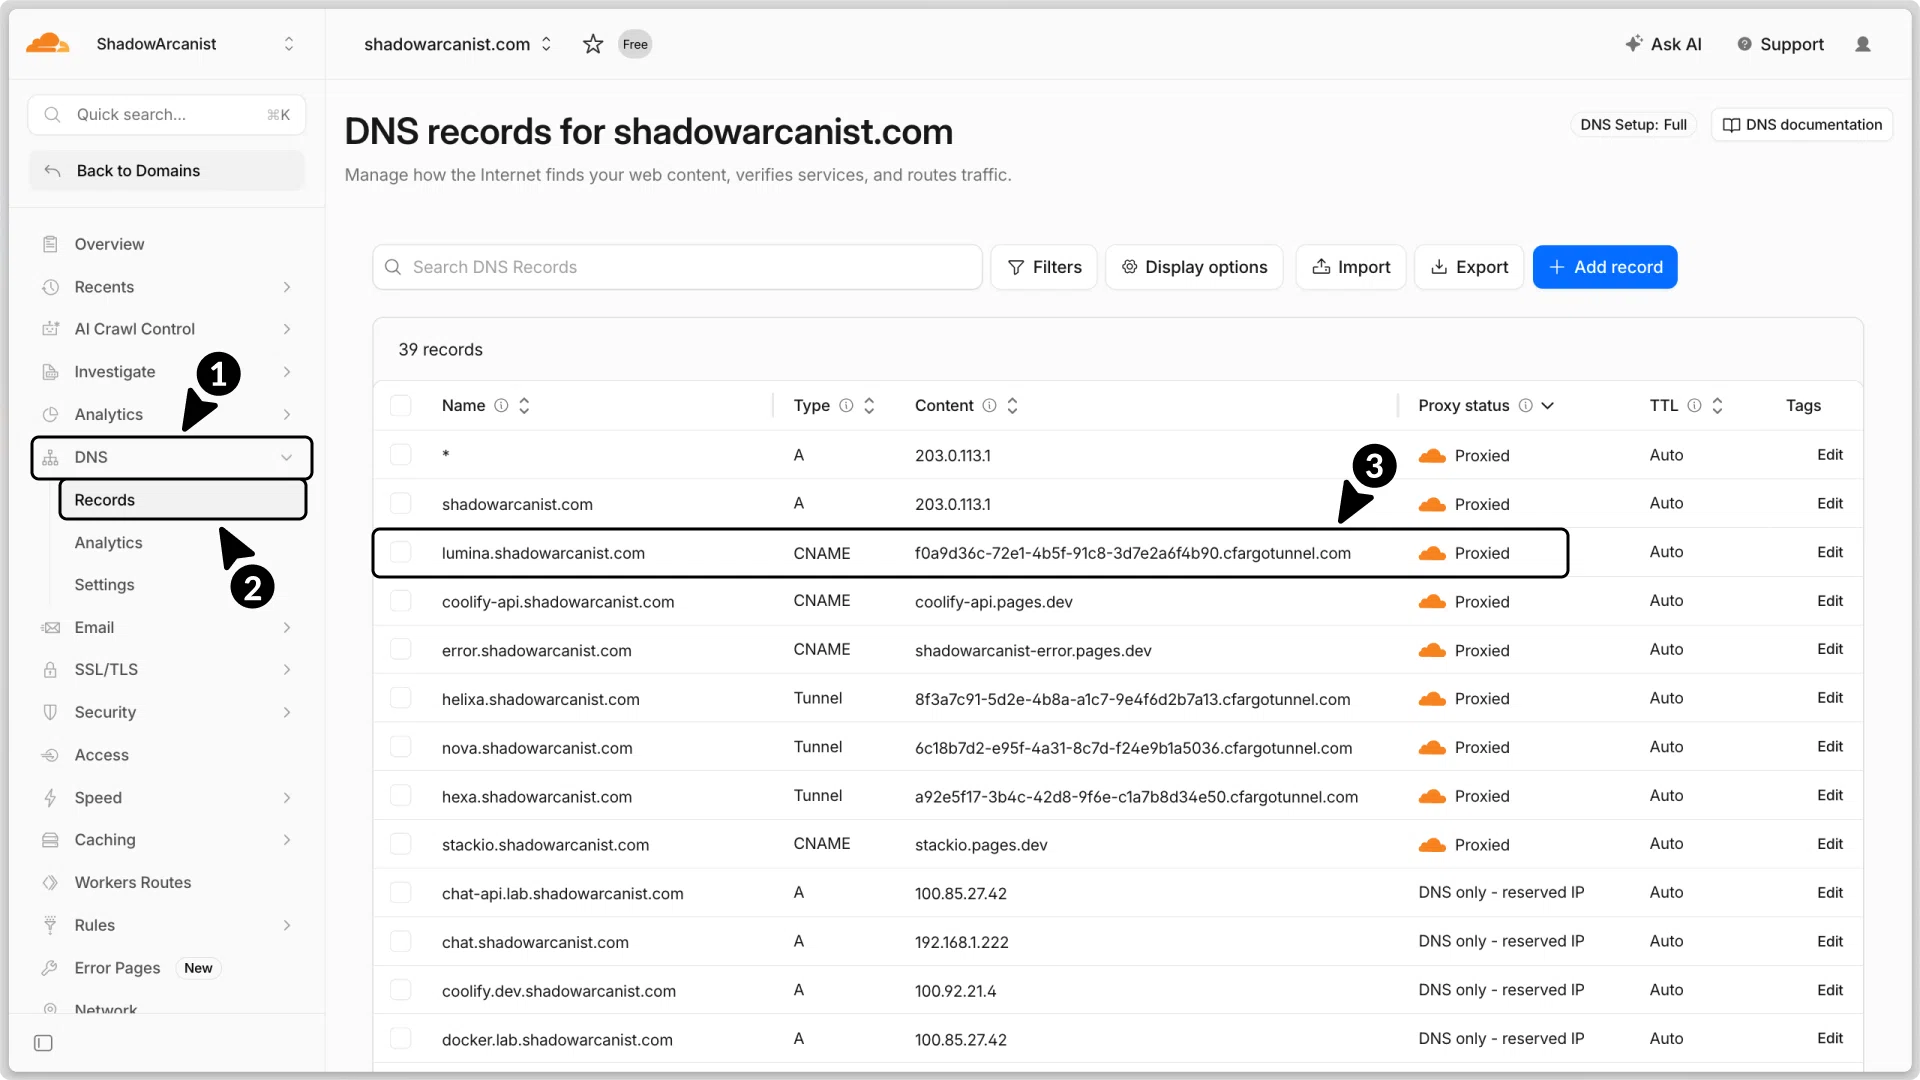
Create a new DNS record with the following details:
- In the Cloudflare dashboard, go to DNS.
- Select Records.
- Add a CNAME record.
- Enter the name as
*or the name of your subdomain (this should match the hostname you have for your app on the tunnel). - For the Target, enter the tunnel ID followed by
.cfargotunnel.com - Set the proxy status to Proxied.
Now, visit the domain of your application, and it should be accessible there.
Access Single Resource via Cloudflare Tunnels
Securely access individual Coolify applications through Cloudflare Tunnels with port mapping, domain configuration, and multi-resource tunneling support.
Full HTTPS/TLS Setup for All Resources
Configure end-to-end HTTPS for Coolify resources through Cloudflare Tunnels with Origin Certificates, strict TLS encryption, and proper domain setup.